How to Replace SSD in Laptop: Easy Guide
Your laptop’s become painfully slow—booting takes minutes, applications freeze constantly, and you’re constantly deleting files to free up space. That frustrating lag isn’t necessarily a sign your laptop’s dying; it’s probably your aging hard drive choking under modern demands. Replacing your laptop SSD transforms sluggish performance into lightning-fast responsiveness, often making your machine feel brand new. This hands-on guide walks you through every critical step to successfully replace your laptop SSD with confidence, whether you’re upgrading storage capacity or boosting to NVMe speed.
Confirm Your Laptop’s SSD Compatibility Before Buying
Determine Your Exact SSD Type and Interface
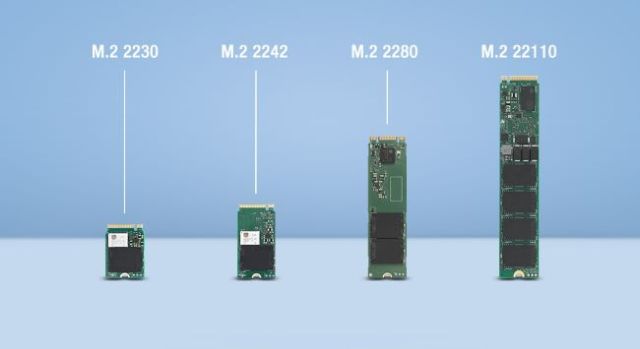
Don’t risk buying the wrong SSD—your laptop likely supports only specific types. Most modern machines use M.2 NVMe SSDs (2280 size), but check your model details before purchasing. Visit your laptop manufacturer’s support page, search for “[Your Model] specifications,” and look under storage details. If you own a Dell XPS 13, for example, you’ll discover it requires a 2242 M.2 NVMe drive, while most HP Spectre models accept standard 2280 sizes. The critical distinction is between SATA and NVMe protocols—installing a SATA SSD in an NVMe-only slot (or vice versa) won’t work, so verify compatibility first.
Identify Physical Constraints in Your Laptop
Your laptop’s internal layout determines what SSD you can install. Gaming laptops like ASUS ROG models often have multiple M.2 slots plus space for a 2.5-inch drive, while ultrabooks like MacBook Airs typically support only one proprietary SSD. Open your laptop’s service manual (search “[Your Model] service manual PDF”) to see exact dimensions. Pay attention to clearance issues—some thin laptops can’t accommodate NVMe drives with bulky heatsinks. If you own a Lenovo ThinkPad T490, you’ll notice it has a dedicated SSD access panel, while MacBook Pro 2016 models require complete bottom-case removal to reach the soldered storage.
Gather the Right Tools to Avoid Damaging Your Laptop

Essential Equipment for Safe SSD Replacement
Skip the kitchen knives and paperclips—proper tools prevent costly damage. You’ll need a precision Phillips #0 screwdriver for most laptop screws, plus a plastic spudger to safely pry open cases without scratching. An anti-static wrist strap is non-negotiable; static electricity can fry components instantly. Before starting, prepare a USB-to-NVMe adapter ($15-$25) to clone your drive externally—you’ll thank yourself later when your system boots perfectly on the new SSD. Organize small screws using a magnetic tray with labeled compartments; losing a single screw can prevent proper reassembly.
Model-Specific Tools You Might Need
Certain laptops require specialized tools that generic kits miss. MacBook Pros demand pentalobe P5 screws for the bottom case, while Dell XPS models use Torx T5 bits. HP Spectre series often has security screws with pin centers requiring a special driver. Check iFixit’s teardown guide for your exact model to avoid getting stuck mid-repair. For MacBook Pro 2015 models, you’ll need a spudger with a flat edge to disconnect the battery connector safely before touching any internal components—skipping this risks short-circuiting the logic board.
Backup Your Data Properly Before Removing Old SSD
Create a Complete System Image (Don’t Just Copy Files)
Simply dragging folders to an external drive misses critical system files. Instead, create a full disk image using Macrium Reflect Free—connect your new SSD via USB adapter, launch the software, and select “Image this disk.” The process takes 1-2 hours depending on data volume, but preserves your exact Windows configuration, programs, and settings. Verify the backup by checking the destination drive’s size matches your original SSD’s used space. If your laptop won’t boot, use Microsoft’s Media Creation Tool to make a bootable USB drive and perform the backup from Windows Recovery Environment.
Critical Pre-Cloning Checklist
Before removing your old SSD, complete these safety steps: Disable BitLocker encryption (if enabled) through Control Panel > BitLocker Drive Encryption > Suspend protection. Sign out of Microsoft Account to prevent activation issues post-replacement. Disconnect peripherals including docking stations and external monitors that might confuse Windows during first boot. Most importantly, charge your laptop to 50% minimum—power loss during cloning corrupts data. If replacing the primary drive, keep your charger connected throughout the process.
Remove Your Old SSD Without Damaging Components
Safely Accessing the SSD Bay in 60 Seconds
Start by powering down completely and flipping your laptop over. Remove all visible screws from the bottom panel—some hides under rubber feet (peel back carefully with a spudger). For most models, you’ll find the SSD behind a small access panel marked with a hard drive icon. If your laptop requires full bottom-case removal like MacBook Pros, work systematically: begin with corner screws, then gently separate the case using a plastic opening tool along the seam. Never force components; if resistance occurs, double-check for missed screws.
M.2 SSD Removal: The Critical Angle Technique
For M.2 drives (90% of modern laptops), locate the tiny screw securing the drive’s end—usually a Phillips #00. After removal, the drive naturally pops up about 30 degrees. Here’s the pro tip: never pull straight up—this damages the connector. Instead, grasp the drive’s edge and slide it gently toward the screw hole before lifting. You’ll feel it release from the socket. If your SSD has a heatsink (common on gaming laptops), remove thermal pads carefully—they tear easily. Transfer any intact pads to your new drive; replacing them ensures proper heat dissipation.
Install Your New SSD with Precision and Confidence

M.2 Installation: Avoiding the #1 Beginner Mistake
The most common SSD installation error? Forcing the drive flat before securing it. Correct installation requires a two-step process: First, insert the SSD at a 30-degree angle into the M.2 slot, aligning the notched edge with the connector’s key. Second, gently press the drive down until flush with the motherboard, then secure it with the single screw. Overtightening cracks the PCB—stop when resistance increases slightly. For NVMe drives without included thermal pads, cut a replacement pad to size using scissors, removing the backing film only when ready to attach.
2.5-Inch SATA Drive Installation Tips
If your laptop uses a 2.5-inch drive (common in older models), handle the caddy carefully—it often holds the drive with four tiny screws per side. Install the new SSD with the label facing up (toward you when inserting), and ensure the SATA connector aligns perfectly before pushing in. Many users break the fragile SATA port by misaligning the drive; wiggle it slightly while inserting until you feel it seat fully. Before closing the case, verify the drive doesn’t rattle inside the caddy—loose drives vibrate and fail prematurely.
Fix Common Post-Installation Problems in Minutes
SSD Not Detected? Try This Three-Step Fix
When your new SSD doesn’t appear in BIOS, don’t panic—this usually has a simple solution. First, reseat the drive by removing and reinstalling it, ensuring perfect 30-degree insertion. Second, reset BIOS settings to default (press F9 during boot on most systems). Third, check SATA operation mode—change from RAID to AHCI in BIOS if you’re using a cloned drive (this often causes detection issues). For NVMe drives in older laptops, update your BIOS first—some systems require version 1.15+ for NVMe support.
Boot Loop After SSD Replacement: Emergency Recovery
If your laptop gets stuck in a boot loop after SSD installation, you likely need to repair the bootloader. Boot from a Windows installation USB, select “Repair your computer” > “Troubleshoot” > “Command Prompt,” then run these commands:
bootrec /fixmbr

bootrec /fixboot

bootrec /rebuildbcd
This rebuilds critical boot files without data loss. If using a cloned drive, also run bcdboot C:\Windows (replace C: if your drive letter differs). For UEFI systems, ensure “Secure Boot” is enabled in BIOS—disabling it often causes boot failures with Windows 10/11.
Optimize Your New SSD for Maximum Longevity and Speed
Critical Windows Settings Most Users Miss
After installation, disable features designed for old hard drives that harm SSDs. Open Command Prompt as admin and type powercfg /h off to disable hibernation (saves 7-10GB space). Disable scheduled defragmentation through Task Scheduler > Microsoft > Windows > Defrag—SSDs don’t need it. Set your power plan to “High Performance” temporarily during heavy writes. Most importantly, verify TRIM is active by running fsutil behavior query DisableDeleteNotify—if it returns “1”, type fsutil behavior set DisableDeleteNotify 0 to enable this critical SSD maintenance function.
Monthly Maintenance That Doubles SSD Lifespan
Install your SSD manufacturer’s utility (Samsung Magician, Crucial Storage Executive) to monitor health metrics. Check the “Percentage Used” indicator monthly—most consumer SSDs last 200-600TBW (Terabytes Written). Keep at least 15% free space; full drives slow down dramatically. For NVMe drives running hot, apply thermal paste between the drive and heatsink (use rice-grain sized dots). Every three months, run a full “Optimize Drives” cycle in Windows—this triggers background TRIM operations that maintain speed.
Replacing your laptop SSD takes less than 30 minutes but delivers years of improved performance. Whether you’re upgrading a work laptop that’s become unbearable or extending the life of a favorite machine, this simple hardware swap outperforms expensive software “optimizers” any day. Remember to handle components by the edges, keep your workspace organized, and never skip the backup step—your future self will appreciate the smooth transition to faster computing. With your new SSD installed, you’ve essentially given your laptop a brand-new heart at a fraction of replacement cost.