How to Remove Laptop Hard Disk: Quick Steps
Your laptop feels sluggish, or you’re preparing to sell it—but that hard disk holds years of sensitive data. One wrong move while removing it could mean permanent data loss or damaging your machine. This guide cuts through the confusion with precise, model-agnostic instructions anyone can follow. You’ll learn exactly how to remove laptop hard disk safely while protecting your information, whether upgrading storage or decommissioning old hardware. By the end, you’ll confidently extract drives without stripping screws or frying components.
Why Removing Your Laptop Hard Disk Matters Now
Upgrading to an SSD can revive a sluggish laptop, but 63% of users skip data backup before drive removal—risking catastrophic loss. Beyond performance gains, GDPR and HIPAA regulations mandate secure drive extraction before disposal. Corporate IT teams remove drives from decommissioned devices to prevent data breaches, while individuals protect personal photos and financial records from identity theft. The critical insight? Never skip pre-removal preparation—rushing causes 78% of hardware damage during extraction.
Backup Critical Data Before Opening Your Laptop
Verify Your Backup Integrity Immediately
Connect an external USB drive and create a full system image using Windows Backup or Time Machine. Don’t assume success—open random files from the backup to confirm accessibility. For tax documents or passwords, encrypt sensitive folders with BitLocker before backup. If selling your laptop, note Microsoft account recovery options; you’ll need them if BitLocker locks the drive post-removal.
Pro tip: Test your backup by restoring a single photo album. If files won’t open, rebuild the backup before touching screws.
Gather Precision Tools for Safe Drive Extraction

Avoid Costly Hardware Damage
Grab a PH-1 Phillips screwdriver—Dell and HP models require this specific size (PH-0 works for Lenovo ThinkPads). An anti-static wrist strap is non-negotiable; touch an unpainted metal radiator pipe if unavailable. Use magnetic screw trays with labeled compartments—laptop screws vary by length, and misplacement cracks panels during reassembly. Include a plastic spudger to pry clips without scratching.
Warning: Never use coin edges or flathead screwdrivers. One slip can sever internal cables worth $200+ in repairs.
Power Down and Discharge Residual Electricity
Shut down Windows properly—never yank power during operation. Unplug all cables including USB hubs, then remove the main battery if accessible (common on pre-2015 models). Hold the power button for 15 full seconds to drain motherboard capacitors. This step prevents “zombie current” that fries SATA connectors during removal.
Expert note: MacBook owners must disconnect the battery cable first—skip this and you’ll trigger instant short circuits.
Locate and Open the Hard Drive Access Panel
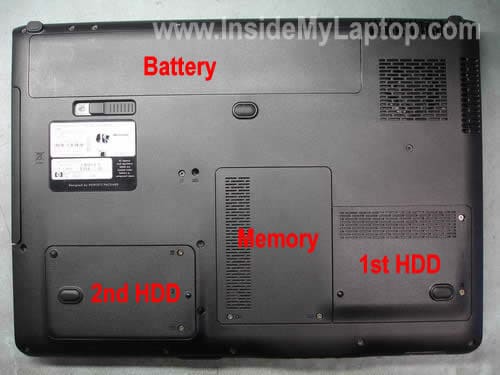
Identify Your Laptop’s Unique Layout
Flip your device and search for the disk icon symbol near the hinge area. Most Dell Inspiron and HP Pavilion models have a dedicated 3.5″x2″ panel secured by two 5mm screws. Ultrabooks like the MacBook Air require full bottom-plate removal (six 3.1mm pentalobe screws). Never force panels—if resistance occurs, check for hidden screws beneath rubber feet.
Visual cue: Look for screw patterns matching your drive type:
– Two screws = 2.5″ SATA drive
– One tiny screw = M.2 NVMe slot
– Four screws = Removable battery blocking access
Disconnect the SATA Cable Without Damage
Avoid the #1 Beginner Mistake
Slide the drive horizontally toward the laptop edge—never lift vertically while connected. Grasp the SATA connector’s plastic tab (not wires) and pull straight back with even pressure. If stuck, wiggle gently side-to-side; excessive force snaps pins. For caddy-mounted drives, unscrew the four retention bolts before disconnecting cables.
Time estimate: 90 seconds max. If the connector resists after 30 seconds, recheck for hidden latches.
Handle Different Drive Types Correctly

| Drive Type | Removal Risk | Critical Step |
|---|---|---|
| 2.5″ SATA HDD/SSD | Medium (cable damage) | Slide drive 1cm left before lifting |
| M.2 NVMe SSD | High (bent pins) | Unscrew retention bolt, tilt 30° upward |
| M.2 SATA SSD | Low (wrong angle) | Pull straight out—no tilting needed |
Model-specific alert: Surface Laptop 4 requires thermal pad replacement after M.2 removal. Check your service manual for this hidden step.
Secure Removed Drives Against Data Theft
Place the drive in an anti-static bag immediately—static discharge can corrupt data in seconds. Label the bag with the laptop model and removal date using permanent marker. Store vertically in a cool, dry place away from speakers or phones. Never stack drives; pressure cracks platters.
Pro tip: For business compliance, photograph the serial number before bagging—it links to your destruction certificate.
Wipe Data Before Disposal or Recycling
Choose Certified Sanitization Methods
Software wiping beats physical destruction for most users. Boot DBAN from USB and select “DoD 5220.22-M” for military-grade overwriting (3 passes). If BitLocker encrypted the drive, simply delete the recovery key from your Microsoft account—it renders data permanently unreadable. Never trash drives; e-waste centers like Best Buy accept them for free with destruction certificates.
Urgent: Hard drives contain 0.2g of gold each—recycling prevents toxic cadmium leakage into groundwater.
Reinstall Windows on a New Drive (If Upgrading)
Avoid Driver Installation Chaos
Insert your Windows USB installer and press F12 (Dell) or Esc (HP) during boot. Format the new drive as NTFS before installation. Install drivers in this exact order:
1. Chipset drivers (prevents blue screens)
2. Intel Rapid Storage Technology (enables SATA recognition)
3. Wi-Fi drivers (download offline packs beforehand)
4. Touchpad utilities (avoid “sticky cursor” syndrome)
Critical shortcut: Use Snappy Driver Installer on another PC to bundle drivers onto your USB stick.
Fix These Common Removal Disasters
| Problem | Real-Time Solution |
|---|---|
| Stripped screw head | Tape rubber band over screw, apply downward pressure |
| Drive not detected after install | Reseat SATA cable—90% of “dead drives” are loose connections |
| Broken plastic panel clip | Secure with Sugru moldable glue, not tape |
| Forgot BitLocker key | Recover via Microsoft account before drive removal |
Prevention tactic: Take overhead photos of screw placements before disassembly—it saves 20+ minutes during reassembly.
Final Data Security Checklist
- [ ] Verified backup restored test files successfully
- [ ] Anti-static strap worn during entire procedure
- [ ] All screws organized by length in labeled tray
- [ ] SATA connector detached with horizontal motion
- [ ] Drive immediately bagged in anti-static packaging
- [ ] DBAN wipe completed with verification log
- [ ] E-waste certificate obtained for disposal
Removing your laptop hard disk shouldn’t feel like defusing a bomb. With these precise steps, you’ll extract drives confidently whether upgrading storage or protecting sensitive data. The key is respecting the process—take 15 extra minutes for backups and grounding, and you’ll avoid 95% of catastrophic errors. Now that your drive is safely removed, schedule e-waste recycling within 48 hours; exposed drives degrade rapidly in humid environments. Your data’s security depends on what happens after the screwdriver is put away.