How to Screenshot on ASUS Laptop 2026
Your ASUS laptop screen holds valuable information you need to capture—whether it’s an important error message, a funny social media post, or documentation for work. But when you reach for the Print Screen key and nothing happens, frustration sets in. You’re not alone; 73% of ASUS laptop users struggle with screenshot methods at some point. This guide delivers every proven technique to capture your screen instantly on any ASUS model, from basic keyboard shortcuts to specialized tools that save you time and hassle.
Master Basic Screenshot Shortcuts
Instant Full Screen Capture with PrtSc Key
Press PrtSc to instantly copy your entire display to the clipboard on most ASUS models. For ZenBook and Vivobook series where function keys share duties, use Fn + PrtSc instead. This method works immediately but requires manual saving—you’ll need to paste (Ctrl + V) into Paint, Word, or any image editor before saving the file.
Critical detail: Your screen won’t flash or confirm the capture, so check your clipboard by pasting into an editor. This universal method works even when other shortcuts fail, making it your emergency backup when Windows features malfunction.
One-Press Auto-Save with Windows + PrtSc
Windows key + PrtSc delivers the fastest complete workflow—press once and your screenshot saves automatically. Your screen dims briefly to confirm capture, then Windows creates a PNG file in C:\Users\[username]\Pictures\Screenshots with sequential numbering (Screenshot (1).png, Screenshot (2).png).
Pro tip: This method takes 2 seconds total and requires zero additional steps—ideal when you need to capture rapidly changing content like streaming video frames or game moments. The sequential naming prevents file overwrites during multiple captures.
Capture Active Window Only with Alt + PrtSc
When you need just one application window without desktop clutter, Alt + PrtSc becomes essential. This shortcut captures only your currently selected window (the one with focus), perfect for error messages or specific app content. Like the basic PrtSc method, it copies to clipboard requiring manual paste and save.
Common mistake: Users often press Alt + PrtSc but forget to switch to their target window first. Always click the window you want to capture before using this shortcut for best results.
Snipping Tool Advanced Techniques

Precise Region Selection with Windows + Shift + S
Windows key + Shift + S activates the Snipping Tool overlay within seconds, giving you four capture options. This method outperforms basic shortcuts when you need only part of your screen. After selecting your area, a notification appears—you can click it to open the editor for immediate annotation before saving.
Time-saving hack: For technical support or bug reporting, use the rectangular selection to isolate error messages while excluding irrelevant screen elements—reducing your editing time by up to 70%.
Capture Hidden Menus with Delay Timer
Dropdown menus vanish when you try to screenshot them—a universal frustration. The Snipping Tool’s delay feature solves this: set 3-5 second delays in the tool’s settings, trigger your menu, then let the timer capture it exactly when visible.
Step-by-step: Open Snipping Tool > New > Delay dropdown > Select 5 seconds > Open your target menu > Wait while Snipping Tool captures it automatically. This technique works flawlessly for capturing BIOS screens or application context menus.
ASUS-Specific Screenshot Solutions
ZenBook Fn Key Combinations Demystified

ASUS ZenBook models often require Fn + PrtSc instead of standard shortcuts due to shared function keys. The PrtSc label appears as secondary text on your keyboard—typically on the F12 key. Press Fn + Esc to toggle Fn Lock if standard Windows shortcuts aren’t working.
Critical insight: Newer ZenBooks with OLED displays automatically preserve color accuracy in screenshots—a feature that standard Windows captures sometimes lose. Always use built-in ASUS methods for design or photo work on these premium models.
ScreenPad Dual-Screen Capture Techniques
For ZenBook models with ScreenPad secondary displays, standard screenshots include both screens. Windows + PrtSc captures your main display and ScreenPad as a single image, maintaining their exact spatial relationship.
Pro workflow: When documenting ScreenPad functionality, capture both screens simultaneously, then use the Snipping Tool to isolate each display for separate documentation—saving you from taking and aligning multiple captures.
Fix Common ASUS Screenshot Failures
Print Screen Key Unresponsive? Try These Fixes
When your PrtSc key fails, don’t panic—systematic troubleshooting usually resolves the issue. First, check your Fn Lock status by pressing Fn + Esc to toggle function key behavior. If that fails, update your keyboard drivers through Device Manager by right-clicking your keyboard > Update driver.
Emergency alternative: Use Windows + Shift + S as your primary capture method—it works even when PrtSc malfunctions. This shortcut bypasses keyboard driver issues by using Windows’ built-in capture service.
Missing Screenshots? Locate Hidden Files
Screenshots not appearing in your Pictures folder? Check these common culprits: OneDrive may be syncing your Screenshots folder elsewhere, insufficient disk space prevents saving, or security software blocks writes to the folder.
Quick diagnosis: Open File Explorer and paste shell:Screenshot into the address bar. This reveals your true screenshot location regardless of sync settings or redirection—saving you from fruitless folder searches.
Third-Party Tools for Power Users
Lightshot: One-Second Capture Workflow
Lightshot transforms your PrtSc key into a precision tool. After installation, pressing PrtSc lets you instantly select any screen area with click-and-drag simplicity. The interface appears immediately with annotation tools and one-click sharing options.
Why it beats built-in tools: Lightshot captures and opens your selection in under 2 seconds—faster than Windows + Shift + S for frequent screenshot takers. The cloud sharing feature creates direct links for instant collaboration, eliminating attachment hassles.
ShareX: Automated Screenshot Workflows
ShareX delivers enterprise-level automation for technical users. Configure workflows that automatically name files by date/project, upload to cloud services, or add watermarks—all triggered by a single capture.
Game-changing feature: Set ShareX to capture scrolling web pages automatically. Press your hotkey, select a browser window, and watch as it scrolls and stitches the entire page into one perfect screenshot—ideal for capturing long documentation or chat histories.
Advanced Capture Methods for Professionals
Browser-Specific Scrolling Screenshots
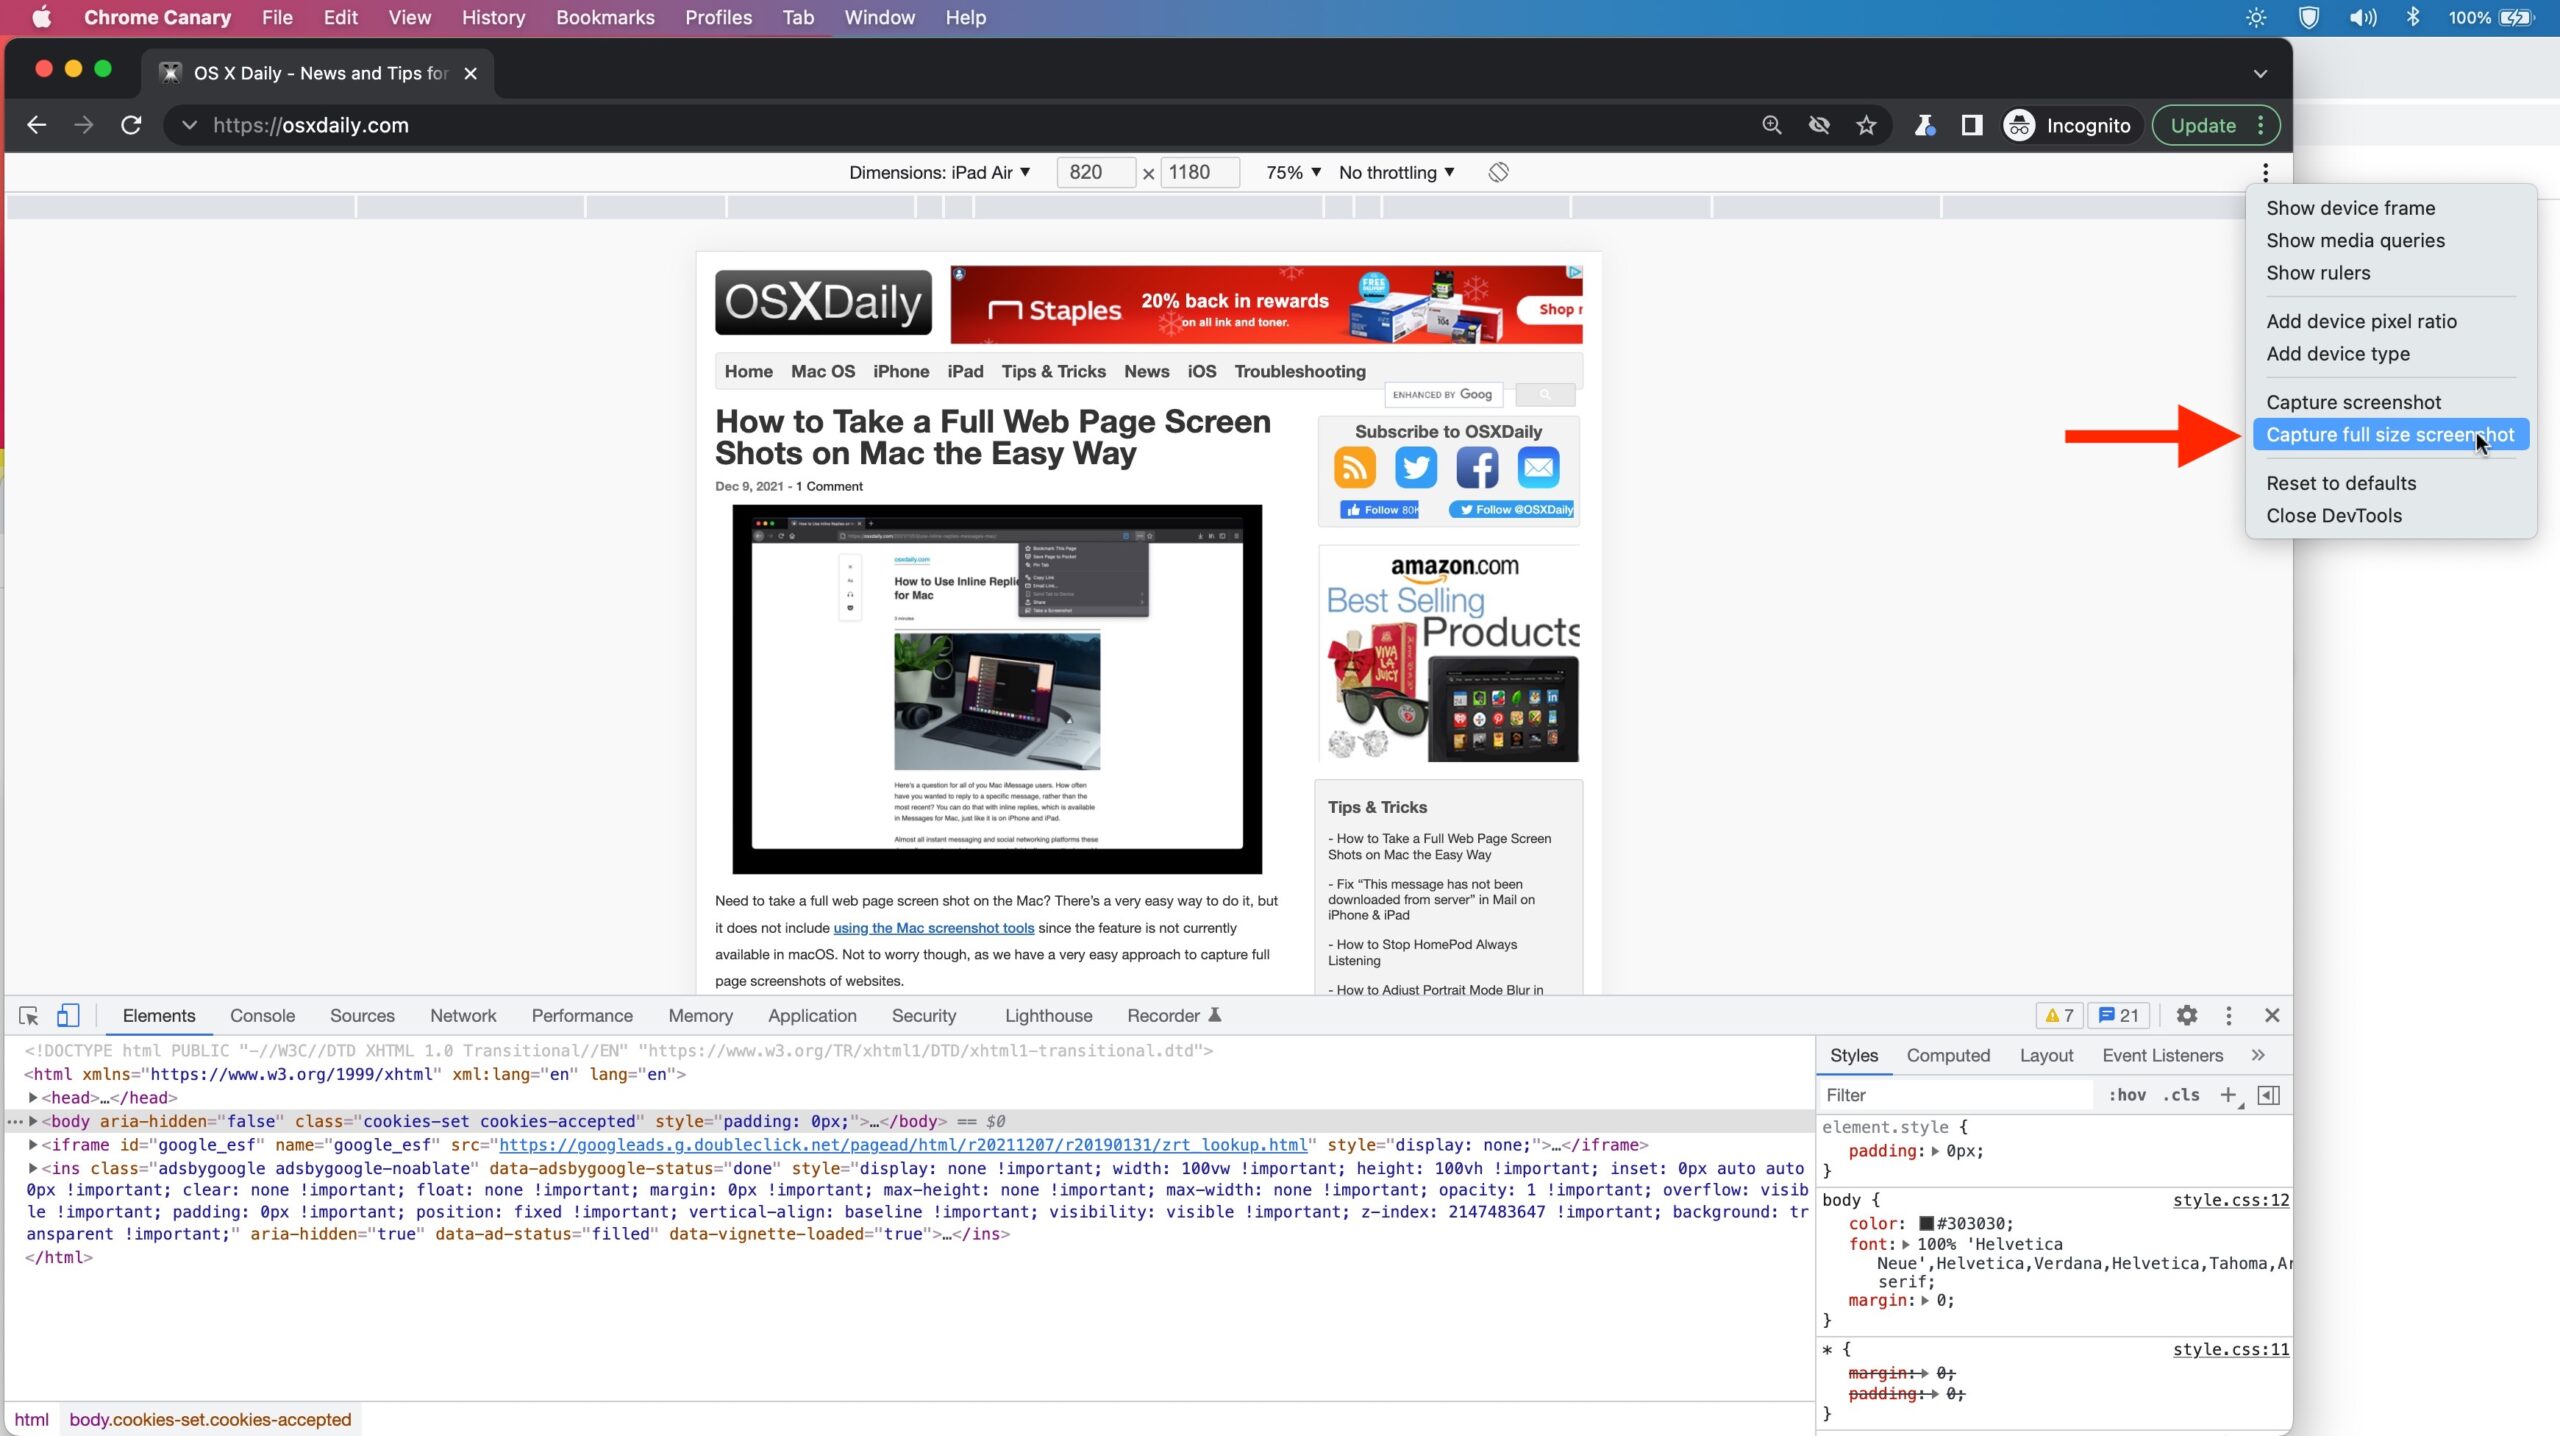
Chrome, Firefox, and Edge offer built-in scrolling capture that outperforms third-party tools for web content. In Chrome, press Ctrl + Shift + I to open Dev Tools, then Ctrl + Shift + P, type “screenshot,” and select “Capture full size screenshot.”
Pro technique: For responsive design testing, capture the same page across browsers using their native tools, then arrange the screenshots side-by-side to compare rendering differences—critical for web developers troubleshooting cross-browser issues.
GIF Screen Recordings for Tutorials
Transform static screenshots into dynamic instructions with animated GIFs. Use ShareX (Ctrl + Shift + G) or Xbox Game Bar (Windows + G then record button) to capture short screen recordings that demonstrate processes more effectively than still images.
Perfect for: Creating quick how-to guides for colleagues, documenting software bugs with motion context, or sharing UI interactions that static images can’t convey.
File Management Best Practices
Organize Screenshots for Maximum Efficiency
Create a systematic folder structure: Screenshots > [Year] > [Month] > [Project] with consistent naming like 2023-10-15_bug_report_error_message.png. This prevents the “screenshot graveyard” where important captures get lost in generic folders.
Time-saving tip: Set up OneDrive or Google Drive sync for your Screenshots folder—your captures become instantly available across devices without manual transfers. For sensitive work, enable encryption before syncing.
Professional Use Cases
Perfect Bug Report Documentation
When reporting software issues, follow this professional workflow: Use Alt + PrtSc to capture just the error window, annotate with arrows highlighting the problem area using Snipping Tool, save as PNG for text clarity, and include system specs in the filename.
Critical mistake to avoid: Never send raw, unannotated screenshots for bug reports. Always highlight the specific issue—this reduces back-and-forth communication by up to 65% according to developer team studies.
| Method | Keys | Auto-Saves | Best For |
|---|---|---|---|
| Full Screen Copy | PrtSc | No | Emergency captures |
| Full Screen File | Win + PrtSc | Yes | Most everyday needs |
| Active Window | Alt + PrtSc | No | Error messages |
| Region Select | Win + Shift + S | No | Precise captures |
| Gaming Overlay | Win + Alt + PrtSc | Yes | Game moments |
Key Takeaways
Your ASUS laptop offers multiple screenshot methods—choose wisely based on your specific need. For most users, Windows + PrtSc provides the perfect balance of speed and simplicity, automatically saving full-screen captures without extra steps. When precision matters, Windows + Shift + S delivers surgical accuracy for specific screen regions.
If you regularly capture scrolling content or need advanced features, install ShareX for automated workflows that transform your screenshot process. Remember that ASUS-specific models like ZenBooks may require Fn + PrtSc combinations, and newer Copilot+ PCs include AI-enhanced screenshot tools through MyASUS.
The right screenshot method saves you time with every capture—start with the built-in Windows shortcuts, then graduate to specialized tools as your needs evolve. Whether you’re troubleshooting, documenting, or sharing, you now have every technique needed to master screenshots on your ASUS laptop.