How to Screenshot on MacBook: Quick Steps
You’re in the middle of an important video call when a critical error message flashes across your screen—gone before you can read it. Or perhaps you need to capture a colleague’s perfectly formatted spreadsheet for your presentation. Whatever the scenario, knowing exactly how to screenshot on your Apple laptop transforms frustrating moments into seamless solutions. Whether you’re using a MacBook Air from 2015 or the latest M3 MacBook Pro, macOS delivers powerful, consistent screenshot capabilities that work identically across all models and chip generations.
This isn’t just about pressing random keys and hoping for the best. Mastering these techniques saves you from desktop clutter, ensures professional-quality captures, and gives you instant annotation tools. You’ll discover methods to freeze disappearing menus, capture specific windows without shadows, and even record your screen activity—all while maintaining perfect organization. By the end of this guide, taking screenshots will become second nature, whether you’re troubleshooting bugs or creating tutorials.
Fix Full-Screen Captures in One Keystroke
Command + Shift + 3 instantly captures your entire display on any Apple laptop. The moment you press this combination, macOS saves a pristine PNG file to your desktop with a timestamped name like “Screenshot 2024-07-18 at 3.22.15 PM.png”. This universal shortcut works identically whether you’re using an Intel-based MacBook or the newest Apple Silicon model running macOS Sequoia.
Hold Control while pressing this combination to bypass file creation entirely. Instead, the screenshot copies directly to your clipboard—ready to paste into emails, documents, or design tools with Command + V. This eliminates desktop clutter when you only need temporary captures for quick sharing.
Why Your Full-Screen Shot Might Fail
DRM-protected content like streaming services or DVD Player often produces black screenshots due to HDCP encryption. This isn’t a malfunction—it’s intentional protection for copyrighted material. If you encounter blank screenshots, try capturing non-DRM elements adjacent to the protected content instead.
Capture Specific Windows Without Shadows
Command + Shift + 4 followed by Spacebar isolates any window, menu, or dialog box with surgical precision. After pressing the initial keys, tap Spacebar to transform your cursor into a camera icon. Hover over your target window—it will highlight with a blue border—and click to capture. Unlike full-screen shots, this method includes subtle drop shadows and transparency effects for professional-looking documentation.
Eliminate Unwanted Background Elements
When targeting menus or pop-ups, position your cursor carefully before clicking. If other windows appear in your capture:
1. Press Command + Shift + 5 to open the Screenshot utility
2. Set a 5-second timer in Options
3. Trigger your menu just before the countdown ends
4. The utility captures only the active menu without stray background elements
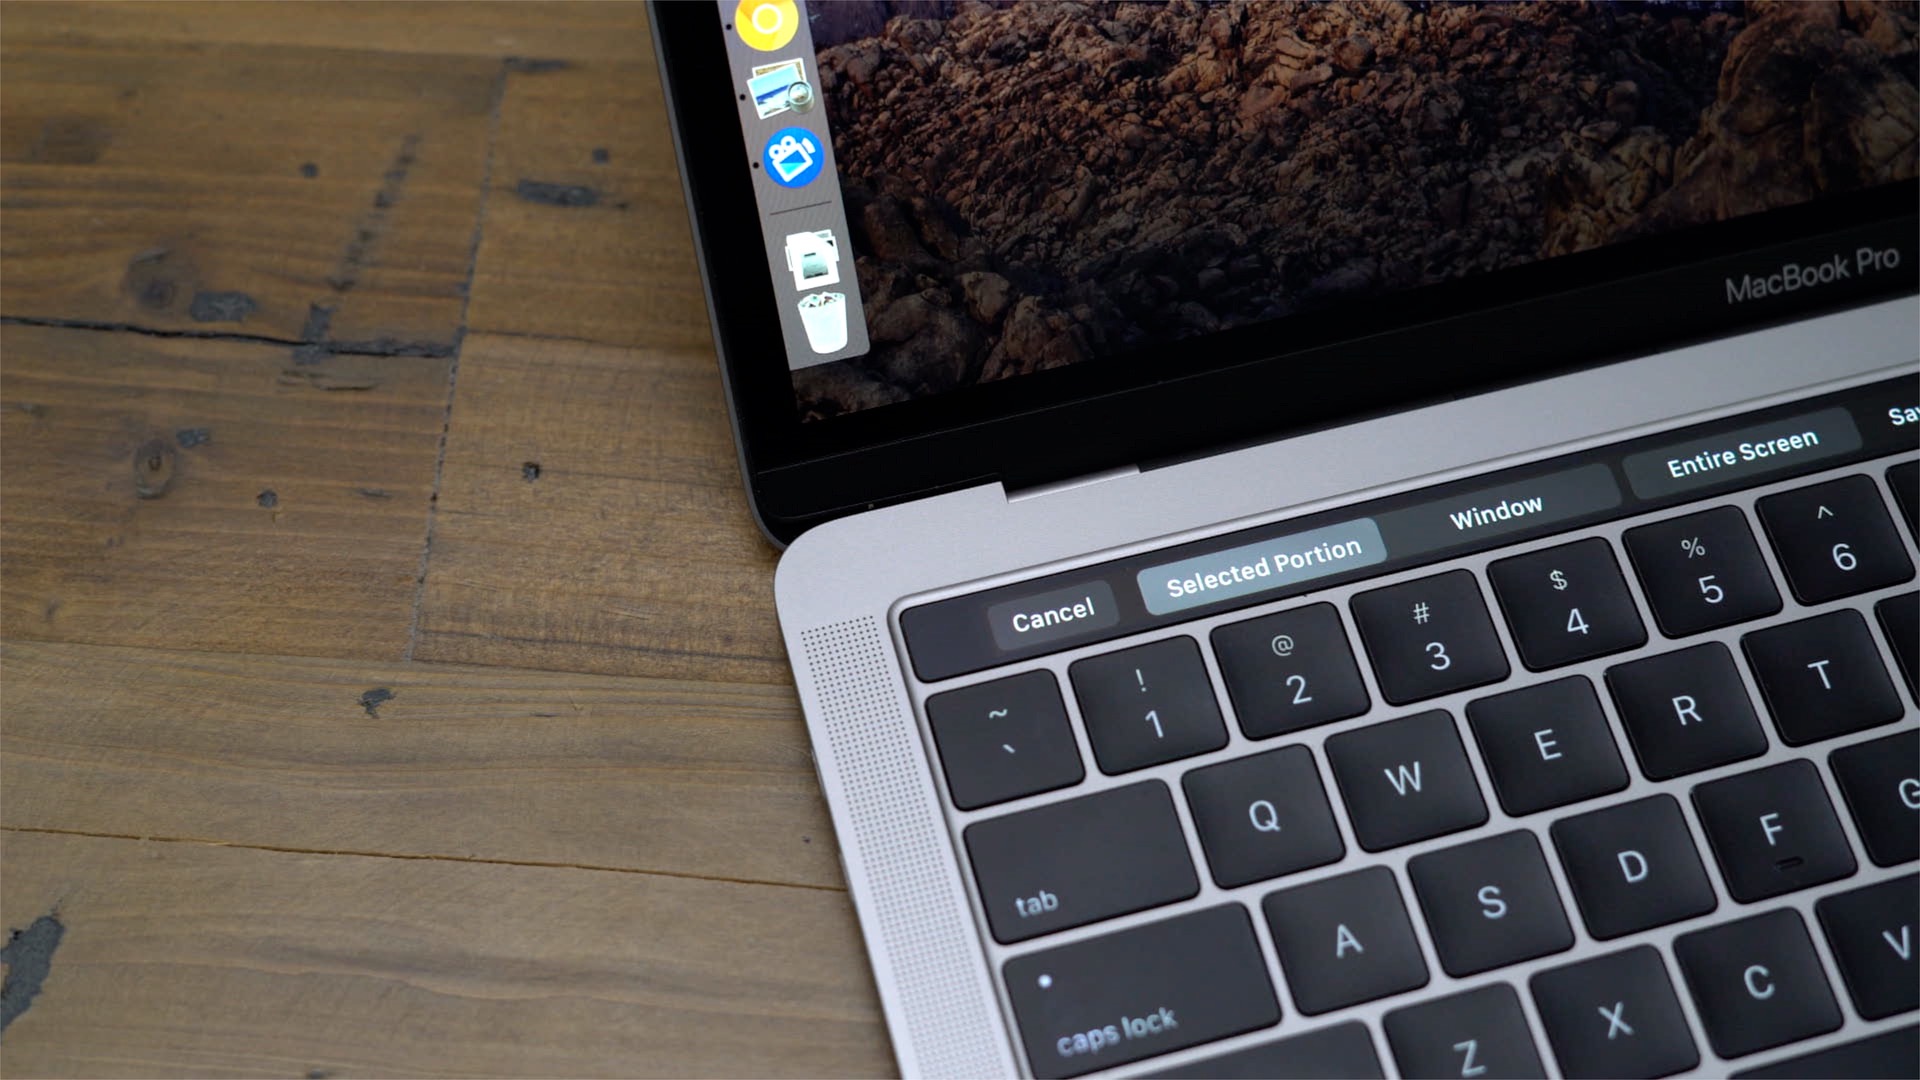
Master the Screenshot Utility Panel

Command + Shift + 5 unlocks macOS’s command center for all capture needs. Available since Mojave and enhanced in every update through Sequoia, this panel consolidates six critical functions in one interface. Unlike keyboard shortcuts, it provides visual controls for complex tasks like timed captures and video recording.
Customize Save Locations to Prevent Desktop Chaos
Click Options in the Screenshot panel to redirect captures:
– Cloud folders: Save directly to iCloud Drive or Dropbox for instant cross-device access
– Dedicated folder: Create a “Screenshots” folder in Documents and set it as default
– Clipboard: Bypass file creation for immediate pasting (equivalent to holding Control)
Enable Remember Last Selection to maintain consistent capture areas during repetitive documentation tasks—perfect for creating multi-step tutorials.
Activate Floating Thumbnails for Instant Sharing
Turn on Show Floating Thumbnail in Options to get a 5-second preview after each capture. During this window:
– Drag the thumbnail directly into Messages or Mail for instant sharing
– Click the thumbnail to open Markup for immediate annotations
– Swipe right on your trackpad to auto-save without opening tools
This feature transforms screenshots from static files into dynamic workflow tools, eliminating extra steps for common sharing tasks.
Grab Specialized Content Like a Pro
Freeze Disappearing Menus
For clean menu captures without desktop backgrounds:
1. Press Command + Shift + 4
2. Tap Spacebar to activate camera mode
3. Hover over your open menu until it highlights
4. Click to capture with transparent background
This method preserves menu aesthetics while removing distracting elements—ideal for software documentation or support tickets.
Capture the Touch Bar on MacBook Pro
Owners of MacBook Pro models with Touch Bar use Command + Shift + 6 for dedicated captures. This creates a wide PNG showing your current layout, including custom app controls and system functions. Share these captures when troubleshooting Touch Bar issues or demonstrating custom configurations.
Extract Frames from Screen Recordings
Need a single image from video activity?
1. Open QuickTime Player
2. Select File > New Screen Recording
3. Record your screen activity
4. Pause playback at the desired frame
5. Choose Edit > Copy to place the frame in your clipboard
This technique is invaluable for capturing transient UI states that vanish too quickly for standard screenshots.
Troubleshoot Missing or Blank Screenshots
Solve the “Where Did My Screenshot Go?” Panic
If captures don’t appear on your desktop:
– Check if you held Control during capture (saves to clipboard, not desktop)
– Verify your save location in Command + Shift + 5 > Options
– Search Spotlight for “Screenshot” to locate recent files
Fix Multi-Monitor Confusion
When using external displays, macOS captures whichever screen contains your cursor. Move your pointer to the target display before triggering shortcuts. For multi-monitor recordings, use Command + Shift + 5 and select the specific display in the recording options.
Handle HDR Display Quirks
On HDR-capable Macs:
– Toggle Capture Format between HDR and SDR in Options
– HDR screenshots appear muted on standard displays but retain full quality when viewed on compatible devices
– For social media sharing, use SDR format to ensure consistent appearance
Organize Your Screenshot Workflow
Create a dedicated folder structure to avoid desktop chaos:
1. Make a “Screenshots” folder in Documents
2. Set it as default in Command + Shift + 5 > Options > Other Location
3. Enable Remember Last Selection for consistent capture areas
4. Rename important captures immediately using descriptive terms
For collaborative work, save directly to shared cloud folders. When capturing sensitive information, use Markup tools to redact details before sharing—click any floating thumbnail and select the Redaction tool.
Quick Reference Cheat Sheet
Keep these essential combinations visible:
| Capture Need | Keystroke | Pro Tip |
|---|---|---|
| Full screen to file | ⌘ + Shift + 3 | Hold Control to copy to clipboard |
| Specific window | ⌘ + Shift + 4, Space, click | Captures with professional shadows |
| Touch Bar layout | ⌘ + Shift + 6 | MacBook Pro exclusive |
| Timed menu capture | ⌘ + Shift + 5 + 5-sec timer | Perfect for dropdown menus |
| Instant annotation | Enable floating thumbnails | Click thumbnail to markup immediately |
Power User Shortcuts You Need
Batch window captures: After pressing Command + Shift + 4 + Spacebar, keep clicking different windows without reactivating the shortcut. Press Escape when finished to exit capture mode.
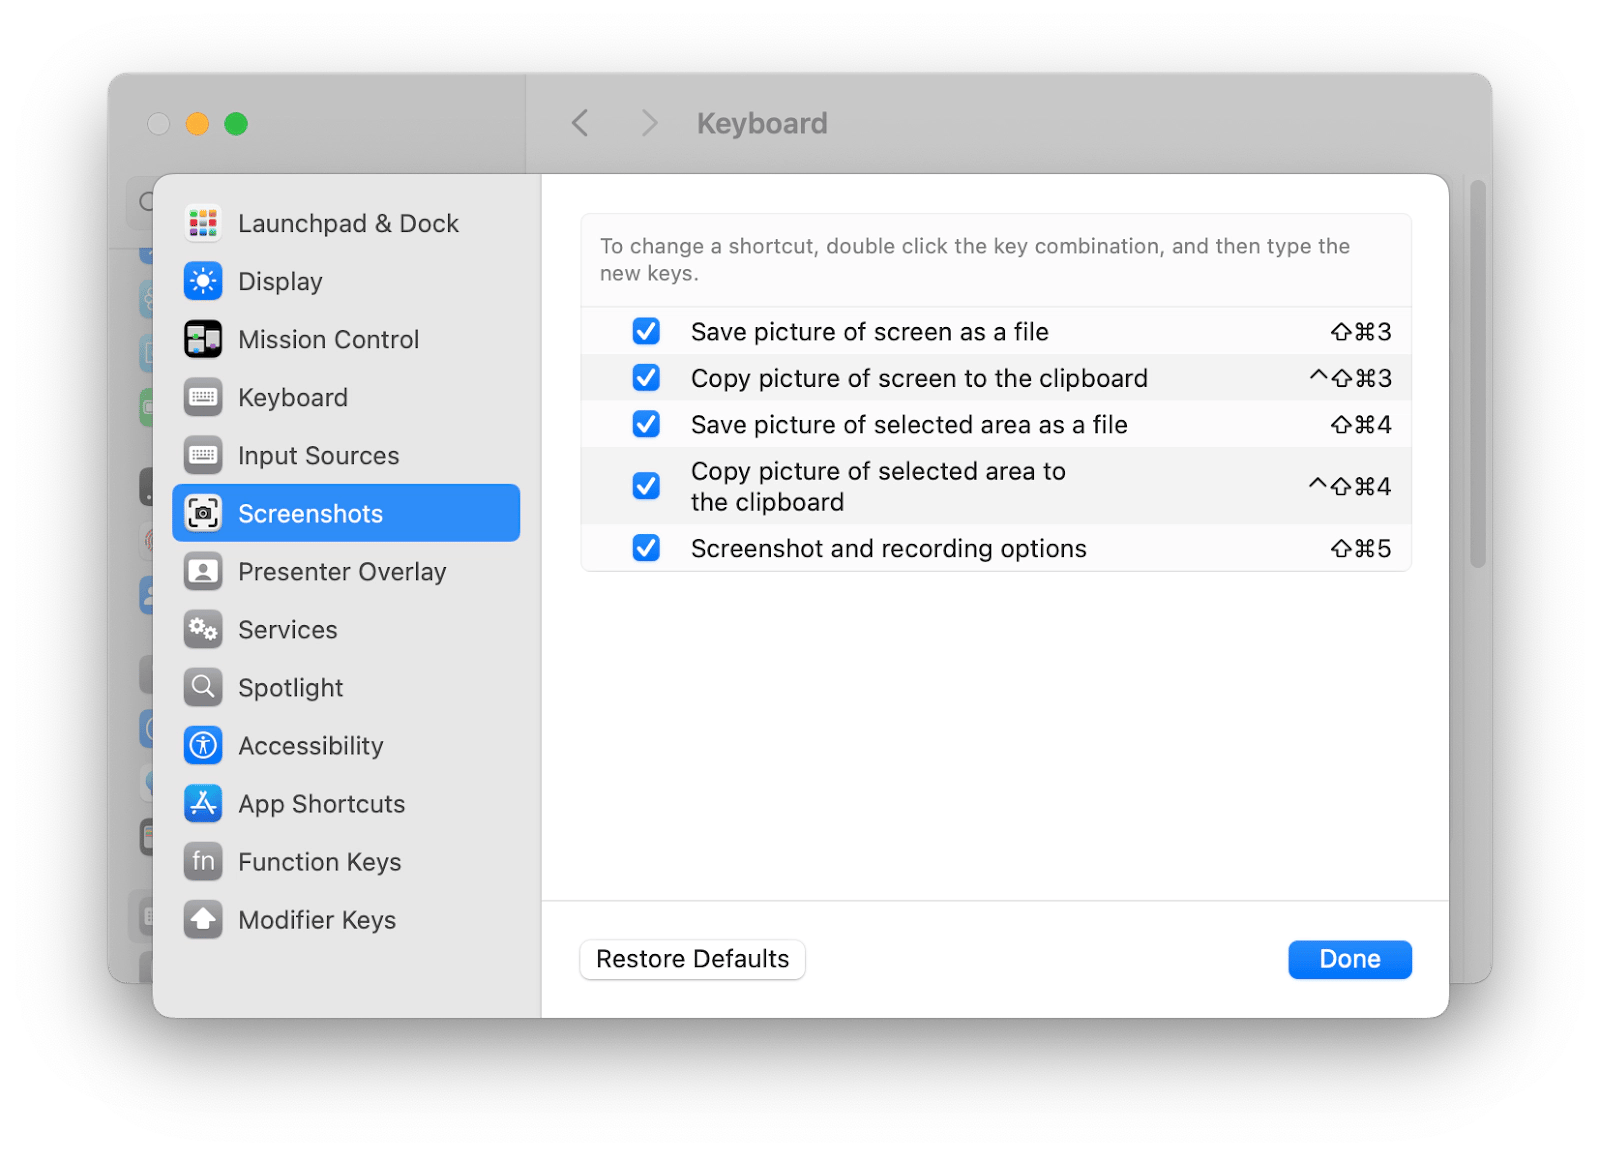
Remap for accessibility: In System Settings > Keyboard > Keyboard Shortcuts > Screenshots, reassign any command to accommodate physical limitations or international keyboards. Double-click existing shortcuts to create custom combinations.
Cloud-synced captures: Set your save location to “iCloud Drive > Desktop” folder. Screenshots instantly appear on all your Apple devices—great for continuing work from iPhone or iPad.
Your Apple laptop screenshot system is now fully optimized. These techniques work identically whether you’re on a decade-old Intel MacBook or the latest M3 model—you’ve just future-proofed your workflow. Practice the three core shortcuts (Command+Shift+3, 4, and 5) for five minutes today, and they’ll become reflexive. Next time that critical error message appears or you need to share visual information, you’ll capture it perfectly on the first try—no more frantic key mashing or missing details. The real power lies not just in taking screenshots, but in doing it with precision that saves you minutes every hour.