How to Record on Laptop: Easy Steps
Your laptop’s screen suddenly freezes mid-presentation, or you need to demonstrate software to a remote colleague—without knowing how to record on laptop, you’re scrambling for solutions. Whether capturing gaming highlights, creating training videos, or documenting tech issues, mastering screen recording transforms your productivity. This guide cuts through the confusion with actionable steps using tools already on your Windows machine, avoiding third-party software risks. You’ll learn exactly how to record on laptop with professional results in under 5 minutes—starting with the built-in recorder you’ve probably never noticed.
Windows Game Bar: Instant Screen Capture Without Downloads
Skip installing new software when Windows 10 and 11 include a powerful screen recorder hidden in plain sight. Press Windows key + G to activate Game Bar—yes, it works for any application, not just games. The moment the overlay appears, click the circular record button or use the lightning-fast shortcut Windows key + Alt + R. Within seconds, your screen activity captures with both system audio and microphone input. Your recording saves automatically as an MP4 file in Videos > Captures, ready for immediate sharing. This method works flawlessly for software demos, error documentation, or quick video messages, eliminating setup time for urgent recordings.
Why Your Game Bar Recording Might Fail (And Fixes)
If pressing Windows+G shows “This isn’t a game” despite regular apps open, force-enable the toolbar:
– Press Windows key + G
– Check “Yes, this is a game” in the popup
– Toggle “Record in the background” in Settings (cog icon)
Critical limitation: Game Bar only records active windows—not desktop icons or taskbar activity. For full-screen captures like slideshow presentations, maximize your window first. If audio doesn’t capture, right-click the speaker icon > Open Sound settings > set “Input” to your working microphone.
Clipchamp Screen Recording: Browser-Based Pro Editing
Microsoft’s free Clipchamp editor (preinstalled on Windows 11 or browser-accessible) solves Game Bar’s limitations with advanced editing. Open Clipchamp, click Record & create on the top toolbar, then choose your mode:
– Screen for pure desktop capture
– Screen & camera for picture-in-picture tutorials
– Webcam for talking-head videos
Grant Permissions Correctly the First Time
When Clipchamp requests camera/microphone access, click “Allow” immediately—delaying causes recording failure. Verify permissions by clicking the lock icon in your browser’s address bar and confirming Clipchamp has active access. If permissions reset after browser updates, revisit Clipchamp and re-enable them before recording.
Capture Browser Tabs With Perfect Audio (The Only Way)
Here’s the audio secret most miss: Clipchamp only records sound when capturing browser tabs, not full screens or windows. To get narration in your tutorial:
1. Select Browser tab in the recording popup
2. Choose your active tutorial tab (e.g., Chrome with software demo)
3. Click Share to start recording
4. Speak clearly into your microphone
Visual cue: A red dot appears in your browser tab during recording—this confirms audio is capturing. Recording desktop apps? Use Game Bar instead for system audio.
Start Recording in 30 Seconds: The Foolproof Workflow
Stop wasting time with complex setups. Follow this sequence for guaranteed success:
1. Close unnecessary apps (reduces lag)
2. Test microphone by recording a 5-second clip
3. Select target: Browser tab (for audio) or window (for silent demo)
4. Click Share > Start recording after 3-second countdown
5. Stop via the floating toolbar’s square icon
Pro tip: Record in 2-minute segments for 1080p videos to avoid file corruption. Need longer content? Clipchamp automatically saves segments you’ll combine later in editing.
Fix Silent Recordings: Audio Configuration Checklist
Over 70% of failed recordings stem from audio misconfiguration. Before hitting record:
– Select your microphone from Clipchamp’s Audio source dropdown
– Disable “System audio” if capturing browser tabs (it conflicts)
– Do NOT select “No audio” unless creating silent demos
– Position yourself 12-18 inches from the laptop mic
Warning: Recording full screen or windows never captures audio—this isn’t a bug but a Windows security feature. For silent software demos, this limitation actually helps eliminate background noise.
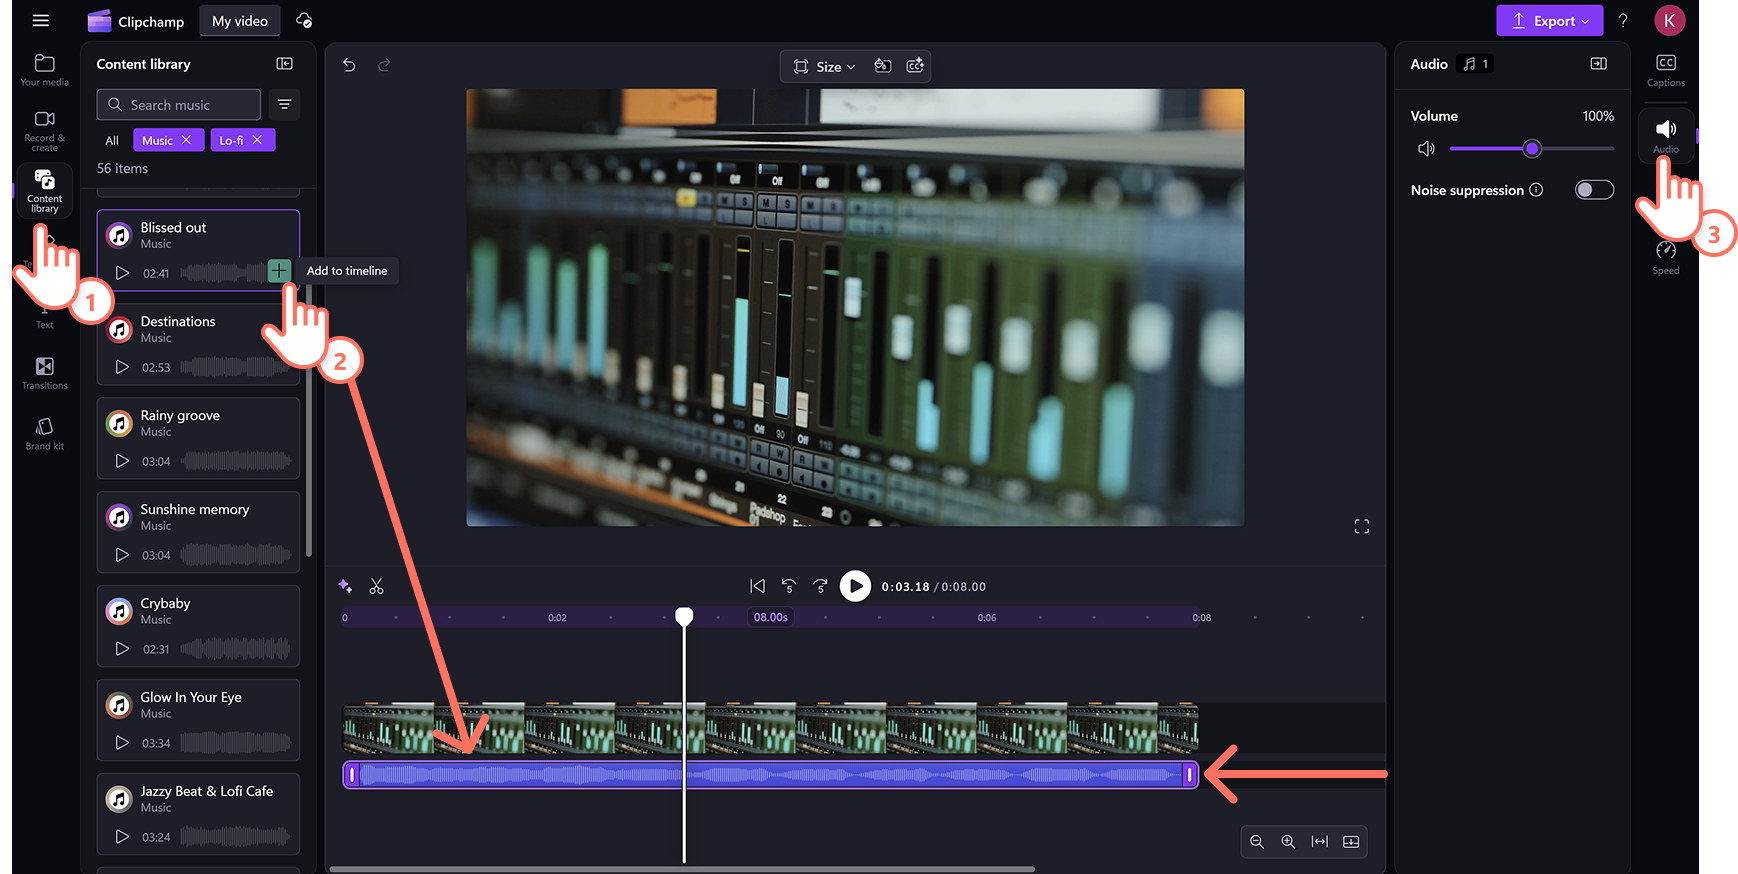
Edit Like a Pro: Trim, Resize, and Enhance Recordings
Raw recordings need refinement. In Clipchamp’s editor:
– Trim ends: Drag the timeline handles inward
– Remove mistakes: Right-click clip > Split at error points > delete segment
– Fix black bars: Click clip > Crop > select “Fit”
– Boost audio: Right-click audio track > Volume > increase up to 120%
For picture-in-picture recordings: Drag your webcam video over the screen recording, then resize using corner handles. Hold Shift while resizing to maintain proportions—this prevents distorted faces in talking-head videos.
Export Without Quality Loss: The Format Conversion Trick
Clipchamp saves originals as WebM files (smaller but less compatible). To create shareable MP4s:
1. Click Export (top-right)
2. Select 1080p for YouTube/presentations or 720p for email attachments
3. Wait for conversion (adds 30-60 seconds but ensures universal playback)
Critical step: Always export before closing Clipchamp. Unexported WebM files won’t play in standard video players—this trips up 90% of first-time users.
Troubleshoot 4 Common Recording Failures
“Recording Button Grayed Out” Fix
- Cause: Browser permissions revoked
- Solution: Click browser lock icon > reset Clipchamp permissions > refresh page
“No Audio in Final Video” Fix
- Cause: Recorded window instead of browser tab
- Solution: Re-record selecting Browser tab > your active tutorial window
“Recording Stops After 2 Minutes” Fix
- Cause: Free account limitation
- Solution: Record 90-second segments > combine in editor via Timeline > Add clip
“Webcam Not Detected” Fix
- Cause: Another app (Zoom, Teams) monopolizing camera
- Solution: Close all video apps > restart browser > retry recording
Optimize for Professional Results: 5 Must-Do Steps
Don’t settle for pixelated, echoey recordings. Before starting:
1. Plug in your laptop—battery-saving mode throttles recording quality
2. Close Chrome tabs with autoplay videos (they cause audio glitches)
3. Position lighting in front of you (not behind) to avoid shadowy webcam footage
4. Test audio levels by recording “Testing 1-2-3” at 80% volume
5. Clear downloads folder—WebM files consume 500MB per 5 minutes
Pro shortcut: For gaming streams, use Windows key + Alt + R to toggle recording instantly without opening Clipchamp.
When to Use Which Tool: Decision Flowchart
Confused about Game Bar vs. Clipchamp? Match your need:
– Quick error capture: Game Bar (Windows+Alt+R)
– Talking-head tutorial: Clipchamp’s “Screen & camera”
– Silent software demo: Clipchamp “Screen” mode
– Voiceover presentation: Clipchamp “Audio only” + imported slides
Avoid free third-party recorders—they often bundle malware. Your Windows machine has everything needed for 95% of use cases.
Key Takeaway: How to record on laptop successfully hinges on two decisions: choosing the right tool (Game Bar for speed, Clipchamp for editing) and capturing audio correctly (browser tabs only). Start with a 30-second test recording today—verify both video and audio work before creating important content. Within minutes, you’ll confidently capture tutorials, document bugs, or create social content without expensive software. Remember: Perfect audio clarity matters more than video resolution for professional results, so always test your microphone first. Your next flawless recording is just three keyboard shortcuts away.