How to Put a Key Back on Laptop Keyboard
That sudden ping as your laptop key flies off during an important work session sends panic through any keyboard user. Whether it’s your spacebar disappearing mid-document or an errant coffee spill dislodging multiple keys, this common mishap affects millions of laptop owners each year. The good news: reinstalling laptop keys is simpler than you think and costs nothing if done correctly. By following these proven techniques, you’ll restore full keyboard functionality in minutes—not days—and avoid unnecessary repair bills that can reach $200 or more.
Most laptop keys use precision-engineered retention systems that snap securely into place when properly aligned. While each manufacturer implements slight variations, the fundamental mechanics remain consistent across brands like Dell, HP, Lenovo, and Apple. Understanding these mechanisms transforms what seems like delicate surgery into a straightforward process you can complete with basic household tools. This guide delivers exactly what you need to know to successfully reattach any missing laptop key, regardless of your device model.
Identify Your Laptop’s Key Retention System
Before attempting reattachment, determining your keyboard’s specific mechanism prevents costly mistakes and component damage. Each system requires slightly different handling techniques for successful reinstallation.
Scissor Switch vs Butterfly Mechanism: What’s Under Your Keys
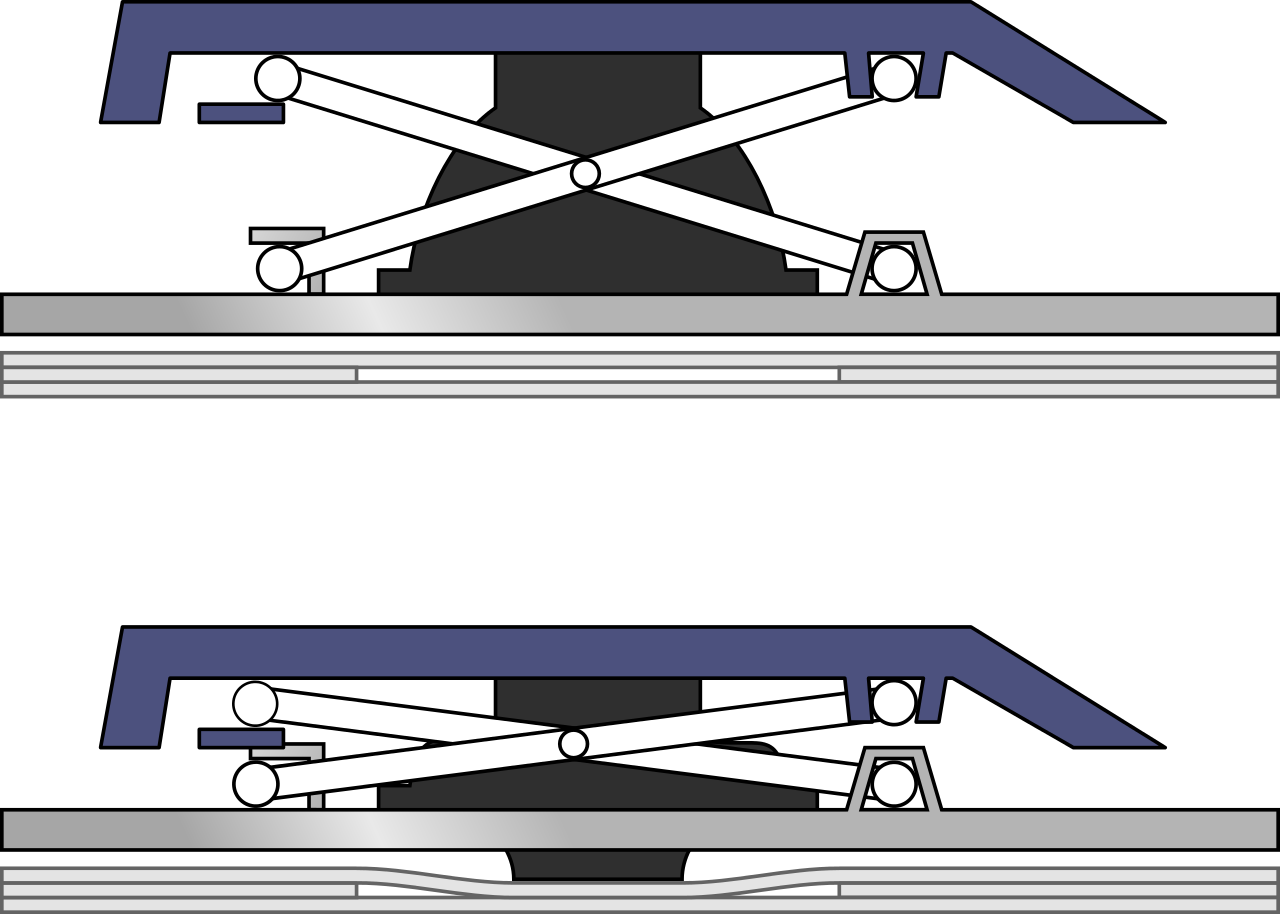
Scissor switch keyboards dominate most Windows laptops and older MacBooks. These feature two interlocking plastic pieces forming an “X” shape beneath each keycap. When you press down, this scissor mechanism collapses smoothly while maintaining key stability, then springs back to position when released. These systems typically have four corner attachment points that snap securely into place.
Butterfly mechanism keyboards appear exclusively on newer MacBooks from 2015-2019. These use a single, wider plastic frame with a central pivot point resembling butterfly wings when viewed from the side. This design allows for thinner keyboards but requires precise alignment during reattachment. Unlike scissor switches, butterfly mechanisms typically attach at two central points rather than four corners.
Quick Visual Inspection Without Tools
Flip your detached keycap over and examine the underside. If you see two separate plastic pieces with small pegs at each corner, your laptop uses scissor switches. A single, solid plastic frame indicates a butterfly mechanism. If no plastic pieces remain attached to the keycap, the retention clips likely stayed connected to your keyboard base—this is actually ideal for reinstallation.
Essential Tools for Successful Key Reattachment

Gathering the right tools before starting prevents frustration and protects your delicate keyboard components from accidental damage during the repair process.
Must-Have Basic Tool Kit
You’ll need just three essential items for most reattachment jobs: precision tweezers for manipulating small parts, a small flathead screwdriver (or guitar pick as a plastic alternative), and a bright light source. The tweezers provide the necessary precision for positioning tiny clips, while the flathead tool helps lift and adjust retention mechanisms without scratching components. Your smartphone flashlight works perfectly for illumination—just position it at a low angle to highlight attachment points.
Helpful Optional Supplies
While not strictly necessary, isopropyl alcohol (90% concentration) and cotton swabs prove invaluable for cleaning debris from key mechanisms before reinstallation. A small container to hold components prevents losing tiny parts, and compressed air removes stubborn dust without direct contact. For problematic keys, a replacement keycap kit (available online for $5-$15) provides peace of mind in case original components are damaged beyond repair.
Prepare Your Workspace for Safe Key Reinstallation
Proper preparation creates optimal conditions for successful reattachment while protecting your laptop from accidental damage during the repair process.
Critical Safety Precautions
Power down your laptop completely and disconnect the charger before beginning. For models with removable batteries, slide the release latch and remove the battery entirely. This eliminates any risk of electrical short circuits while working with metal tools near exposed keyboard components. Never attempt key reattachment while your laptop remains powered on or connected to power.
Optimal Work Environment Setup
Work on a clean, flat surface with good lighting—natural light supplemented by your phone flashlight works perfectly. Place a white towel beneath your laptop to make tiny components visible if they fall. Keep all tools and the detached key organized in one area to prevent misplacing critical parts. Take a clear photo of your keyboard with your phone before starting; this serves as your reference for key orientation and spacing during reassembly.
Inspect for Missing or Damaged Components
Careful inspection reveals exactly what needs reattachment and whether any components require replacement before proceeding.
Keyboard Base Examination Protocol
Look closely at the empty space where your key detached. You should see either metal hooks, plastic clips, or both—these secure the key mechanism. Check for the rubber dome (a small, round silicone piece) that provides key bounce; this often stays in place when keys detach. If you see bent metal brackets or broken plastic mounting points, professional repair may be necessary instead of DIY reattachment.
Keycap Component Assessment
Examine your detached keycap for four critical features: corner clips that snap into the mechanism, a central peg that connects to the rubber dome, any broken plastic pieces, and debris buildup. If corner clips are cracked or missing, the key won’t stay attached regardless of your technique. Gently clean any debris from the keycap’s underside using a soft brush or compressed air before attempting reinstallation.
Reattach Scissor Switch Keys Like a Pro
Windows laptops and older MacBooks use this common mechanism. Follow these precise steps for successful reattachment without damaging delicate components.
Scissor Mechanism Positioning Technique
First, ensure the scissor mechanism is properly seated in the keyboard base. The mechanism should click into small metal hooks at each corner. Use tweezers to align and gently press until you hear or feel it snap into place. If the mechanism appears flipped or twisted, rotate it 180 degrees—many users install these upside down initially. The correct orientation shows the plastic “X” standing upright when viewed from the side.
Keycap Alignment Method That Prevents Damage
Hold the keycap at a 45-degree angle above the mechanism. Align the bottom edge first, ensuring the clips on the keycap match the corresponding slots on the mechanism. The keycap should slide partially into place with minimal resistance. Never force the keycap straight down—this common mistake breaks plastic clips. If alignment feels difficult, rotate the keycap 180 degrees; many keys (like Enter or Shift) have specific orientations.
Secure Locking Procedure for Long-Term Stability
Once aligned, press firmly but gently on all four corners of the key in sequence—top-left, top-right, bottom-left, bottom-right. You should hear distinct clicking sounds as each corner locks into position. Test the key by pressing it several times—it should feel springy and return to position smoothly without wobbling. If the key feels loose, remove and reinstall with slightly more pressure on the problematic corner.
Troubleshoot Common Key Reattachment Problems

Even with careful technique, issues can arise during reinstallation. These solutions address the most frequent problems encountered by DIY repairers.
Key Pops Off Immediately After Installation
This almost always indicates broken plastic clips or improper corner engagement. Remove the key and inspect each corner clip for cracks or missing pieces. If clips are damaged, order a replacement keycap specific to your laptop model. When reinstalling, apply firm pressure directly over each corner until you feel and hear the distinct click of engagement.
Key Sticks Down or Feels Unresponsive
Debris under the rubber dome commonly causes this issue. Remove the key and use compressed air to clear particles from the mechanism. For stubborn debris, apply a drop of isopropyl alcohol to a cotton swab and gently clean around the rubber dome. Ensure the dome sits perfectly centered before reinstalling the key mechanism—off-center domes cause inconsistent key response.
Key Sits at Incorrect Height Compared to Neighbors
This indicates one corner of the mechanism isn’t fully engaged. Remove the key and mechanism, then carefully reinstall while watching each corner engagement. Compare to surrounding keys as you press down—properly installed keys sit perfectly flush with neighbors. If height issues persist, the rubber dome may be damaged and require replacement.
Prevent Future Key Detachment With Smart Habits
Simple preventive measures significantly reduce the likelihood of keys detaching again, extending your keyboard’s functional lifespan.
Proper Cleaning Techniques That Won’t Damage Keys
Never pry keys for cleaning—this is the leading cause of accidental detachment. Instead, use compressed air at a 45-degree angle to dislodge debris without direct contact. For stubborn particles, gently brush between keys with a soft-bristled toothbrush. When eating near your laptop, keep food crumbs away from the keyboard by using a plate or tray that catches falling debris.
Transportation and Handling Best Practices
Always close your laptop lid gently—slamming the screen shut creates shockwaves that loosen keys over time. When transporting your device, ensure the keyboard faces upward in your bag to prevent pressure on keys from other items. Consider a silicone keyboard cover if you frequently travel with your laptop; these transparent protectors shield keys from impact while maintaining typing functionality.
Monthly Maintenance Routine for Longevity
Inspect your keyboard monthly by pressing each key lightly to check for looseness. Address any wobbling keys immediately before the problem worsens. Every three months, power down your laptop and use compressed air to remove accumulated dust from between keys. For users in dusty environments, consider replacing keyboard covers quarterly to prevent debris buildup.
When to Seek Professional Keyboard Repair Services
While DIY reattachment works for most single-key issues, certain scenarios require professional intervention to avoid further damage.
Internal Damage Warning Signs
If multiple keys detach simultaneously after a liquid spill, internal circuitry may be compromised. Similarly, if the keyboard base shows visible cracks or bent metal brackets, DIY repair won’t restore full functionality. These situations require complete keyboard assembly replacement by a qualified technician to prevent data loss or electrical issues.
Cost-Benefit Analysis for Repairs
Professional keyboard replacement typically costs $150-400 depending on your laptop model and brand. For devices under warranty, contact the manufacturer first—unauthorized repairs often void coverage. When weighing repair costs against replacement value, consider that keyboard issues on laptops older than five years may indicate broader component failures requiring full system replacement.
Mastering laptop key reattachment transforms a potentially expensive problem into a five-minute fix you can perform anywhere. Start with gentle pressure and patience—the delicate plastic components respond best to careful handling rather than forceful installation. By understanding your specific keyboard mechanism and following these proven techniques, you’ll maintain full typing functionality while avoiding unnecessary repair costs. Keep this guide bookmarked for future reference, and share these time-tested methods with fellow laptop users who’ve experienced the panic of a flying keycap. With practice, you’ll develop the confidence to handle any keyboard component issue that comes your way.