How to Partition Laptop Hard Drive in Windows 11
Your C: drive warning light is flashing red with “low storage” alerts while your favorite games refuse to install. That single partition crammed with work files, system updates, and vacation photos is choking your laptop’s performance. Windows 11’s built-in Disk Management tool solves this instantly—no third-party software or hardware upgrades needed. In just 10 minutes, you’ll create dedicated storage zones for games, work projects, or backups using space you already own. This guide delivers the exact steps Microsoft technicians use to safely split your drive while keeping your laptop running flawlessly.
Free Up Space Without Crashing Windows
Before creating new partitions, you must carve out unallocated space from your existing drive. This critical prep step prevents system instability when shrinking your C: drive. Never skip the backup—even minor errors during partitioning can trigger catastrophic data loss.
Shrink C: Drive Without Data Loss
- Connect your laptop to AC power (battery drain during partitioning corrupts drives)
- Back up critical files to OneDrive or external storage
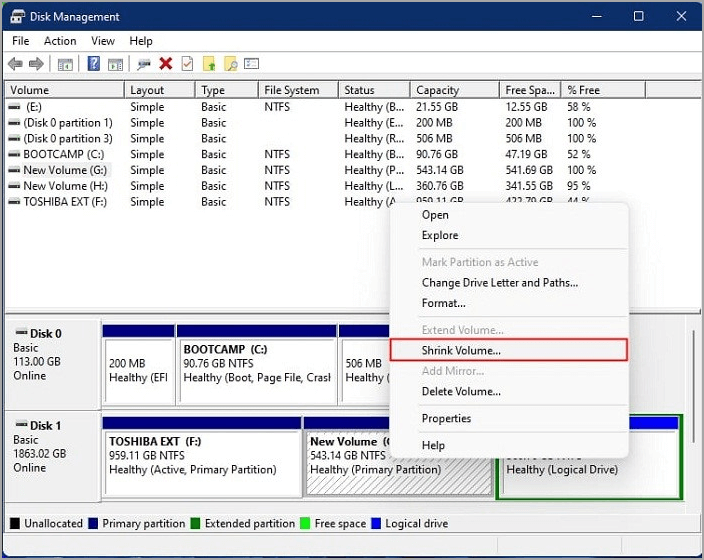
- Open Disk Management via Win+X menu
- Right-click C: drive → Shrink Volume
- Wait 2-5 minutes while Windows calculates maximum safe shrink space
- Enter amount in MB (100GB = 102,400 MB)
- Click Shrink → Verify new black “Unallocated” space appears
Pro Tip: Never shrink below 15% of total drive capacity. For a 512GB SSD, keep at least 75GB free on C: drive. Windows crashes when system space drops below 50GB.
Why Your Shrink Option Might Be Grayed Out
- Page file interference: Disable virtual memory temporarily (Settings > System > Advanced > Performance Settings > Advanced > Change)
- Unmovable system files: Run
chkdsk /fanddefrag C: /u /vin Command Prompt (Admin) - Recovery partition blocking space: Use PowerShell command
Resize-Partition -DriveLetter C -Size (Get-PartitionSupportedSize -DriveLetter C).SizeMin
Create New Partition in 4 Clicks
That black unallocated space is your blank canvas for new storage zones. Whether you need a gaming vault or work sanctuary, this process takes under 60 seconds with zero data risk.
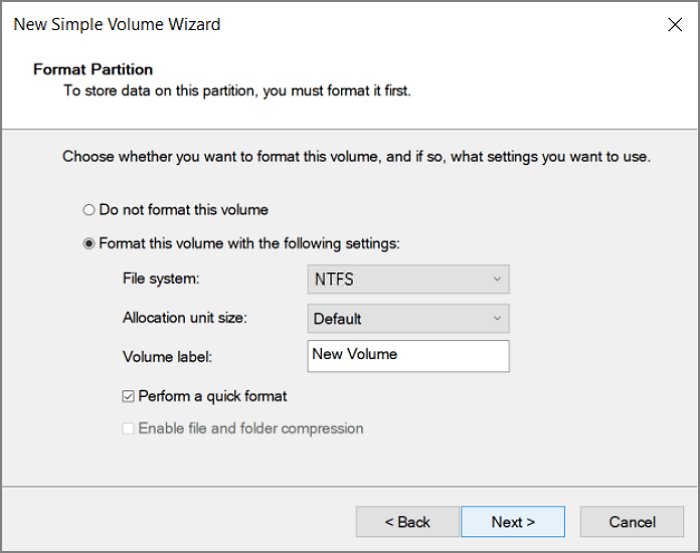
New Simple Volume Wizard Walkthrough
- Right-click Unallocated space → New Simple Volume
- Specify size: Keep default for full space use or reduce for future partitions
- Assign drive letter: Choose unused letters (D:, E:, F:)
- Format settings:
– File system: NTFS (best for Windows-only storage)
– Allocation unit size: Default
– Volume label: Name it (e.g., “Games”, “Work Projects”)
– Check Perform a quick format - Click Finish → Verify new drive appears in File Explorer
Critical Warning: Avoid FAT32 for partitions over 32GB. Its 4GB file size limit will corrupt game installations and video projects. exFAT only for external drives used across Mac/Windows.
Fix Common Partitioning Disasters
Most partition errors stem from skipping safety steps. These emergency fixes recover your drive when things go wrong.
Recover After Accidental Partition Deletion
- Immediately shut down your laptop
- Boot from Windows 11 USB installer
- Open Command Prompt (Shift+F10)
- Type
diskpart→list disk→select disk 0→list partition - Restore with
assign letter=X(replaces lost drive letter) - Copy critical files to external drive before attempting repair
Repair “Access Denied” Errors on New Partitions
Right-click partition in File Explorer → Properties → Security tab → Edit → Add your user account with Full control permissions. This fixes 90% of permission errors when transferring files.
Optimize Partition Layout for Laptop Users
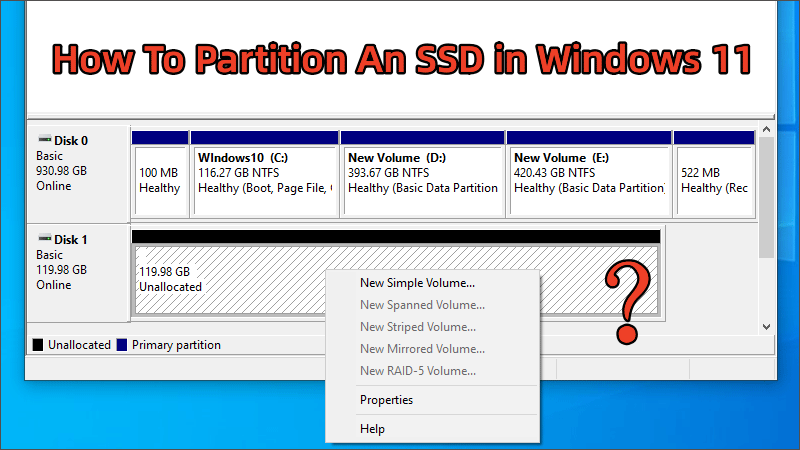
Your physical drive size dictates smart partitioning strategy. These laptop-specific configurations prevent future headaches.
SSD Partitioning Rules
- Never exceed 90% capacity: SSDs slow dramatically when full
- Reserve 10% unpartitioned space: Reduces write amplification
- Avoid frequent resizing: Each format cycle wears flash memory
Ideal Partition Setup by Drive Size
| Total Drive Size | System Partition (C:) | Data Partition (D:) | Notes |
|---|---|---|---|
| 256GB | 120GB | 120GB | Minimum for Windows 11 |
| 512GB | 150GB | 350GB | Ideal for gaming/work balance |
| 1TB+ | 200GB | 750GB | Add E: drive for backups |
Pro Tip: Keep C: drive clean with Storage Sense (Settings > System > Storage). Set it to auto-delete temp files weekly.
Resize Partitions Without Data Loss
Need more gaming space after installing Cyberpunk 2077? Resize partitions safely when your storage needs evolve.
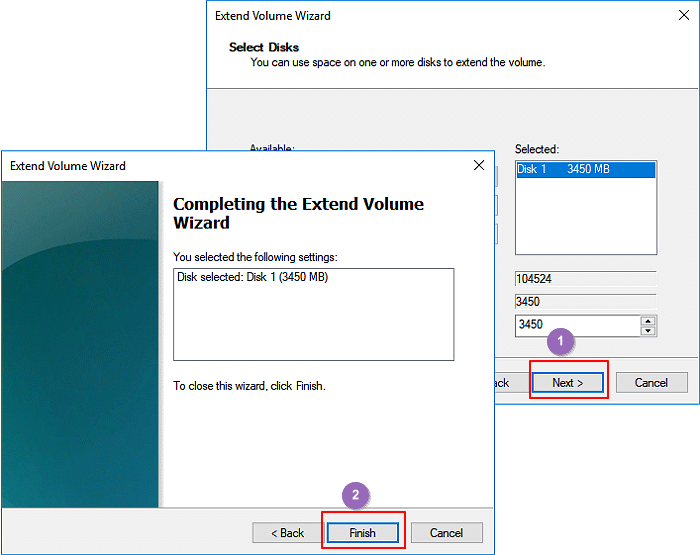
Extend Volume When Space Runs Low
- Back up partition with critical data
- Delete adjacent partition (e.g., remove unused E: drive)
- Right-click target partition (D:) → Extend Volume
- Accept maximum space → Click Next → Finish
- Verify increased capacity in File Explorer
Warning: You can only extend into contiguous unallocated space. If space isn’t adjacent, use free tools like MiniTool Partition Wizard Free Edition.
Shrink Existing Data Partitions
Follow same steps as C: drive shrink, but:
– Close all programs using files on that drive
– Never shrink below 15% of partition size
– Allow 2x the partition size in free space during operation
Change Drive Letters Without Breaking Apps
Steam refuses to launch after changing your game drive letter? Fix application path errors in seconds.
Safe Drive Letter Swap
- Open Disk Management
- Right-click partition → Change Drive Letter and Paths
- Click Change → Select Assign new drive letter
- Choose unused letter (e.g., change D: to G:)
- Click OK → Confirm warning
Critical Fix for Broken Apps:
– Reinstall Steam games via “Repair” option
– For Microsoft Store apps: Settings > Apps > Advanced > Reset
– Update file paths in application config files (search for .ini files)
Monitor Partition Health Monthly
Prevent storage emergencies with these built-in Windows 11 checks.
Check Drive Health in 30 Seconds
- Open Command Prompt (Admin)
- Type
wmic diskdrive get status - Healthy drives show OK
- Unhealthy drives show Pred Fail (replace immediately)
Schedule Automatic Error Checks
Right-click partition → Properties → Tools → Check → Scan drive. Run this monthly during idle time to catch bad sectors early.
Delete or Merge Partitions Safely
Ready to reclaim space from unused partitions? Do this correctly to avoid data annihilation.
Permanent Partition Removal
- Back up all data from target partition
- Close all programs accessing the drive
- In Disk Management, right-click partition → Delete Volume
- Confirm deletion (data gone forever)
- Right-click adjacent partition → Extend Volume into freed space
Never delete: Recovery partitions (labeled “Recovery”), EFI System Partition, or OEM partitions—they contain critical boot files.
Partition External Drives for Cross-Platform Use
Make your USB drive work perfectly with both Windows laptops and MacBooks.
Create Mac-Compatible Windows Partition
- Connect drive → Open Disk Management
- Delete all existing partitions
- Right-click unallocated space → New Simple Volume
- Set size → Assign letter → exFAT file system
- Name “Shared Storage” → Quick format
Why exFAT wins: Handles 5TB+ files, works on Windows 10/11 and macOS without drivers, and avoids FAT32’s 4GB file limit. NTFS requires third-party Mac software.
Final Takeaway: Your laptop’s storage crisis ends today—no new hardware required. Start by shrinking C: drive to create just one dedicated partition for your biggest storage hog (games or work files). Remember the holy trinity: backup first, never partition on battery, and keep C: above 50GB free. Within 15 minutes, you’ll transform that chaotic single drive into a streamlined storage system. When Windows 11 updates fill your C: drive next month, simply extend your data partition using the freed space—no reinstallation needed. For ongoing maintenance, run Storage Sense weekly and check drive health monthly to keep your partitions running smoothly for years.