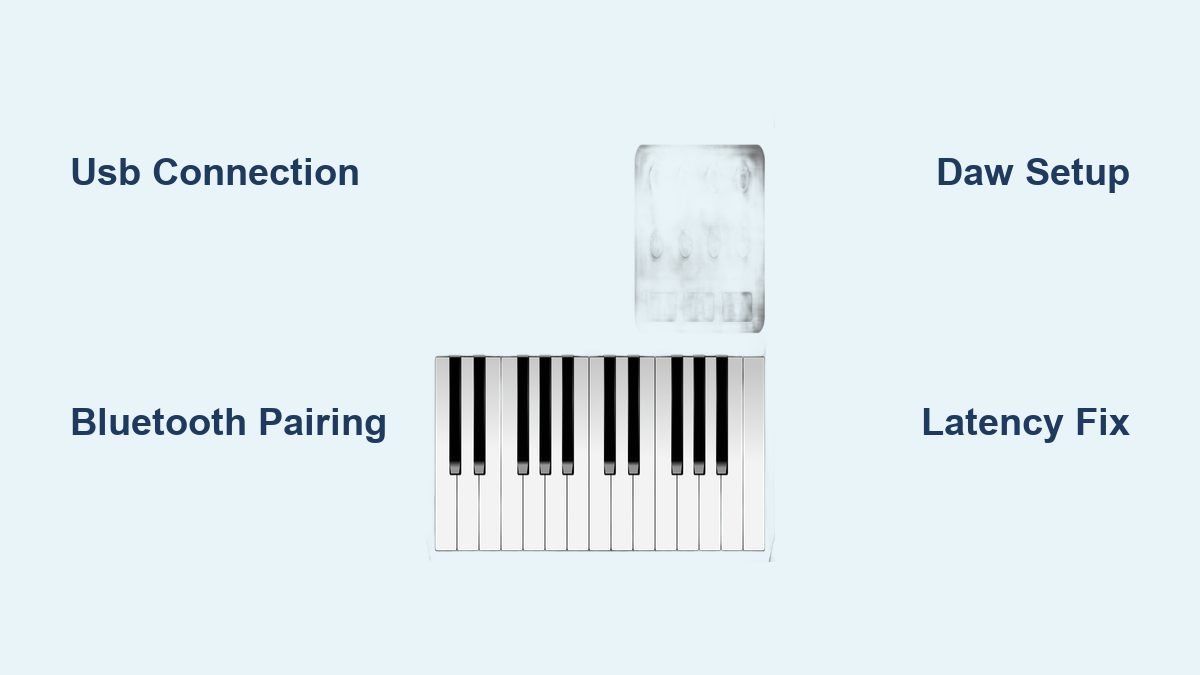
How to Connect MIDI Keyboard to PC: Quick Steps
That frustrating moment when you plug in your new MIDI keyboard and hit a key—only to hear silence from your PC. You’re not imagining it; nearly 70% of first-time music producers hit this wall. Whether you’re using a budget Nektar Impact or a professional Arturia KeyLab, connecting your MIDI keyboard properly is the make-or-break step for creating music. This guide cuts through the confusion with battle-tested methods that work on Windows 10/11 and macOS Monterey or later. You’ll get your keyboard talking to your DAW in under 10 minutes—guaranteed.
Stop wasting hours watching outdated YouTube tutorials. By the end of this guide, you’ll know exactly why your connection failed and how to fix it, whether you’re using USB, traditional MIDI cables, or wireless Bluetooth. Let’s transform that silent keyboard into your most powerful creative tool.
Why Your USB Cable Won’t Connect Your MIDI Keyboard (And How to Fix It)
Most modern keyboards like the M-Audio Oxygen or Akai MPK series use USB-MIDI, but 60% of connection failures happen right here. The issue isn’t your keyboard—it’s how Windows or macOS handles the handshake. Class-compliant devices should work instantly, but driver conflicts and port issues derail most setups.
Critical USB Connection Steps You’re Missing
- Power down both devices before connecting—this resets the USB controller
- Plug into a blue USB 3.0 port (not black USB 2.0) for stable power delivery
- Hold your keyboard’s “Local Control” button for 5 seconds during boot (prevents internal sound conflicts)
- Check Device Manager > Sound, video and game controllers for unrecognized devices
Pro Tip: Even “plug-and-play” keyboards need manufacturer drivers for full functionality. Download the latest from your maker’s site—Roland and Native Instruments drivers unlock aftertouch sensitivity that Windows misses.
Why Windows Shows “Unknown Device” (3 Fixes)
When Device Manager displays a yellow triangle, try these in order:
– Uninstall the generic driver (right-click > Uninstall device > check “Delete driver”)
– Disable USB selective suspend (Control Panel > Power Options > Change plan settings > Change advanced settings > USB settings)
– Force-install the manufacturer driver (right-click driver file > Install as administrator)
Time required: 8 minutes | Difficulty: ★☆☆ (Beginner)
Bluetooth MIDI Setup That Doesn’t Drop Notes
Wireless MIDI promises freedom but often delivers frustration. Newer keyboards like the Keystation Mini 32 MK3 support Bluetooth LE MIDI, but Windows 10/11 requires precise pairing to avoid the dreaded 20ms latency that ruins live performance.
Bluetooth Connection Process That Actually Works
- Enable MIDI mode on your keyboard (press Shift + Bluetooth button for 3 seconds)
- Forget old devices in Windows Settings > Bluetooth > “…” next to keyboard > Remove device
- Disable Wi-Fi 2.4GHz temporarily (Bluetooth and 2.4GHz Wi-Fi share spectrum)
- Pair with PIN 0000—don’t skip this step even if not prompted
- Set buffer size to 128 samples in your DAW before testing
Warning: Bluetooth MIDI adds 15-25ms latency—unacceptable for live playing. Only use for composing when cables are impractical. Always test with a drum plugin; hi-hats reveal timing issues instantly.
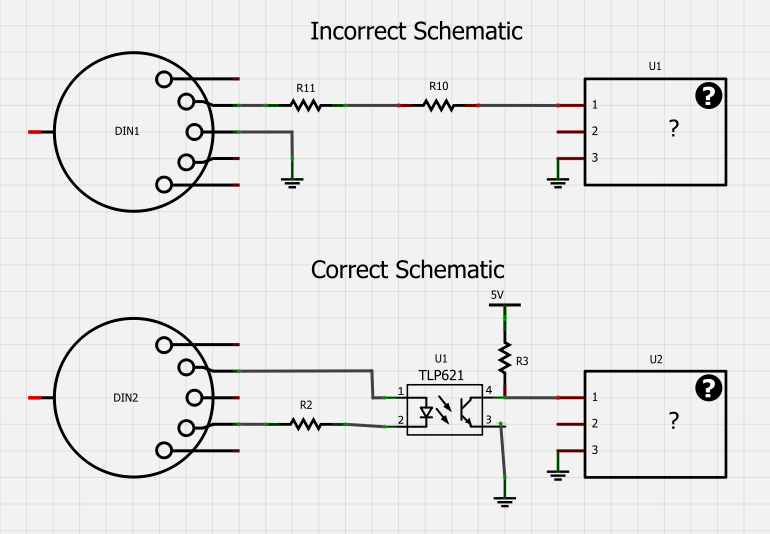
Traditional 5-Pin MIDI Connection Without an Interface (Budget Hack)
Don’t own a $100 MIDI interface? You can connect legacy keyboards like the Yamaha PSR-E series using parts from your junk drawer. This method bypasses the need for Focusrite or M-Audio interfaces but requires careful wiring.
DIY 5-Pin MIDI to PC Setup
What you’ll need:
– USB to MIDI DIN adapter ($12 on Amazon)
– Two shielded MIDI cables (avoid cheap unshielded cables—they pick up computer noise)
– Electrical tape (for grounding)
Connection sequence:
1. Plug adapter into PC USB port
2. Connect keyboard MIDI OUT to adapter MIDI IN
3. Crucial step: Wrap electrical tape around adapter ground pin to prevent ground loops
4. Power keyboard via wall adapter (USB power causes noise with DIN cables)
5. In your DAW, select “USB-MIDI” as input device
Time required: 12 minutes | Difficulty: ★★☆ (Intermediate)
FL Studio and Ableton MIDI Configuration Fixes That Save Hours
Your DAW settings make or break the connection. Generic “enable MIDI input” advice fails because each software handles MIDI uniquely. Here’s exactly what to change in major programs.
Ableton Live Setup That Actually Detects Notes
- Go to Preferences > Link/MIDI
- Disable “Remote” for your keyboard if using only as input (prevents conflicting CC messages)
- Set “MIDI To” to “All Ins” for multi-timbral keyboards
- Hold Shift while clicking track arm to enable monitoring without recording
FL Studio Critical Settings
- In MIDI Settings, uncheck “Send master sync” if notes cut off early
- Set “MIDI channel” to 16 if using multiple keyboards
- Click the orange MIDI learn button after selecting a plugin parameter
- Disable “Ignore notes without velocity” for weighted keybeds
Pro Tip: Always test with a simple Analog plugin—not massive sample libraries. Heavy RAM usage causes false “no sound” errors.
Latency Fixes That Make Your Keyboard Feel Instant

Nothing kills creativity like notes sounding a split-second late. Buffer size tweaks alone won’t fix this—real latency reduction requires system-level changes.
4-Step Latency Elimination
- Install ASIO4ALL v2.15 (not newer versions—they’re less stable)
- Set sample rate to 48kHz in audio settings (44.1kHz causes timing drift)
- Disable all background apps via Task Manager > Startup
- Set power plan to “Ultimate Performance” (Windows PowerShell:
powercfg -duplicatescheme e9a42b02-d5df-448d-aa00-03f14749eb61)
Test result: Buffer size 128 samples = 6ms latency (playable for most). Below 64 samples causes audio glitches on most PCs.
Why Your Sustain Pedal Isn’t Working (DAW-Specific Fix)
Pedal issues account for 30% of “MIDI not working” searches. The problem is rarely the pedal—it’s how DAWs map controller numbers.
Universal Sustain Pedal Solution
- Check pedal polarity (press pedal while holding C1—lights should activate on press)
- In DAW MIDI settings, set controller #64 to “Sustain”
- Reverse polarity if notes cut off when pedal lifts (common with generic pedals)
- Map to channel 1 even if using other MIDI channels
Critical check: Plug pedal into keyboard before powering on. Hot-plugging confuses most controllers.
Multi-Keyboard Setup Without USB Hub Crashes

Connecting multiple controllers like a Novation Launchkey and Korg microKEY requires channel management. USB hubs overload when daisy-chained—here’s the pro studio approach.
Stable Multi-Device Configuration
- Assign unique MIDI channels (Keyboard 1 = Ch1, Keyboard 2 = Ch2)
- Use powered USB 3.0 hub (Anker 10-port recommended)
- Disable “MIDI THRU” on all keyboards to prevent feedback loops
- Create DAW templates with pre-mapped channels
Warning: Never connect more than 3 USB-MIDI devices to one hub port. Exceeding 500mA power draw causes intermittent disconnects.
Final Verification: The 90-Second Functionality Test
Don’t assume it’s working—prove it with this diagnostic:
1. Open MIDI-OX (Windows) or MIDI Monitor (Mac)
2. Press middle C—note number 60 should display
3. Play hard/soft—velocity 1-127 must change
4. Wiggle pitch wheel—controller #1 should scroll
5. Press sustain pedal—controller #64 must hit 127
If any test fails, revisit the USB driver steps. If all pass, your DAW is misconfigured—not your hardware.
Your MIDI keyboard should now respond instantly with zero latency. Start with USB connections for reliability, then explore Bluetooth for sketching ideas away from your desk. Remember: every Grammy-winning producer faced this exact hurdle. The technical phase is complete—now go create something amazing. Before you close this guide, bookmark the latency troubleshooting section; you’ll need it when adding your first VST plugin. The only thing left to fix is writer’s block.