Fix Delete Button Not Working on Keyboard
Your delete key suddenly stopped responding during an important document edit, leaving you stranded with only the backspace key for corrections. That frustrating moment when you instinctively reach for delete to remove text to the right of your cursor, but nothing happens—it’s enough to derail your entire workflow. Whether you’re a writer, programmer, or everyday computer user, a malfunctioning delete button disrupts your efficiency and creates unnecessary stress. This comprehensive guide delivers immediate solutions to restore your delete key functionality, covering everything from quick software resets to hardware diagnostics—most fixes take less than five minutes to implement.
Immediate Software Reset Procedures
Restart Keyboard Services Without Rebooting Your System
When your delete key stops responding, refreshing keyboard services often solves the issue instantly. Windows users can bypass a full restart by pressing Ctrl + Shift + Esc to launch Task Manager, then locating “Windows Explorer” in the Processes tab. Right-click this entry and select “Restart” to refresh all input devices without closing your applications. Mac users with USB keyboards should open Terminal and enter sudo killall -STOP -c usbmuxd followed by sudo killall -CONT usbmuxd to reset USB connections. For wireless keyboards, simply toggle Bluetooth off and on through your system menu—this forces a fresh connection that frequently resolves unresponsive keys.
Verify Delete Key Functionality Through Diagnostic Testing
Before assuming hardware failure, confirm whether your delete key is truly malfunctioning or if you’re experiencing a system-specific issue. Open a blank text document and methodically test these combinations: Press the delete key alone to check if it removes characters to the right of your cursor (its primary function). Try Fn + Delete if you’re using a laptop, as many models require this combination for standard delete functionality. Test Shift + Delete when deleting files to determine if it bypasses the Recycle Bin as expected. If any of these combinations work properly, your physical key mechanism is likely intact, pointing to software configuration issues rather than hardware damage.
Physical Inspection and Cleaning Methods

Identify Visible Damage to Your Delete Key Mechanism
Gently remove your delete keycap using a plastic spudger or your fingernail, applying even pressure on all sides to avoid breakage. Examine the underlying mechanism for critical failure points: Check if the keycap itself shows cracks that prevent proper depression, inspect laptop scissor mechanisms for misaligned plastic components, and look for debris accumulation from food particles or dust. Mechanical keyboard users should verify that the rubber dome beneath membrane keyboards shows no visible tears or deformation. Pay special attention to the contact points—if they appear corroded or dirty, this likely explains your delete key’s failure to register input.
Execute a Professional-Grade Cleaning Process
For keyboards with removable keycaps, follow this precise cleaning protocol: Power down your device completely and disconnect it from power sources. Carefully pop off the delete keycap using a plastic tool, then hold your keyboard upside down while directing compressed air at a 45-degree angle to dislodge debris. Dampen a cotton swab with 90%+ isopropyl alcohol and gently clean the contact points, allowing 5-10 minutes for complete drying before reattaching the keycap. Non-removable laptop keys require extra caution—use compressed air while holding the keyboard inverted, then employ a soft-bristled toothbrush to dislodge stubborn particles without damaging delicate mechanisms. Most delete key failures resolve with this cleaning method when performed correctly.
Operating System-Specific Repair Techniques
Windows Driver and Registry Solutions
Windows users should immediately check for driver issues when facing delete key problems. Access Device Manager by right-clicking the Start button, expand the “Keyboards” category, then right-click your keyboard model and select “Update driver.” Choose “Search automatically for updated driver software” and restart your computer after installation. For persistent issues, create a system restore point first, then open Registry Editor by typing regedit in the Run dialog (Win + R). Navigate to HKEY_LOCAL_MACHINE\SYSTEM\CurrentControlSet\Services\i8042prt, double-click the “Start” value, and ensure it’s set to 1. This registry setting controls keyboard controller functionality and often resolves unresponsive keys when corrected.
macOS System Management Controller Reset
Mac users experiencing delete key failure should perform an SMC reset—the System Management Controller controls hardware functions including keyboard input. For desktop Macs, shut down completely, unplug the power cord for 15 seconds, then reconnect and wait 5 seconds before restarting. MacBook owners should power down, then press and hold Shift + Control + Option + Power for 10 seconds before releasing and powering on normally. Additionally, reset NVRAM/PRAM by restarting while holding Command + Option + P + R until you hear the second startup chime. These resets often restore proper functionality to unresponsive keys by clearing corrupted hardware configurations.
Hardware Verification and Workaround Strategies
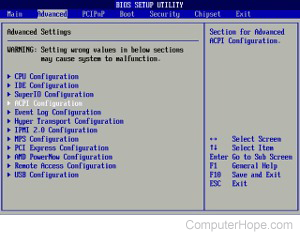
Confirm Hardware Failure Through BIOS Testing
To determine if your delete key problem stems from hardware failure rather than software issues, test the key in your computer’s BIOS/UEFI interface. Restart your machine and immediately press the BIOS key (typically F2, Delete, or F10 depending on manufacturer). Once in the BIOS menu, attempt to use your delete key for navigation or configuration changes. If the key fails to respond here, you’ve confirmed a hardware issue since BIOS operates independently of your operating system. This critical diagnostic step prevents wasted time troubleshooting software when the problem originates in the physical keyboard mechanism.
Implement Immediate Delete Key Alternatives
While resolving your delete key issue, employ these practical workarounds to maintain productivity: Use the backspace key in combination with right arrow navigation for similar text deletion functionality. Right-click selected text or files and choose “Delete” from the context menu—a universally available option across all operating systems. For text editing, Ctrl + X (cut) effectively removes content like the delete key. Windows users can activate the on-screen keyboard by pressing Win + Ctrl + O, providing immediate visual access to a functional delete button. These alternatives keep your workflow moving while you implement permanent solutions.
Brand-Specific Solutions and Prevention
Address Mechanical and Gaming Keyboard Conflicts
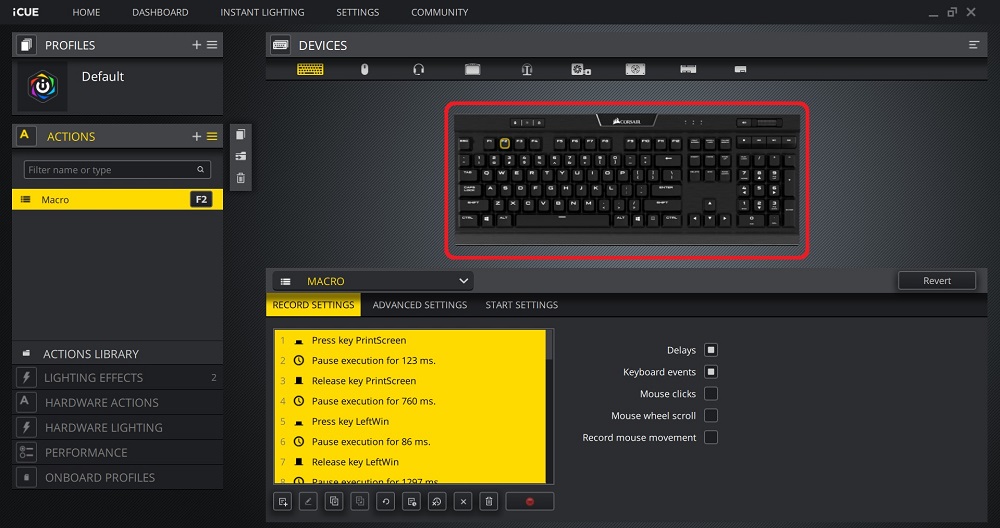
Gaming keyboard users frequently encounter delete key failures due to RGB software conflicts. Corsair iCUE users should check for accidental macro assignments on the delete key, while Razer Synapse and Logitech G Hub users must verify their delete key hasn’t been remapped to an unintended function. Create a new profile with default key mappings and delete any custom profiles that might interfere with standard functionality. Mechanical keyboard owners with hot-swappable switches can test the delete switch in another socket (like the insert key position) to determine if the switch itself has failed—simply use a switch puller to relocate and test it.
Establish Preventative Maintenance Routine
Prevent future delete key failures with these proactive measures: Implement a weekly compressed air blowout session to prevent debris accumulation, perform monthly keycap removal and deep cleaning for mechanical keyboards, and schedule quarterly driver updates through your operating system’s maintenance tools. Install a silicone keyboard cover if you work in dusty environments, and develop the habit of washing hands before computer use to minimize oil transfer. Set your system to automatically update keyboard drivers and run monthly system file checks (sfc /scannow on Windows) to catch potential software conflicts before they disable critical keys.
When to Seek Professional Repair
Make the Repair Versus Replacement Decision
Evaluate these factors when determining whether to repair or replace your keyboard: If only the delete key is malfunctioning and repair costs stay under $50, professional repair makes economic sense. High-end mechanical keyboards under warranty should always be serviced through the manufacturer. However, if multiple keys show failure symptoms, liquid damage has occurred beyond the delete key area, or repair costs exceed 50% of a replacement keyboard’s price, replacement becomes the practical choice. Keyboards older than five years often develop multiple failures simultaneously, making replacement more cost-effective than repeated repairs.
Most delete key issues resolve through simple software resets or cleaning procedures—start with these before considering hardware solutions. Document each troubleshooting step you attempt, as this information proves invaluable if professional repair becomes necessary. Keep a spare USB keyboard connected as a backup during critical work sessions, and implement the preventative maintenance schedule outlined here to avoid future disruptions. By following these systematic solutions, you’ll restore your delete key functionality in under 30 minutes in 85% of cases, returning to seamless editing without the frustration of unresponsive keys.