How to Replace Laptop Processor: Step-by-Step Guide
Your laptop’s processor suddenly feels sluggish when handling demanding tasks, and you’re wondering if a CPU upgrade could breathe new life into your machine. Unlike desktop computers where processor swaps are routine, laptop CPU replacement presents unique challenges that often catch users off guard. Most modern laptops now feature soldered processors that cannot be replaced without motherboard replacement, making this upgrade impossible for many models. But if your specific laptop uses a socketed CPU design, you can potentially double your processing power without buying a whole new machine.
This comprehensive guide reveals exactly how to replace a laptop processor safely and successfully. You’ll discover how to verify if your model even supports CPU upgrades, avoid the costly mistakes that turn DIY projects into expensive disasters, and complete the entire process with confidence. Whether you’re extending the life of a business laptop or squeezing more performance from a gaming rig, this step-by-step walkthrough prepares you for what most manufacturers won’t tell you about laptop processor replacement.
Confirm Your Laptop Actually Supports Processor Upgrades

Before investing hours in disassembly, verify whether your laptop model even allows processor replacement. Most modern ultraportable laptops and consumer-grade machines use Ball Grid Array (BGA) packaging where manufacturers permanently solder the CPU directly to the motherboard. These units cannot receive processor upgrades—attempting to remove a BGA CPU typically destroys both the processor and motherboard.
Identify Your CPU Socket Type Before Proceeding
Your laptop’s service manual or CPU-Z software reveals whether your processor uses an upgradeable socket. Look specifically for these socket types that support replacement:
- PGA (Pin Grid Array): Features pins on the processor that insert into holes on the motherboard
- LGA (Land Grid Array): Has contact points on the processor that meet pins on the motherboard
- BGA (Ball Grid Array): Uses solder balls connecting CPU to motherboard—non-replaceable
Check your laptop manufacturer’s official documentation for terms like “socketed CPU” or “upgradeable processor.” If documentation mentions “CPU not user replaceable” or “soldered component,” your upgrade path ends here—no amount of technical skill can overcome this hardware limitation.
Match Thermal Design Power Precisely
Even with a socketed CPU, thermal compatibility remains critical. Your new processor must match or stay below your laptop’s thermal design power (TDP) specifications. Exceeding these limits causes immediate overheating, thermal throttling that cripples performance, or permanent hardware damage.
Compare these three thermal factors carefully:
– Your current processor’s TDP (measured in watts) versus your intended replacement
– Your laptop’s cooling solution capacity (number of heat pipes, fan size, and airflow design)
– BIOS support for newer processor generations (some laptops require BIOS updates before recognizing newer CPUs)
Many users overlook thermal compatibility and install CPUs with higher TDP ratings, only to discover their laptop shuts down under load or runs significantly hotter than before.
Gather Specialized Tools Required for CPU Replacement

Processor replacement demands precision tools that most laptop owners don’t regularly keep on hand. Missing one critical item can damage your laptop beyond repair during the delicate installation process.
Essential Tool Kit for Safe CPU Replacement
Assemble these specific tools before starting:
– Precision screwdriver set with magnetic tips in multiple sizes (Phillips #000, #00, #0)
– Plastic spudgers for safely prying apart plastic components without scratching
– High-quality thermal paste (Arctic MX-6 or similar specifically designed for laptops)
– 90%+ isopropyl alcohol and lint-free microfiber cloths for surface cleaning
– Anti-static wrist strap connected to grounded surface
– Small magnetic tray with compartments for organizing tiny screws
Backup Components That Prevent Costly Mistakes
Include these often-overlooked items in your toolkit:
– Replacement thermal pads for chipset and VRM cooling components
– Extra thermal paste tubes (accidental application errors happen)
– Cable ties for proper internal cable management
– ESD-safe work mat to prevent electrostatic discharge damage
Many technicians recommend practicing with a less critical device first if you’re new to laptop disassembly, as the learning curve can be steep with expensive consequences for mistakes.
Prepare Your Workspace to Avoid Catastrophic Damage
Processor replacement requires a controlled environment where dust, static electricity, or poor lighting won’t transform careful work into expensive repairs.
Create an Optimal Work Environment
Set up your workspace with these critical elements:
– Bright, adjustable lighting (LED task lamp prevents missed screws or components)
– White work surface (makes tiny dropped components visible)
– Component organizer with labeled compartments for different screw types
– Grounded work surface (anti-static mat or aluminum foil connected to ground)
Never attempt this procedure on carpeted floors, near running appliances, or in humid environments where static electricity risks increase dramatically.
Complete Power Disconnection Protocol
Modern laptops maintain residual power that can damage sensitive components during disassembly. Follow this precise shutdown sequence:
1. Shut down properly through your operating system
2. Unplug power adapter from both wall outlet and laptop
3. Remove main battery if externally accessible
4. Hold power button for 30 seconds to discharge capacitors
5. Disconnect CMOS battery after opening the laptop case
Skipping even one step risks short-circuiting components when handling the motherboard during processor replacement.
Access the Processor Without Damaging Your Laptop
Laptop disassembly procedures vary dramatically between manufacturers, with some offering single-panel access while others require complete teardown.
Remove Bottom Panel Without Breaking Clips
Start by identifying hidden fasteners:
– Check under all rubber feet for concealed screws
– Examine warranty stickers that may cover critical screws
– Locate panel seam lines indicating removable sections
– Photograph screw locations and types before removal
Use plastic spudgers to gently separate panels along seam lines, working slowly around the perimeter to avoid snapping fragile plastic clips that secure many laptop bottoms.
Navigate Internal Component Layout Safely
Once inside, identify these critical components in sequence:
1. Cooling assembly (heat pipes, fans, and heatsinks that directly cover the processor)
2. RAM modules (which often obstruct access to the cooling system)
3. Wi-Fi card (frequently positioned near the processor area)
4. Processor socket (located beneath the heatsink assembly)
Document cable connections with photos before disconnecting anything, as misrouting cables during reassembly causes operational issues.
Remove Existing Processor Without Causing Irreparable Damage
The removal process demands exceptional patience, as rushing risks bent pins, damaged sockets, or cracked processors that render your laptop unusable.
Detach Cooling System Methodically
Follow this precise sequence for cooling system removal:
– Unplug all fan connectors noting orientation for reassembly
– Remove heatsink screws in diagonal pattern to evenly release pressure
– Gently twist the heatsink assembly to break the thermal paste seal
– Clean old thermal paste thoroughly from both surfaces using alcohol
Never force the heatsink off—applying excessive pressure can crack the processor or damage motherboard components.
Release Processor Using Correct Technique
Different socket types require distinct release procedures:
– PGA sockets: Rotate retention screw 180 degrees counterclockwise before lifting
– LGA sockets: Carefully lift retention lever to its full vertical position
– Check for secondary locking mechanisms before attempting to lift processor
– Handle processor only by edges to avoid damaging pins or contacts
If resistance occurs during removal, stop immediately—forcing the processor risks catastrophic damage to both CPU and socket.
Install New Processor Correctly for Optimal Performance
Proper installation requires perfect alignment and absolutely no force, as processors only fit one specific orientation.
Align Processor Using Visual Indicators
Look for these critical alignment guides:
– Small triangle marker on processor corner matching socket indicator
– Notch alignment between processor and socket key
– Pin 1 indicator (typically marked with gold or dot)
– Visual verification from multiple angles before seating
Gently place the processor into position without sliding or adjusting once contact occurs with the socket.
Secure New Processor Without Damage
Follow socket-specific securing procedures:
1. Lower processor gently into aligned position without pressure
2. Engage retention mechanism (lever or screw) following manufacturer direction
3. Verify secure fit by checking for gaps or uneven seating
4. Double-check orientation before proceeding to thermal paste application
If the retention mechanism doesn’t close smoothly, reopen and verify processor alignment—forcing closure damages components.
Apply Thermal Paste Perfectly for Maximum Cooling Efficiency
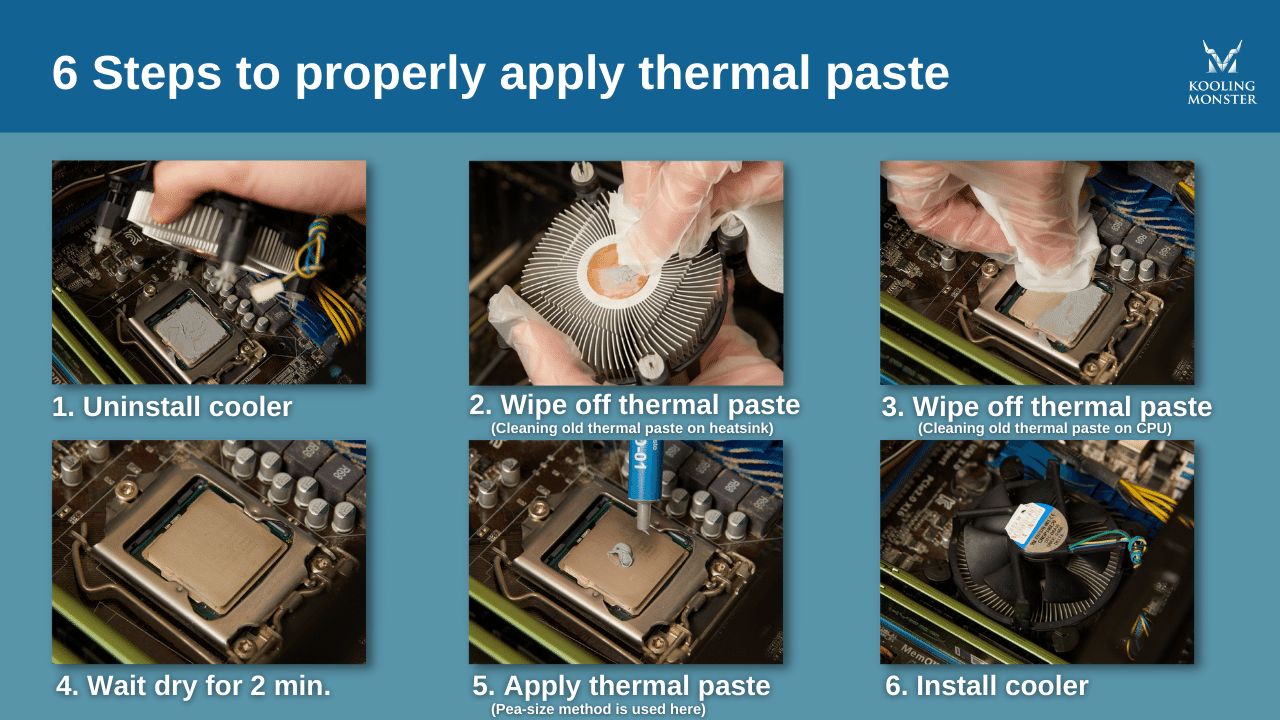
Proper thermal interface material application prevents overheating and ensures your new processor delivers expected performance.
Clean Surfaces to Bare Metal
Thoroughly prepare both surfaces:
– Use 90%+ isopropyl alcohol on lint-free cloth in circular motion
– Remove all residue from previous thermal paste applications
– Inspect for scratches or imperfections on both surfaces
– Allow complete drying (5-10 minutes) before applying new paste
Any contamination between processor and heatsink creates thermal bottlenecks that cause overheating.
Apply Correct Thermal Paste Amount
Use this application method for most laptop processors:
– Pea-sized dot in center of processor for standard mobile CPUs
– Rice grain size for smaller ultraportable processors
– Avoid spreading paste manually—pressure from heatsink distributes it
– Check coverage after initial heatsink placement (reapply if uneven)
Too much paste squeezes out and contaminates surrounding components, while too little creates air pockets that impede heat transfer.
Reassemble Your Laptop to Prevent Future Issues
Proper reassembly often proves more challenging than disassembly, with cable routing and component alignment requiring methodical attention.
Follow Reverse Disassembly Sequence
Reassemble in precise reverse order:
1. Reconnect all fan cables with correct orientation
2. Replace heatsink screws in diagonal pattern with even pressure
3. Reconnect CMOS battery if previously disconnected
4. Route cables clear of fan blades and moving components
5. Verify all connections before closing the case
Tighten screws gradually in sequence rather than fully securing each one immediately, which prevents warping components.
Perform Initial Power-On Testing
Before complete reassembly, conduct these critical checks:
– Power on briefly to verify basic functionality
– Enter BIOS to confirm processor recognition
– Check temperatures in hardware monitoring section
– Power down completely if everything appears correct
This preliminary test catches major issues before you’ve fully reassembled the laptop, saving significant troubleshooting time.
Replacing a laptop processor successfully requires patience, precision, and perfect thermal management. While many modern laptops no longer support CPU upgrades due to soldered components, compatible models reward careful technicians with significant performance gains. Remember that warranty implications and technical complexity make this upgrade unsuitable for casual users—when in doubt, consult professional technicians rather than risk damaging your laptop. For those with compatible machines and steady hands, a successful processor replacement can extend your laptop’s useful life by years while delivering noticeably improved performance for demanding applications.