How to Rotate Dell Laptop Screen in Windows 11
Your Dell laptop’s screen suddenly flips upside down during a crucial video call. Or maybe you’re trying to read a lengthy PDF in portrait mode but can’t figure out how to rotate your XPS 13 display. Whatever your scenario, mastering screen rotation on your Dell Windows 11 device solves these frustrations in seconds—and this guide reveals every reliable method specific to your Dell model.
Whether you own an Inspiron 15, Latitude 9430, or premium XPS 17, you’ll discover the fastest way to rotate your display using built-in Windows features, Intel graphics shortcuts, and specialized 2-in-1 controls. Most Dell owners don’t realize their laptop has multiple rotation methods depending on model and graphics configuration—this guide cuts through the confusion with actionable steps that work immediately.
Rotate Dell Screen Using Windows 11 Display Settings
Windows 11 provides the most universally compatible screen rotation method that works across all Dell laptop models. Right-click any empty space on your desktop and select Display settings from the context menu—this opens directly to your display configuration without navigating through multiple menus.
Locate the Display orientation dropdown near the top of the Settings window (below Scale & layout). This crucial menu offers four rotation options: Landscape (standard), Portrait (vertical with power button at top), Landscape (flipped), and Portrait (flipped). Select your preferred orientation and a 15-second preview appears showing the transformed display. Click Keep changes if satisfied, or wait for the countdown to automatically revert if the rotation doesn’t match your needs.
Critical tip: If the Display orientation dropdown appears grayed out, your Dell might be connected to an external monitor, or rotation lock could be active on convertible models. Disconnect all peripherals and check your laptop’s physical position before proceeding.
When Windows Rotation Controls Fail
Several common scenarios prevent Windows display settings from rotating your Dell screen:
- External display interference: Windows disables rotation controls when external monitors are connected
- Driver conflicts: Outdated display drivers often block orientation changes
- BIOS limitations: Some business-grade Dell models restrict rotation in BIOS settings
To bypass these issues, open Device Manager (press Windows + X), expand Display adapters, right-click your graphics device, and select Update driver. Choose “Search automatically for updated driver software” and follow prompts. After updating, restart your Dell laptop and retry the Display settings method.
Activate Intel Graphics Rotation Shortcuts on Dell Laptops
Most Dell laptops feature Intel integrated graphics with powerful keyboard shortcuts that rotate your screen instantly—no menus required. These hotkeys work whether you’re using an Inspiron 16 or premium XPS model, but require initial setup through Intel’s graphics utility.
Enable Intel Rotation Controls
Press Windows + Q, type “intel,” and open Intel Graphics Command Center. Navigate to System → Hotkeys and toggle the switch to On. Select Ctrl + Alt as your modifier keys (the recommended option), then close the application. These shortcuts override Windows settings, making them ideal for quick orientation changes during presentations or creative work.
Essential Intel Rotation Shortcuts
Once enabled, these keyboard combinations work system-wide:
– Ctrl + Alt + Up Arrow: Instantly returns to standard landscape view
– Ctrl + Alt + Right Arrow: Rotates 90° clockwise to portrait mode
– Ctrl + Alt + Down Arrow: Flips screen to upside-down landscape
– Ctrl + Alt + Left Arrow: Rotates 90° counterclockwise to portrait mode
Pro tip: If these shortcuts fail, your Dell might be using older Intel graphics requiring the classic Control Panel. Right-click desktop → Intel Graphics Settings → Options and Support → Hot Key Manager to configure rotation keys. Older Dell models like Inspiron 3000 series often use this legacy interface.
Control Auto-Rotation on Dell 2-in-1 Convertibles
Dell’s XPS 13 2-in-1, Inspiron 14 5000 series, and Latitude 9330 Detachable models automatically rotate based on physical position—just like smartphones. However, you’ll need manual control when the screen flips unexpectedly or won’t rotate when needed.
Four Ways to Toggle Rotation Lock
Keyboard shortcut: Press Windows + O to instantly lock or unlock screen rotation. This works whether you’re in laptop or tablet mode and provides immediate feedback through a brief notification.
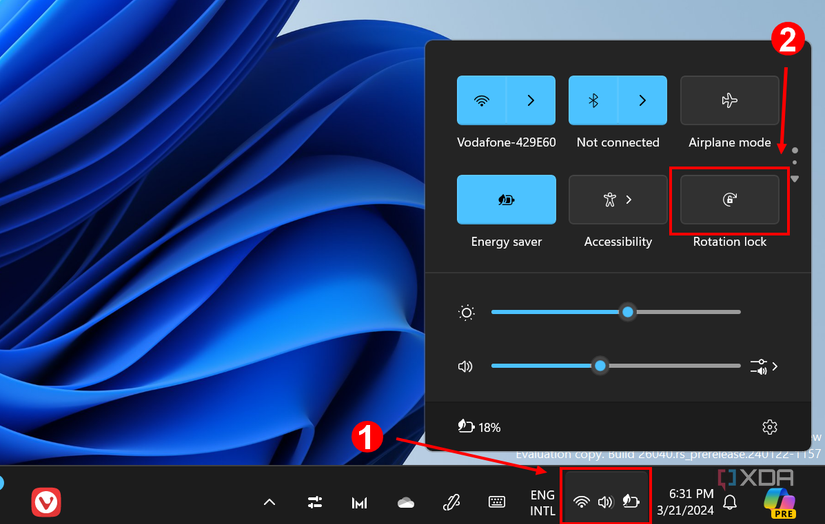
Quick Settings panel: Press Windows + A to open Quick Settings. The Rotation lock button shows current status—blue highlight means rotation is locked (disabled), gray means it’s unlocked (enabled). Click to toggle states.
Windows Settings: Navigate to Settings → System → Display. Find the Rotation lock toggle under Scale & layout for detailed visual feedback about current settings.
Registry modification: For persistent issues, download Dell’s registry files (TurnOFFscreenrotationlock.reg or TurnONscreenrotationlock.reg), double-click to apply, then sign out and back in. Warning: System updates may reset these changes.
Fix Grayed-Out Rotation Controls
When rotation options appear disabled on your Dell 2-in-1:
– Ensure your laptop is fully rotated past 180 degrees into tablet mode
– Disconnect any external keyboards (like Dell’s Premium Active Keyboard)
– Remove all USB peripherals and external displays
– Update sensor drivers via Device Manager → Sensors → right-click each entry
Solve Common Dell Screen Rotation Problems

Even with reliable Dell hardware, screen rotation occasionally fails. These targeted fixes resolve the most frequent issues without unnecessary steps.
Screen Stuck in Wrong Orientation
When Windows auto-revert fails and your Dell display remains upside down:
1. Press Ctrl + Alt + Up Arrow repeatedly until landscape view returns
2. If hotkeys don’t work, restart in Safe Mode (hold Shift while clicking Restart)
3. In Safe Mode, open Display settings and select Landscape orientation
4. After rebooting, update your Intel graphics drivers from Dell’s support site
Emergency tip: If you can’t see anything due to rotation, press Ctrl + Alt + Up Arrow 15 times rapidly—this often triggers the orientation cycle to return to normal.
Intel Hotkeys Not Responding
When Ctrl + Alt + Arrow shortcuts fail on your Dell:
– Re-enable hotkeys through Intel Graphics Command Center → System → Hotkeys
– Close applications like Photoshop or Zoom that might hijack keyboard inputs
– Download the latest Intel drivers specifically for your Dell model number
– Press Ctrl + Shift + Windows + B to restart the graphics driver instantly
Dell Model-Specific Rotation Capabilities

All Dell laptops support screen rotation, but implementation varies significantly by model series.
XPS Series: Premium XPS 13, 15, and 17 models feature seamless auto-rotation in tablet mode with precise sensor calibration. These models respond instantly to physical position changes and support all Intel graphics shortcuts.
Inspiron Convertibles: Inspiron 14 5000 and 7000 2-in-1s provide reliable auto-rotation but may require sensor calibration after Windows updates. Standard Inspiron models without 360-degree hinges rely solely on Windows settings and Intel shortcuts.
Latitude Business Laptops: Latitude 9430 and 7320 Detachable models include enterprise-grade rotation controls with BIOS-level configuration options. Business models often have rotation lock enabled by default for security.
Alienware & G Series: Gaming laptops support standard rotation methods but lack auto-rotation features. Use Windows settings or Intel graphics shortcuts exclusively on these performance-focused models.
External Monitor Rotation Considerations
Using your Dell laptop with external displays creates unique rotation challenges:
- Windows settings apply rotation individually to each display—click each monitor number in Display settings to configure separately
- Extended desktop mode enables independent rotation for your laptop screen and external monitor
- Duplicate display mode often disables rotation to maintain identical views across screens
- External monitors require their own orientation configuration through Windows settings
Pro tip: When connecting your Dell laptop to a vertical monitor, configure portrait orientation before connecting to avoid display confusion.
Prevent Future Dell Screen Rotation Issues
Keep your Dell’s rotation features functioning smoothly with these monthly maintenance steps:
Driver management:
– Run Dell SupportAssist to automatically update Intel graphics drivers
– Check Windows Update weekly for sensor driver improvements
– Create a system restore point before major driver updates
Rotation health check:
– Test all four orientations monthly to catch early issues
– Verify Intel hotkeys work after Windows feature updates
– Calibrate touchscreens using Windows’ built-in “Calibrate the screen for pen or touch input” tool
Emergency preparedness:
– Bookmark this guide for quick reference during rotation emergencies
– Save Dell’s registry files for rotation lock control
– Keep Intel Graphics Command Center shortcuts visible on your taskbar
Mastering screen rotation on your Dell Windows 11 laptop transforms how you work with documents, presentations, and creative projects. Whether you’re flipping to portrait mode for coding sessions, rotating for digital art creation, or fixing unexpected orientation issues, these model-specific methods ensure your display always matches your needs. Bookmark this guide—you’ll appreciate having these precise solutions when your Dell screen suddenly spins the wrong way during an important task. With these techniques, you’re never more than a few keystrokes away from perfect display orientation, no matter which Dell model you’re using.