How to Screenshot on HP EliteBook Windows 10
That critical error message just flashed on your screen, but you can’t capture it because your HP EliteBook’s keyboard layout doesn’t match standard screenshot instructions. You’re not alone—thousands of professionals struggle with this daily. The frustrating reality is HP EliteBook models vary significantly in keyboard design, making standard Windows 10 screenshot techniques unreliable without model-specific knowledge. This guide delivers precise, tested methods to capture your screen on any HP EliteBook running Windows 10, eliminating the guesswork that wastes your productivity.
Unlike consumer laptops, HP EliteBooks feature business-class keyboards where the Print Screen key placement differs dramatically between models. Discover exactly where to find your screenshot controls and which combinations actually work for your specific EliteBook series. Whether you’re documenting software issues, creating training materials, or saving crucial information, you’ll master every capture technique available—no third-party tools required.
Where to Find Screenshot Controls on EliteBook Keyboards

HP EliteBook keyboards present unique challenges for screenshot capture due to inconsistent key placement across models. Your ability to take screenshots depends entirely on identifying your specific keyboard layout before attempting any capture method.
800 Series Standard Layouts: On EliteBook 840 G5, 850 G6 and similar business-class models, locate the PrtScn key in the top row between F12 and Insert. This traditional placement follows standard keyboard conventions, making screenshot capture intuitive once you know where to look.
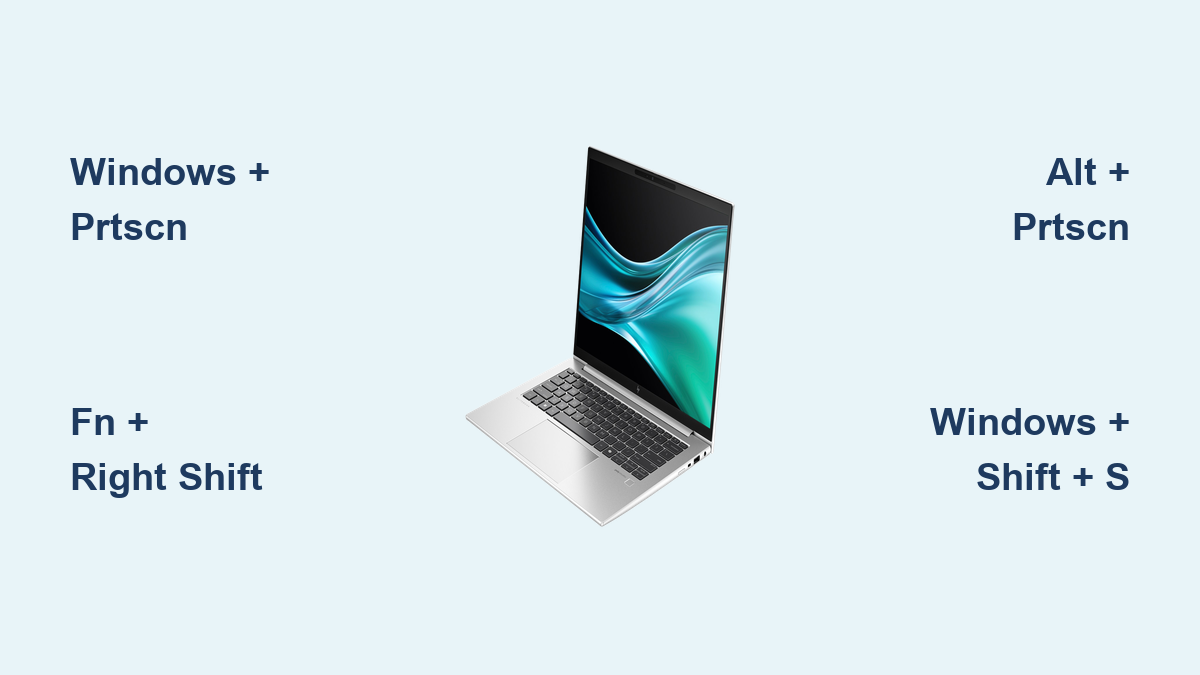
1000 Series Compact Designs: The ultra-slim EliteBook 1030 G7 and similar models eliminate the dedicated Print Screen key entirely. Instead, press Fn + Right Shift to trigger screenshot functionality—a non-intuitive combination that leaves most new users searching for the missing key.
ZBook Professional Workstations: HP’s premium ZBook Studio x360 G5 and similar mobile workstations adopt the 1030 series’ compact approach. You’ll need Fn + Right Shift or sometimes Fn + PrtScn to capture your screen, depending on your specific configuration.
Why EliteBook Keyboards Confuse Screenshot Capture
The inconsistent keyboard layouts directly impact your ability to use standard Windows screenshot shortcuts. Unlike consumer laptops that maintain consistent key placement, HP designs EliteBooks for specific professional use cases—meaning your 1030 series won’t function like your colleague’s 840 model. This variation explains why generic “how to screenshot on Windows” guides fail business users daily.
Full Screen Capture That Actually Works
Windows + PrtScn Auto-Save Method
This technique bypasses clipboard limitations and delivers instant file creation:
- Press Windows key + PrtScn simultaneously
- Watch for the screen dim—this visual confirmation means your capture succeeded
- Open File Explorer and navigate to Pictures > Screenshots
- Find your new PNG file with automatic sequential naming (Screenshot (1).png)
Critical note: This method fails on EliteBook 1030 series due to missing PrtScn key functionality. Use Windows + Fn + Right Shift instead for auto-saving on compact models.
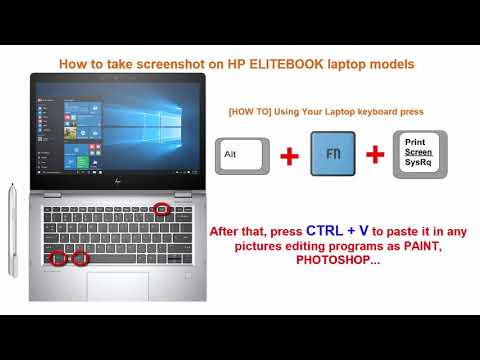
Traditional Print Screen Copy Process
When auto-save isn’t available or you need immediate clipboard access:
- Press PrtScn (or Fn + Right Shift on 1030 series)
- Open Paint by typing “Paint” in the Windows search bar
- Press Ctrl + V to paste your screenshot
- Save as PNG for maximum quality retention
This approach gives you complete control over file naming and storage location—essential when organizing documentation for clients or IT support tickets.
Precision Capture for Active Windows
Alt + PrtScn Professional Technique
Eliminate desktop clutter by capturing only your active window:
- Click anywhere inside the window you need to capture
- Press Alt + PrtScn (add Fn for 1030 series models)
- Paste directly into email, documentation, or image editor with Ctrl + V
- Save immediately since clipboard contents overwrite with new captures
Why this matters: This technique excels for software documentation and technical support. The resulting image includes window borders and title bars, providing crucial context that full-screen captures often obscure.
Snip & Sketch: EliteBook’s Most Powerful Tool
Windows + Shift + S Precision Capture
Windows 10’s built-in Snip & Sketch tool offers professional-grade control perfect for business use:
- Press Windows key + Shift + S
-
Select from four capture modes:
– Rectangular Snip: Drag around specific content for precise documentation
– Freeform Snip: Outline irregular shapes like handwritten notes
– Window Snip: Click any open window for perfect edge capture
– Fullscreen Snip: Capture everything visible without keyboard access -
Click the notification that appears to open your capture in the editor
- Apply professional annotations before saving
Essential Annotation Features for Business Use
Once in Snip & Sketch, enhance your screenshots with these productivity-boosting tools:
- Pen tool: Draw attention to specific UI elements with colored arrows
- Highlighter: Mark important text fields or error messages
- Ruler: Create straight lines for professional diagrams and flowcharts
- Crop tool: Remove sensitive information before sharing
- Eraser: Correct annotation mistakes without restarting
Pro tip: Use the ruler tool (press R) to create perfectly straight lines when documenting processes—this subtle touch makes your documentation look professionally produced.
Model-Specific EliteBook Shortcuts That Work
1030 Series Keyboard Workarounds
The compact EliteBook 1030 requires these specific combinations:
- Fn + Right Shift: Replaces traditional PrtScn function
- Fn + Alt + Right Shift: Captures only the active window
- Windows + Fn + Right Shift: Auto-saves full screen captures
Time-saving insight: Remap these shortcuts using Microsoft PowerToys to use standard Windows screenshot keys—this eliminates the awkward finger positioning required by HP’s default configuration.
ZBook Professional Models
ZBook Studio x360 G5 and similar workstations require similar adaptations:
- Fn + Right Shift: Primary screenshot trigger
- Fn + PrtScn: Alternative combination when Right Shift feels unnatural
- Test both methods during your first capture session to determine your preferred muscle memory
Fix EliteBook Screenshot Failures Immediately
Print Screen Key Not Responding
When your screenshot keys fail:
- Toggle Fn Lock: Press Fn + Esc to switch function key behavior
- Update keyboard drivers: Open Device Manager > Keyboards > Update Driver
- Restart Windows Explorer: Right-click taskbar > Task Manager > Restart Explorer
- Test alternative methods: Try Snip & Sketch before assuming hardware failure
Screenshots Won’t Save to Folder
Auto-save failures typically indicate folder permission issues:
- Verify folder existence: Navigate to Pictures > Screenshots
- Reset folder permissions: Right-click Screenshots > Properties > Security > Edit
- Clear existing captures: Delete old files if storage space is low
- Restore default location: Right-click Screenshots > Properties > Location > Restore Default
Warning: Never store sensitive screenshots in the default Screenshots folder—move them to encrypted storage immediately after capture.
Professional Workflow Integration
Streamlined Support Documentation
Create perfect IT tickets in seconds:
- Press Windows + Shift + S to capture the error message
- Annotate the problematic area using Snip & Sketch
- Paste directly into your ticket system with Ctrl + V
- No file attachments needed—images embed automatically
Presentation-Ready Visuals
Build polished client materials efficiently:
- Use Windows + PrtScn for full-screen application captures
- Open in Paint for quick cropping of unnecessary elements
- Save as high-quality PNG to maintain text clarity
- Insert directly into PowerPoint without quality loss
Pro tip: When capturing dark mode interfaces, temporarily switch to light mode for better readability in printed materials—this simple adjustment prevents text from disappearing in grayscale documents.
Storage and Organization Best Practices
Custom Folder Setup for Business Use
Move beyond Windows’ default organization:
- Create dedicated project folders instead of using Screenshots
- Implement consistent naming: “ClientName-ProcessStep-Date.png”
- Set up cloud sync for team access to critical documentation
- Apply retention policies to automatically archive old captures
Quick Reference Shortcut Guide
| EliteBook Model | Full Screen | Active Window | Auto-Save |
|---|---|---|---|
| 840 G5/G6 | PrtScn | Alt + PrtScn | Windows + PrtScn |
| 1030 G7 | Fn + Right Shift | Fn + Alt + Right Shift | Windows + Fn + Right Shift |
| ZBook Studio | Fn + Right Shift | Fn + Alt + Right Shift | Windows + Fn + Right Shift |
Master these HP EliteBook screenshot techniques by practicing one method daily until it becomes second nature. Start with Windows + PrtScn for quick captures, then incorporate Windows + Shift + S for precision work when documenting complex processes. Your EliteBook’s built-in Windows 10 screenshot capabilities rival professional capture software—no additional downloads required once you understand your specific model’s keyboard configuration. Remember, the right screenshot method saves critical time during technical support incidents and client documentation, making it one of the most valuable productivity skills for any HP EliteBook professional.