How to Turn Off Projection on Laptop
You’re wrapping up a critical presentation when you need to quickly disconnect from the projector. The boardroom is waiting, your laptop is still connected, and you need to turn off projection immediately without confusing the audience. Whether you’re ending a meeting, switching to private work, or troubleshooting display issues, knowing how to instantly disable external projection is essential for any Windows laptop user.
This guide delivers every proven method to turn off projection on your Windows laptop—no fluff, just actionable steps that work. You’ll learn not only the fastest keyboard shortcuts but also how to navigate display settings when hotkeys fail, plus troubleshooting tips when your laptop refuses to disconnect from external displays. By the end, you’ll confidently manage projection modes in any situation.
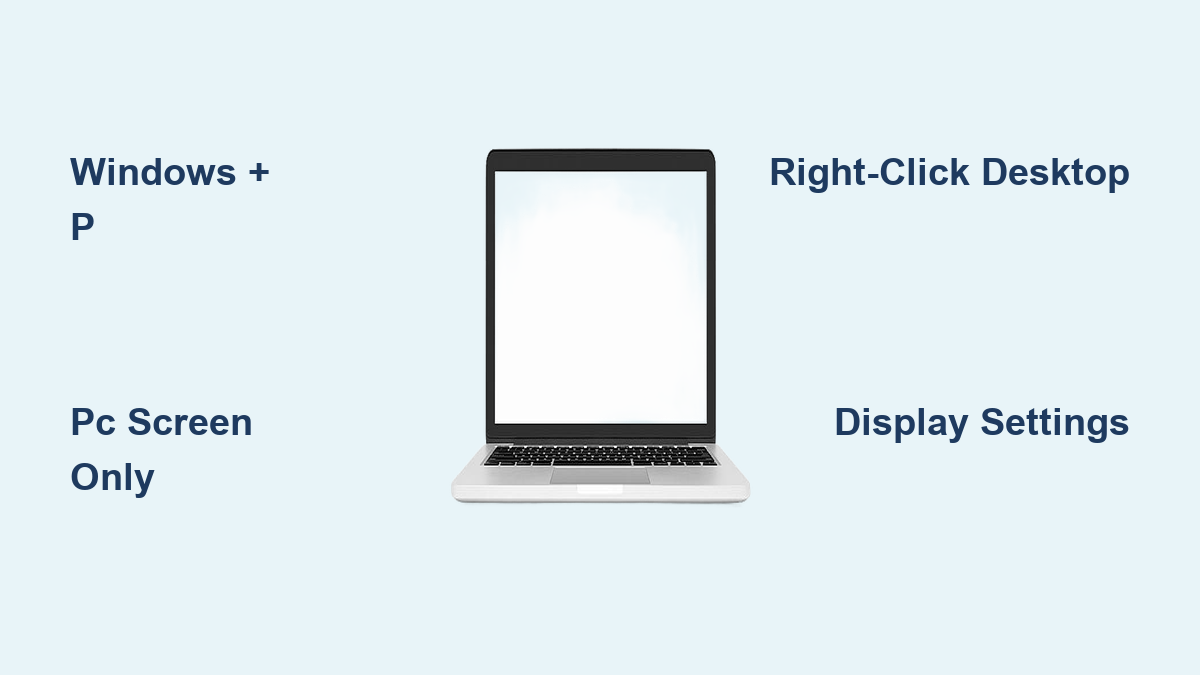
Disable Projection Instantly with Windows + P Shortcut
Press Windows Key + P Together
Stop fumbling with menus—this two-key combination works in seconds regardless of what program you’re using. Hold down the Windows key (located between Ctrl and Alt) and tap P once. The projection menu appears instantly as a semi-transparent overlay on your screen, showing all four display options without interrupting your workflow.
This shortcut functions the same across Windows 7, 8, 10, and 11, making it the universal solution for turning off projection. If your keyboard has a dedicated Windows key with the Windows logo, that’s the one to use—some external keyboards place it in different locations, so familiarize yourself with its position before your next presentation.
Choose PC Screen Only Mode
Once the projection menu appears, you’ll see four distinct options arranged horizontally. Use your right arrow key to navigate to “PC screen only” (the first option) or click it directly with your mouse. This selection immediately terminates the connection to your external display while keeping your laptop screen fully functional.
Pro tip: If you accidentally select the wrong option, simply press Windows + P again to reopen the menu without closing your current applications. No need to panic—recovery takes just seconds even during high-pressure presentations.
Verify Successful Disconnection
After selecting PC screen only, watch for visual confirmation signs. Your laptop screen may flicker briefly for 1-2 seconds as Windows reconfigures the display output. Within 5-10 seconds, the external projector or monitor will display “No Signal” or enter power-saving mode, often indicated by an orange standby light.
If the external display remains active, wait up to 15 seconds—some projectors take longer to recognize signal loss. Your laptop has likely already disconnected; the external display just needs time to process the change. Never physically unplug cables before completing this transition to avoid potential display corruption.
Navigate Display Settings When Hotkeys Fail
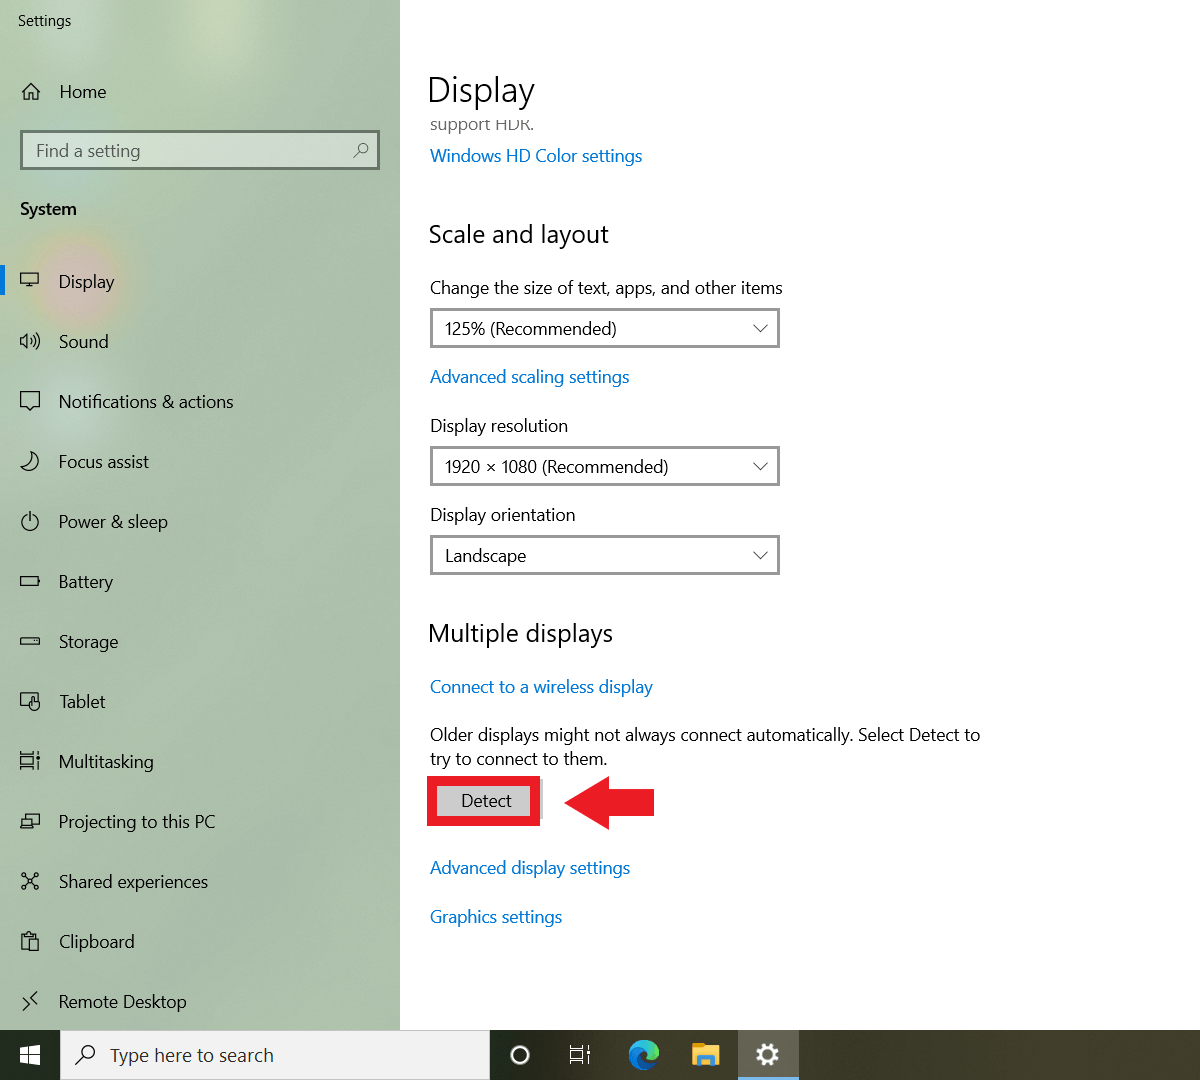
Access Display Settings via Desktop Right-Click
When your Windows + P shortcut isn’t responding, bypass the issue through Windows’ visual interface. Right-click on any blank area of your desktop background—be careful not to click on icons or open windows, as this won’t trigger the correct menu. From the context menu that appears, select “Display settings” (Windows 10/11) or “Screen resolution” (Windows 7/8).
This method works even when your external display isn’t properly detected, giving you manual control over your projection settings. If you’re using a touchpad, perform a two-finger tap instead of a physical right-click to access the same menu.
Confirm Which Display Is Which
The display settings window shows numbered rectangles representing each connected screen. Typically, Screen 1 is your laptop’s built-in display while Screen 2 represents the external projector or monitor. Click the “Identify” button to display large numbers (1 or 2) on each physical screen, eliminating confusion about which display corresponds to which number.
If your external display isn’t showing in the settings window, click “Detect” to force Windows to search for connected displays. Some projectors require this manual detection step, especially when waking from sleep mode or after driver updates.
Select Exclusive Laptop Display Mode
In the “Multiple displays” dropdown menu, locate and select “Show desktop only on 1” to completely disable projection to external displays. This crucial selection ensures all content appears exclusively on your laptop screen. After making this change, click “Apply” to confirm, then “Keep changes” when Windows asks if you want to maintain the new configuration.
Warning: Selecting “Show desktop only on 2” does the opposite of turning off projection—it turns off your laptop screen while keeping the external display active. Double-check this setting to avoid accidentally disabling your primary workspace.
Troubleshoot When Laptop Won’t Stop Projecting
Fix Non-Responsive External Displays
When your laptop screen shows “PC screen only” but the projector remains active, physical connection issues are likely the culprit. First, ensure cables are firmly seated at both ends—HDMI, VGA, and DisplayPort connections can become loose during presentations. Gently wiggle the connector to confirm it’s fully inserted without damaging the port.
Some classroom and conference room projectors have built-in signal memory that retains the last image for several minutes. This isn’t a laptop problem—simply wait 30-60 seconds for the projector to recognize the signal loss. If the image persists, manually switch the projector’s input source using its remote control.
Resolve Unresponsive Windows + P Shortcut
If pressing Windows + P does nothing, outdated graphics drivers are the most common cause. Access Device Manager by typing “devmgmt.msc” in the Windows search bar, then expand “Display adapters.” Right-click your graphics card and select “Update driver” to install the latest version from Windows Update.
For institutional settings like university classrooms, contact technical support at 510-643-8637—they often manage specialized projector systems that require specific connection protocols. Never force-restart your laptop while connected to institutional projectors, as this can trigger security locks.
Handle Display Detection Failures
When Windows fails to recognize your external display entirely, follow this sequence: disconnect all cables, restart your laptop, then reconnect the external display while Windows is fully booted. This “cold start” process often resolves detection issues by allowing Windows to properly initialize the display connection.
If problems persist, try a different cable or port on your laptop—faulty HDMI ports are common on frequently used business laptops. Most modern laptops have multiple video output options (USB-C, HDMI, Mini DisplayPort), so switching ports can bypass hardware-specific issues.
Optimize Your Projection Workflow

Understand Response Time Variables
While most laptops complete the projection disable process in 5-10 seconds, several factors affect transition speed. High-end laptops with dedicated NVIDIA or AMD graphics cards typically respond in 2-3 seconds, while older models with integrated Intel graphics may take up to 15 seconds, especially when running graphics-intensive applications.
Close resource-heavy programs like video editors or 3D modeling software before changing projection modes—background applications consuming significant GPU resources can dramatically slow the transition process. For critical presentations, test your projection shutdown sequence beforehand to anticipate timing.
Implement Connection Best Practices
Always connect cables before powering on external displays to ensure proper device handshake. When disconnecting after a presentation, follow this sequence: select “PC screen only” via Windows + P, wait for visual confirmation, then physically unplug cables. This prevents potential display corruption that can occur when disconnecting while Windows still thinks the external display is active.
Invest in high-quality cables with secure locking mechanisms—cheap HDMI cables often have loose connections that cause intermittent projection issues. For frequent presenters, consider a portable HDMI switch that lets you quickly toggle between multiple display setups without reconfiguring settings each time.
Maintain Driver Health Proactively
Schedule quarterly graphics driver updates through Windows Update or your laptop manufacturer’s support website. Outdated drivers cause 70% of persistent projection issues according to enterprise IT reports. Enable automatic driver updates in Windows Settings > Windows Update > Advanced options to maintain compatibility.
When troubleshooting projection problems, always update drivers before attempting more complex solutions. Most modern laptops automatically install basic display drivers through Windows Update, but manufacturer-specific drivers often include critical display management enhancements.
Quick Reference: For immediate projection shutdown, press Windows + P and select PC screen only. If this fails, right-click desktop > Display settings > Multiple displays > Show desktop only on 1. When external displays remain active, check physical connections and wait 15 seconds for signal recognition. Master these techniques to seamlessly transition between presentation and private work modes—no more awkward moments struggling with display settings while your audience waits.