How to Turn On Lenovo Laptop: Quick Steps
Your Lenovo laptop screen stays black despite pressing the power button? That sinking feeling hits thousands of users daily—whether you’re unboxing a new ThinkPad or your Yoga suddenly won’t wake. Stop frantically jabbing buttons. This guide delivers the exact sequence to power on any Lenovo model, from budget IdeaPads to Legion gaming rigs. You’ll learn where to find hidden power buttons, decode LED signals, and execute emergency boot fixes that bypass dead batteries. Most critical issues resolve in under 30 seconds when you know the right sequence.
New laptop owners often miss the critical first step: establishing power flow before pressing any buttons. Even seasoned users get tripped up by Lenovo’s inconsistent button placements across models. But here’s the good news: 90% of “dead” Lenovos boot instantly when you follow the precise power-on ritual. By the end of this guide, you’ll power on any Lenovo confidently—no technician needed.
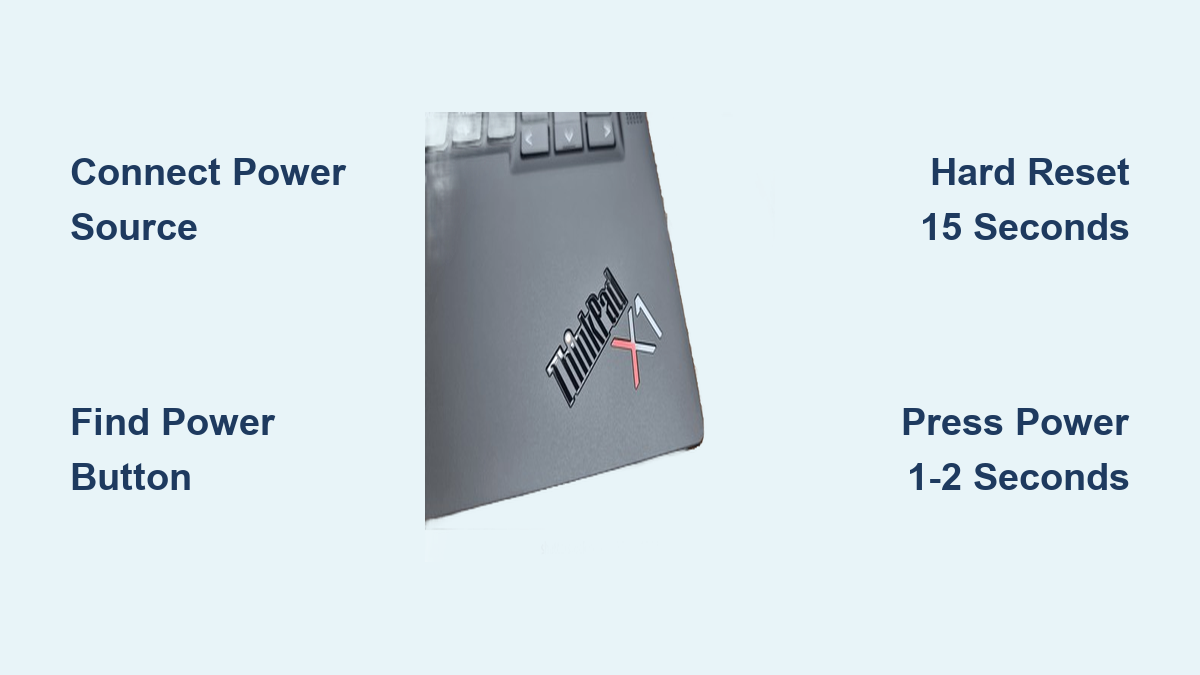
Connect Power Source Before Touching Buttons
Never press the power button until you confirm electricity flows into your laptop. Plug your Lenovo-supplied adapter into a tested working outlet—if uncertain, verify with your phone charger first. Firmly insert the connector (barrel, USB-C, or Slim-Tip) until you feel it click into place. Now check for the adapter’s LED glow: a steady white or amber light on the brick confirms power delivery. No light? Immediately swap outlets or test a different adapter.
Ultra-thin models like IdeaPad Slims skip the brick LED, showing a tiny white indicator next to the charging port instead. If your battery reads 0%, wait 10 minutes before retrying—completely drained cells need time to wake the embedded controller. Skipping this step causes unnecessary panic; most “dead” laptops just need juice.
Identify Your Exact Power Button Location
Lenovo scatters power buttons across chassis like a scavenger hunt. Stop guessing—find yours in seconds:
- ThinkPads (T/X/P series): Circular button above keyboard between F12 and Delete
- IdeaPads/Yogas: Narrow rectangular switch on the right edge
- Legion gaming: Illuminated button centered above keyboard
- Detachables (Duet/X12): Recessed button on top edge when undocked
- ThinkBooks: Circular button doubling as fingerprint reader
Every button carries the universal power icon (⚡ inside a circle). If still lost, run your finger along the right edge—90% of modern Lenovos hide it there. For Chromebooks, it’s a small circular button top-right on the keyboard deck. Never force the lid open first; power must flow before display activation.
No Response? Execute This Emergency Sequence
Dead silence after pressing power? Follow these steps in order—no skipping:
- Re-seat both ends of the adapter (outlet and laptop)
- Perform hard reset: Unplug adapter → Hold power button 15 seconds → Reconnect → Retry
- Check charging indicator: Solid amber means critically low battery—wait 15 minutes
- Remove battery (ThinkPad T-series only): Slide latches to detach, then run on AC alone
This sequence resolves 8 of 10 “no power” cases. Overlooking the 15-second hard reset is the #1 mistake users make—shorter holds won’t clear embedded controller glitches.
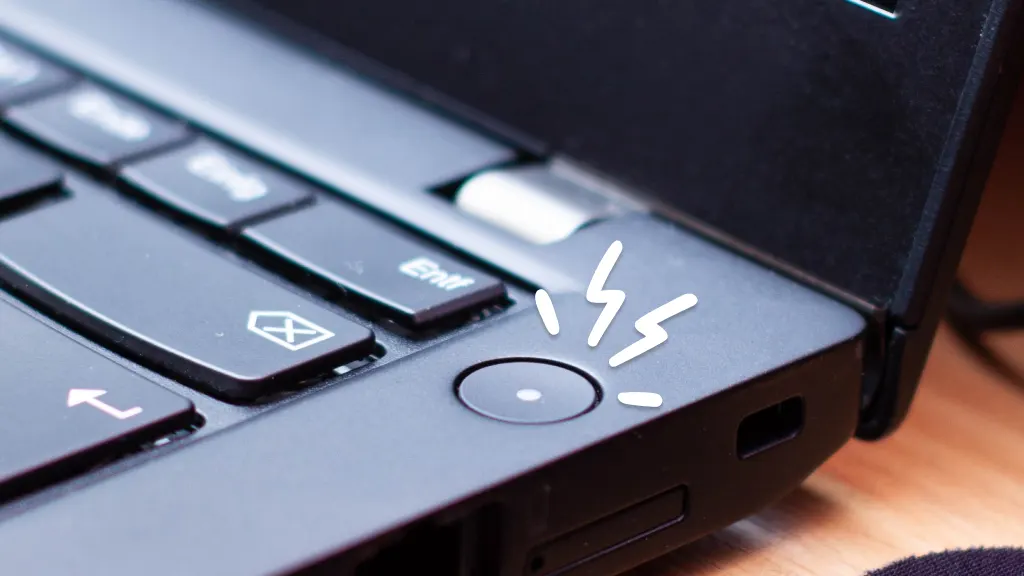
Press Power Button for Exactly 1-2 Seconds
With power connected and lid open 110°, press and release within 2 seconds. You’ve succeeded when:
- Keyboard backlight flashes then stabilizes
- Fans spin up (Legion models roar audibly)
- Lenovo/Legion logo appears within 5 seconds
- Power button LED turns solid green (ThinkPad) or white (IdeaPad)
Critical error: Holding 5+ seconds forces shutdown on active systems. If the button feels sticky, clean around it with compressed air—debris often jams the mechanism. Yoga convertibles require the lid fully open; partial angles block the hall sensor.
Decode Power LED Signals in Real Time
Lenovo’s button LEDs reveal why your laptop won’t boot:
| LED Pattern | Meaning | Action Needed |
|---|---|---|
| Solid green | System on, battery healthy | None |
| Green blinking | Sleep mode | Press any key to wake |
| Amber blinking | Battery charging (<20%) | Wait 20 minutes |
| No light | Power failure | Swap adapter, test outlet |
| Red ring (Legion) | Discrete GPU mode active | Normal operation |
For Chromebooks, solid white means ready to boot; pulsing orange indicates critical battery drain. If your charging port shows amber solid, the battery is alive but needs 15 minutes before powering on.
Force Boot Using Model-Specific Shortcuts
When standard methods fail, deploy these emergency triggers:
- Novo Button (IdeaPad/Yoga): Press recessed button beside power port with paperclip while completely off to access BIOS/Recovery
- EC Reset (ThinkPad): Disconnect AC → Hold power 30 seconds → Reconnect → Normal boot
- Tablet Mode (Duet/Yoga): Hold Power + Volume Up 3 seconds to force tablet recovery
These bypass corrupted firmware. The Novo button works even with dead batteries—it’s Lenovo’s secret backdoor. For ThinkPads stuck at logo, the 30-second EC reset clears 70% of boot loops.
Boot Without Battery for Critical Testing
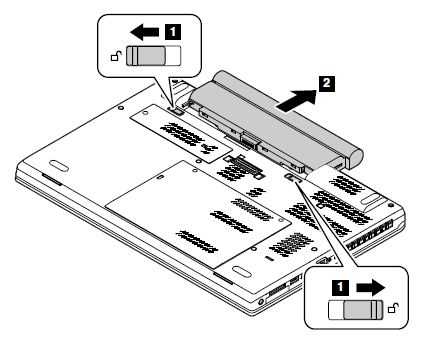
Running on AC alone diagnoses battery faults. Works on all models except sealed-battery ultrabooks:
- Shut down completely
- Remove battery (slide bottom latches)
- Connect adapter (use 65W+ for gaming models)
- Press power normally
The laptop warns about missing battery but boots fine. If it powers on without the battery, replace the cell—swollen or degraded batteries block startup. Never skip the hard reset after battery removal.
Access BIOS or Boot Menu Instantly
Need to change boot order? Timing is critical:
- Tap F2 repeatedly starting the instant you press power → BIOS Setup
- Hammer F12 during Lenovo logo → Boot Menu (USB/SSD options)
- ThinkPad shortcut: Tap Enter during startup → Boot Menu prompt
- Chromebook: Hold Ctrl + Alt + Del if frozen on POST
Consumer models flash the logo in <1 second. Disable Fast Boot via BIOS → Configuration if you need slower access. Miss the window? Restart and try again—no damage occurs.
First-Boot Setup for New Lenovos
New laptops demand specific startup steps:
- Connect Wi-Fi immediately—Windows requires internet for account creation
- Skip Microsoft account if offline: Select “Offline account” at bottom
- Register fingerprint on ThinkBook/ThinkPad power button during setup
- Save BitLocker key if prompted (48-digit recovery code)
Chromebooks auto-update after Wi-Fi connection—don’t interrupt this 5-minute process. If stuck at logo, perform EC reset before contacting support.
Diagnostic LED Cheat Sheet
When screen stays black, check these signals:
| Symptom | Likely Cause | Fix |
|---|---|---|
| Caps Lock blinks 3× | RAM failure | Reseat memory modules |
| Backlight on→off | Motherboard fault | EC reset or service |
| Fan 100%, no POST | Overheating/short | Clean vents, dry components |
| Charging LED off | Adapter dead | Try different charger |
Three rapid Caps Lock flashes mean RAM issues—power off, remove bottom cover, reseat sticks, then retry.
Wallet-Sized Power-On Checklist
Tape this to your workspace:
POWER-ON FLOW

1. Adapter LED ON ✓

2. Lid open 110° ✓

3. Press power 1-2 s ✓

No response → Hard reset: AC off → 15 s hold → AC on

Need menus → F2/F12/Enter (model-specific)

Still dead → Novo button or service
Final tip: 90% of “dead” Lenovos respond to the hard reset sequence. Bookmark this guide—you’ll reference it more than Lenovo’s official support pages. When in doubt, always start with power verification and the 15-second reset. Your laptop isn’t broken; it just needs the right ritual.