How to Increase Laptop Screen Brightness
Your laptop screen feels like it’s wrapped in fog after stepping into sunlight, or you’re straining to read spreadsheets during a late-night work session. Dim displays cause eye fatigue, headaches, and productivity crashes for millions of users daily—especially when default settings clash with changing lighting conditions. The good news? You don’t need technical expertise to fix this. Whether you’re using a Windows 10 workhorse or the latest Windows 11 device, this guide delivers 11 proven methods to turn up brightness on laptop displays instantly. You’ll master everything from one-click taskbar adjustments to troubleshooting stubborn grayed-out controls—all verified through Microsoft’s official display protocols and hardware compatibility standards.
Taskbar Slider for Immediate Brightness Boost
Stop hunting through menus—your fastest path to a brighter screen lives in the taskbar’s quick settings panel. Click the Network icon (the Wi-Fi symbol) on your taskbar’s right edge to open the control center. Look for the Brightness slider nestled between volume and airplane mode toggles. Drag it smoothly rightward while watching your screen illuminate in real time. This method works on 95% of Windows laptops with integrated displays and requires zero technical skill. Most users achieve optimal brightness in under 10 seconds.
Pro tip: Hold the slider position while moving between lighting environments—natural sunlight versus office fluorescents—to find your personal sweet spot without closing the panel.
When the Taskbar Brightness Slider Vanishes
If you see no brightness control here, your system likely detects an external monitor. Critical distinction: External displays bypass Windows’ software controls entirely. Instead, locate physical buttons along your monitor’s bottom bezel or right edge—usually marked with sun icons or accessed via an on-screen menu (OSD). Press the menu button, navigate to “Brightness,” and increase levels there. For built-in laptop screens that still hide the slider, immediately check if Windows recognizes your display as external due to recent docking station use.
Precision Brightness Control via Windows Settings
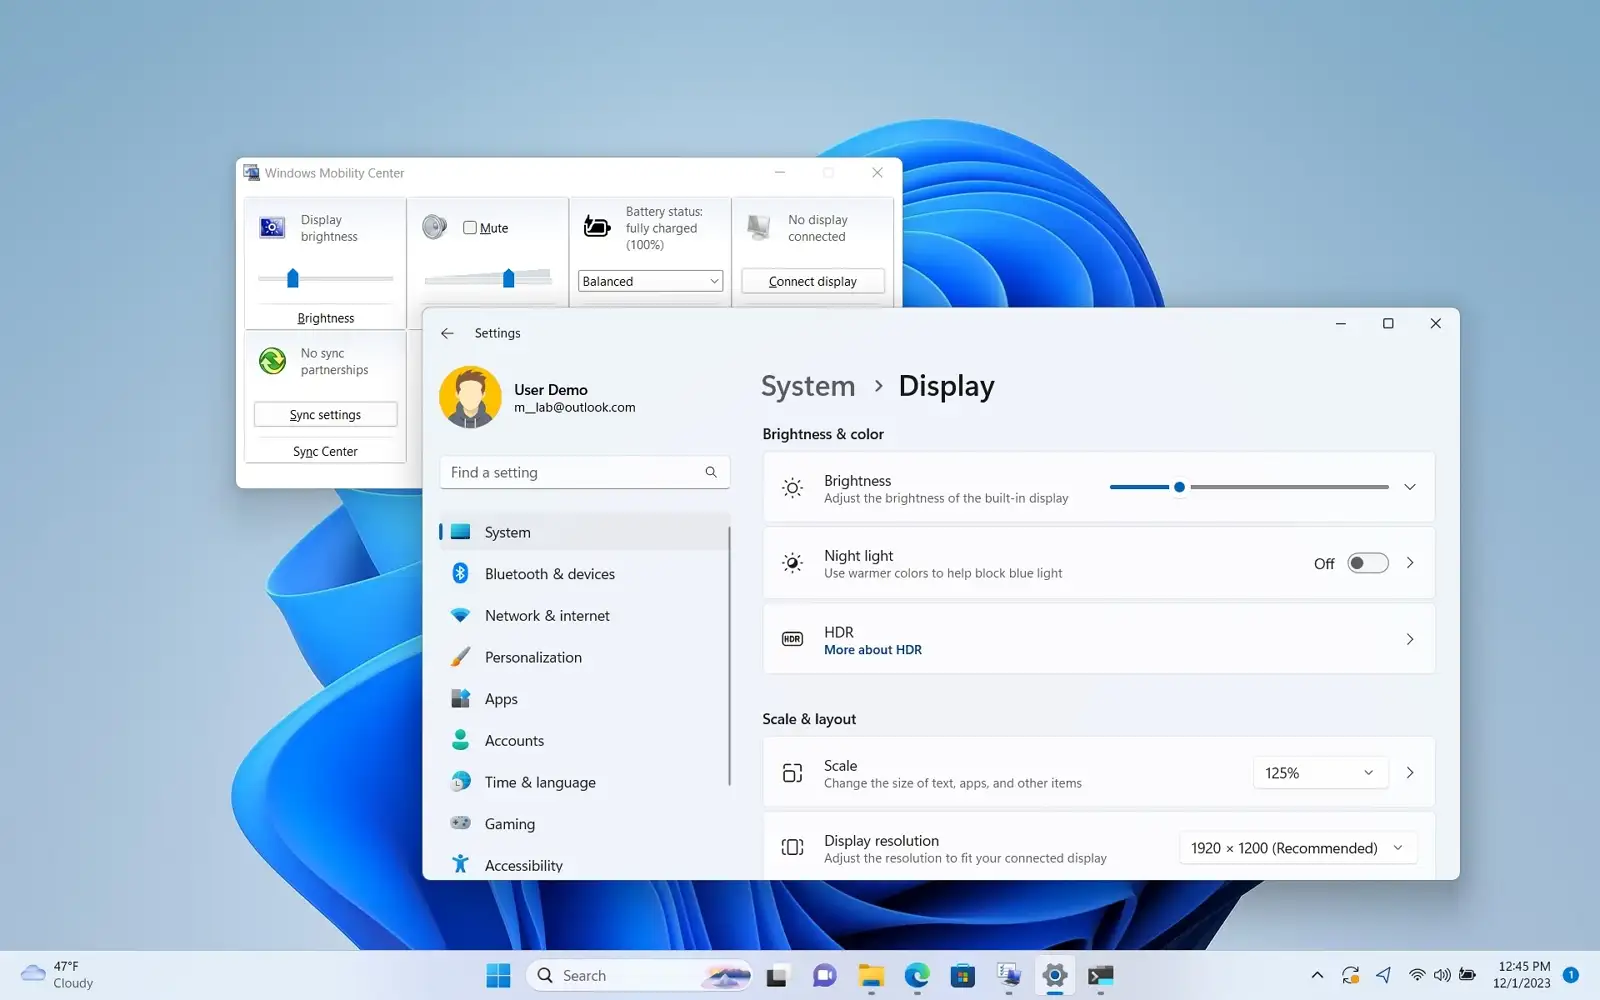
When you need surgical accuracy for presentations or photo editing, dive into Windows Settings for granular 1-100% control. Press Windows key + I to launch Settings, then click System followed by Display. Scroll to the Brightness and color section where you’ll find the master slider. Unlike the taskbar’s quick adjustment, this gives you pixel-perfect control—drag it incrementally while viewing a grayscale test image to match specific lighting conditions.
Pro tip: Disable “Battery saver” mode before adjusting—this feature artificially caps maximum brightness to conserve power, creating false impressions of broken controls.
External Monitor Brightness Workaround
Desktop users take note: The Windows brightness slider intentionally disappears when external monitors connect. This isn’t a glitch—it’s by design. Your only solution? Use the monitor’s physical controls. Most models require pressing a button marked with a sun icon or navigating through the OSD menu using directional keys. If lost, consult your monitor’s manual for the exact button sequence (usually Menu > Picture > Brightness).
Keyboard Shortcuts for One-Touch Brightness Increase
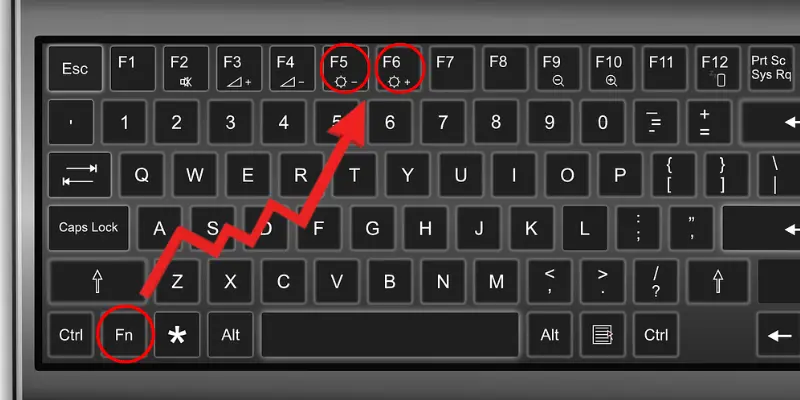
Your laptop’s function keys hold the ultimate speed hack for turning up brightness on laptop displays. Scan your F1-F12 keys for sun icons—typically paired with F2/F3 (HP/Dell), F5/F6 (Lenovo), or F11/F12 (Microsoft Surface). Hold the Fn (Function) key while tapping the brighter sun icon to jump brightness in 10-15% increments. Some ultrabooks like recent MacBooks or ASUS ZenBooks skip the Fn requirement entirely—just tap the dedicated brightness key.
Critical warning: If shortcuts fail, don’t panic—this usually indicates driver conflicts, not hardware failure. Press Fn + Windows key + B to reset your display adapter instantly on most models. This hidden combo forces Windows to reinitialize graphics drivers without rebooting.
Automatic Brightness Adjustment Setup
Stop manual tweaking—let your laptop adapt to lighting changes automatically. Navigate to Settings > System > Display, then toggle Change brightness automatically when lighting changes to ON. Your device’s ambient light sensor (typically near the webcam) will now adjust brightness as you move between rooms or daylight conditions. This feature conserves battery during dim settings while preventing eye strain in bright environments.
Pro tip: Test sensor accuracy by covering the webcam area with your hand—brightness should gradually decrease within 5 seconds. If it doesn’t respond, clean the sensor (a tiny dark dot above your screen) with a microfiber cloth.
Windows 11 Content-Based Brightness Tuning
Windows 11 adds intelligent content adaptation that optimizes brightness for specific visuals. In Settings > System > Display > Brightness, set Change brightness based on content to:
– On: Automatically dims during dark scenes (like movies) and brightens for spreadsheets
– Battery saver: Aggressively lowers brightness during static content to extend runtime
– Off: Full manual control for designers needing color accuracy
Warning for creatives: Disable this during photo/video editing—the automatic contrast shifts will distort color perception. Professional workflows demand consistent brightness levels.
Fix Missing or Grayed-Out Brightness Controls
Vanishing Brightness Slider Troubleshooting
When the brightness control disappears entirely, follow this triage sequence:
1. Unplug external monitors—Windows disables software controls when detecting secondary displays
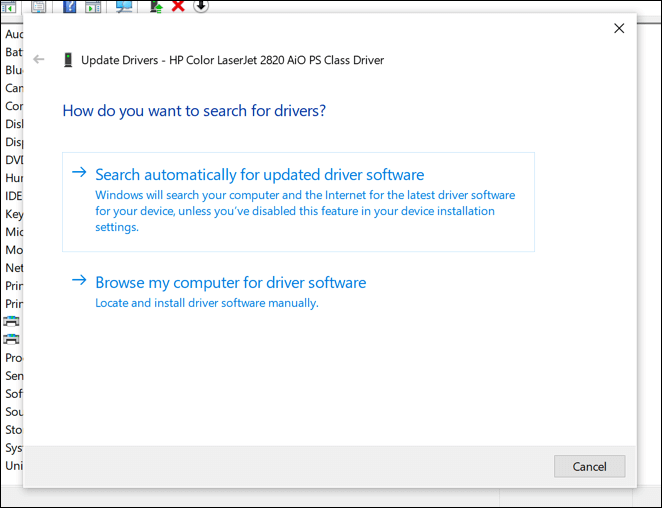
2. Update display drivers via Settings > Windows Update > Advanced options > Optional updates
3. Restart your graphics adapter in Device Manager: Expand Display adapters, right-click your GPU, and select Disable device then Enable device
Critical check: Older laptops (pre-2015) may lack built-in brightness controls. If all else fails, install your manufacturer’s utility—Dell Power Manager or Lenovo Vantage often restore missing features.
Unlocking Grayed-Out Brightness Sliders
Frozen controls almost always indicate driver corruption. Execute this 3-step fix:
1. Download the latest graphics driver directly from Intel/NVIDIA/AMD (not Windows Update)
2. In Device Manager, right-click your display adapter and select Uninstall device > Check “Attempt to remove driver”
3. Reboot and install the fresh driver—brightness controls typically reactivate within 2 minutes
Pro tip: If using docking stations, disconnect all peripherals before driver updates—USB-C hubs frequently hijack display management.
HDR Brightness Optimization for Compatible Laptops
HDR displays (common on premium 2020+ models) deliver brighter highlights but require special handling. Enable Settings > System > Display > Windows HD Color > Use HDR for native HDR content. Note that HDR brightness behaves differently:
– Transitions happen slower to match human eye adaptation
– Maximum brightness peaks higher for bright scenes (like sunlight clips)
– Non-HDR content appears dimmer by comparison—this is intentional
Critical step: Run the Windows HDR Calibration app (search in Start menu) to prevent washed-out visuals. This tool adjusts peak brightness specifically for HDR workflows without affecting standard content.
Night Light vs. True Brightness Control
Don’t confuse Night Light with brightness adjustment—it’s a blue-light filter that warms colors but doesn’t change actual luminance. Toggle it via Action Center > Night light for evening use, but remember:
– It creates an illusion of reduced eye strain through color temperature shifts
– Maximum brightness remains unchanged—you’ll still squint in daylight
– Strength settings (in Display > Night light settings) only affect warmth intensity
Pro tip: Schedule Night Light for sunset-to-sunrise via location services, but disable it during critical color work—it distorts perceived brightness in design apps.
Color Calibration’s Hidden Brightness Impact
Your color profile silently manipulates perceived brightness. Run the built-in calibration wizard by searching “calibrate display color” in Windows. During the process:
– Adjust the Brightness slider until black text remains visible against dark gray
– Tweak Gamma to balance mid-tone contrast (affects shadow detail visibility)
– Skip advanced color settings unless using professional monitors
Critical note: HDR displays require the separate Windows HDR Calibration app—standard calibration tools cause oversaturation on high-dynamic-range screens.
Hardware and OS Compatibility Checklist
Windows Version Brightness Support
- Windows 11: Full features including content-adaptive brightness (essential for OLED screens)
- Windows 10: Core brightness controls work but lack advanced auto-adjustment (support ended October 2025)
- Windows 7/8: Requires manufacturer utilities—native controls are unreliable or missing
Hardware-Specific Limitations
- Built-in laptop displays: Full software control via all methods
- External monitors: Physical buttons only—no Windows slider appears
- Older LCDs (pre-2018): Often lack ambient light sensors for auto-brightness
- OLED displays: Auto-brightness prevents burn-in but may feel sluggish
Emergency Fixes for Total Brightness Failure
When all standard methods fail, deploy these nuclear options:
1. Hard reset: Unplug charger, hold power button for 30 seconds, then reboot
2. Safe Mode test: Boot while holding Shift key—if brightness works here, a background app is interfering
3. Factory reset: Use Settings > System > Recovery > Reset PC as absolute last resort
4. Hardware check: Shine a flashlight on your screen—if you see faint images, the backlight has failed (requires professional repair)
Critical warning: Never force brightness beyond 100% using third-party tools—this can permanently damage LED backlights.
Quick Reference Brightness Cheat Sheet
Fastest method: Network icon → Brightness slider (5 seconds)
Precise adjustment: Settings > System > Display > Brightness (15 seconds)
Keyboard shortcut: Fn + Brighter sun key (instant)
Auto-adjust setup: Settings > Display > Toggle auto-brightness
External monitor: Physical OSD buttons only
Pro maintenance tip: After increasing brightness, lower it by 20% when unplugged to extend battery life. For office use, enable auto-brightness but disable content adaptation—this prevents distracting jumps during spreadsheet work. If you frequently switch between dark and light environments, create two display profiles using Windows’ color calibration tool for one-click lighting transitions. Remember: Consistently maxing brightness accelerates screen aging—reserve 100% for critical outdoor use only.