How to Unsync PCs from Laptop: Quick Steps
Your laptop is slowing down because OneDrive keeps syncing unnecessary files from your main PC. You need to stop OneDrive from automatically mirroring everything between devices—but you’re not sure which method works best for your situation. Whether you’re trying to free up precious storage space on your laptop, separate work and personal files, or simply want different content on each machine, this guide delivers exactly what you need to know about how to unsync PCs from laptop without losing any data.
Unlike what many users fear, disconnecting your devices doesn’t mean losing access to your files. Microsoft designed OneDrive with multiple control points so you can maintain cloud access while stopping local synchronization. In the next few minutes, you’ll learn every approach from temporarily pausing sync to completely unlinking devices—each method carefully explained with step-by-step instructions that work for both Windows and Mac systems. You’ll discover which solution fits your specific needs, avoid common pitfalls that lead to accidental file loss, and maintain complete control over where your files live.
Immediately Stop OneDrive Syncing Between Devices
When your laptop’s performance suffers from constant background synchronization, you need solutions that work right now without affecting your files.
Pause Syncing for Hours or Days
Windows quick pause:
– Right-click the OneDrive cloud icon in your system tray
– Select “Pause syncing” from the menu
– Choose 2, 8, or 24 hours depending on your needs
– Resume anytime by clicking OneDrive in your Start menu
Mac users: Control-click the OneDrive icon in your menu bar, select “Pause syncing,” and choose your preferred timeframe. This temporary solution gives you breathing room while you decide on a permanent fix.
Pro tip: If you need to pause longer than 24 hours, simply repeat the process after the initial pause period ends. Many users schedule pauses during work hours and allow sync to resume overnight.
Force Quit OneDrive for Instant Relief
Windows procedure:
1. Right-click the OneDrive icon in your system tray
2. Select “Quit OneDrive” from the menu
3. Confirm the action when prompted
4. Relaunch OneDrive from your Start menu when ready
Mac alternative:
– Control-click the OneDrive menu bar icon
– Choose “Quit OneDrive”
– Restart from your Applications folder when synchronization is convenient
This method stops all background activity immediately but doesn’t unlink your devices—perfect for when you need your laptop’s resources for intensive tasks.
Selectively Control Which Folders Sync Between Devices
Keep OneDrive active while customizing exactly which content appears on your laptop versus your main PC.
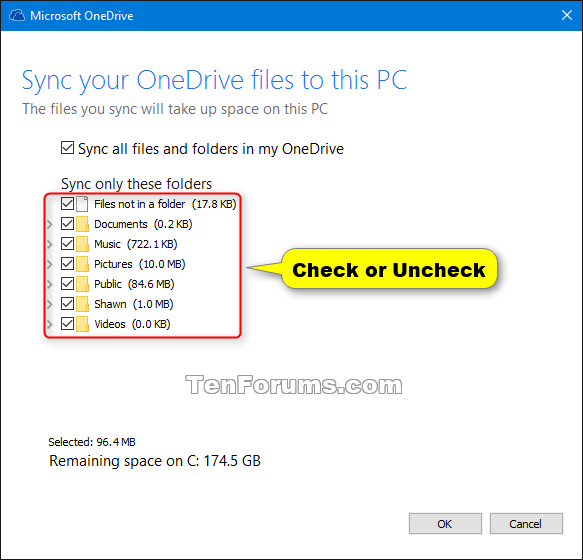
Choose Specific Folders to Sync
Windows method:
1. Right-click the OneDrive system tray icon
2. Select “Settings” then click “Choose folders”
3. Uncheck folders you don’t want on your laptop
4. Click “OK” to apply your changes immediately
Mac configuration:
– Click the OneDrive menu bar icon → Preferences → “Choose folders” tab
– Deselect the boxes next to folders you want to exclude
– Your changes take effect instantly without restarting
Critical consideration: Files you deselect remain fully accessible through OneDrive.com—they simply won’t occupy space on your local device.
Storage Space Benefits of Selective Sync
By strategically choosing which folders sync to your laptop, you can:
– Save 10-50GB by excluding video archives from your portable device
– Keep sensitive work documents only on your secure desktop PC
– Maintain photo libraries exclusively on devices where you perform editing
This approach gives you the perfect balance between cloud accessibility and local storage management.
Manage Individual Files Without Affecting Overall Sync

Sometimes you need precise control over specific files while maintaining synchronization for everything else.
Cancel Active File Transfers
Web interface method:
1. Open OneDrive.com in your browser
2. Look for the upload progress bar at the top of the screen
3. Click the “Uploading” text to view details
4. Cancel individual files or the entire transfer
Mobile device control:
– Tap the X icon beneath uploading file thumbnails
– Access your Download Manager notifications
– Stop specific downloads instantly without affecting other files
Prevent Files from Downloading Locally
When opening online-only files through File Explorer:
1. Click the OneDrive system tray icon
2. Locate files currently downloading in the activity pane
3. Click the X next to each file you want to keep cloud-only
4. These files remain accessible via OneDrive.com without using local storage
Correct Common Sync Mistakes Immediately
Accidentally synced the wrong files? Made changes that affected both devices? Here’s how to fix sync errors safely.
Remove Incorrectly Synced Files
Safe deletion process:
1. First: Pause OneDrive sync temporarily through the system tray
2. Then: Delete or move unwanted files from your OneDrive folder
3. Finally: Resume sync through the OneDrive menu
4. Important: Files deleted from OneDrive.com go to the OneDrive Recycle Bin, while local deletions go to your computer’s Recycle Bin/Trash
Reverse “Always Keep on This Device” Settings
Recovering storage space:
1. Close OneDrive completely via the system tray
2. Restart OneDrive from your Start menu or Finder
3. Right-click files taking up too much space
4. Select “Free up space” to convert them to online-only files
This method instantly reclaims storage without losing cloud access to those files.
Completely Unlink Your Laptop from OneDrive
When you’re switching devices permanently or need a clean separation between work and personal machines.
Unlink Your Computer Properly
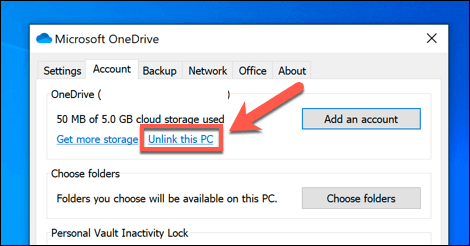
Windows procedure:
1. Click the OneDrive cloud icon in your system tray
2. Click the gear icon → Settings
3. Navigate to the Account tab
4. Select “Unlink this PC” and confirm
Mac process:
– Click the OneDrive menu bar icon → Preferences → Account
– Click “Unlink this Mac” and confirm the action
What Actually Happens When You Unlink
- Your files remain completely safe in both local storage and OneDrive cloud
- No new synchronization occurs between your computer and cloud storage
- Web access continues uninterrupted through OneDrive.com
- Other devices keep syncing unless you unlink them individually
This method provides complete separation while maintaining full access to your files through other channels.
Permanently Remove OneDrive from Your Laptop
For situations where you’ve switched to another cloud service or no longer need OneDrive on your portable device.
Complete Windows Uninstallation
- Press Windows key + I to open Settings
- Navigate to Apps → Installed apps
- Search for “Microsoft OneDrive”
- Click Uninstall and confirm
- Restart your computer to complete removal
Critical fact: Uninstalling OneDrive never deletes your files. Everything remains fully accessible through OneDrive.com and mobile apps.
Mac Removal Process
- Open your Applications folder
- Drag the OneDrive app to Trash
- Empty Trash to complete removal
- Your files remain securely stored in OneDrive cloud
Maintain File Access After Unlinking
Even after stopping synchronization between devices, multiple access methods keep your files available whenever you need them.
Web Browser Access Anywhere
- Visit OneDrive.com from any device with internet access
- Sign in with your Microsoft account credentials
- Download or upload files as needed
- Share documents with colleagues or family members instantly
Mobile App Advantages
- Access files without computer synchronization
- Automatically upload photos from your phone
- Share files via text message or email directly from the app
- Edit documents on-the-go with Microsoft Office integration
Platform-Specific Unsyncing Considerations
Work or school accounts: Your organization’s IT department may have set restrictions that prevent certain unlinking options. Contact them before making changes to avoid account issues.
Personal accounts: Give you complete control over sync settings and unlinking decisions—no external approval needed.
OneDrive for Mac users: The interface differs slightly from Windows but offers identical functionality for unsyncing devices.
Key takeaway: You have five distinct methods to unsync your PC from laptop, ranging from temporary pauses to complete software removal. The right choice depends on your specific needs: quick relief requires pausing sync, selective control needs folder management, and permanent separation demands account unlinking. Remember that your files always remain safe in OneDrive cloud storage regardless of which approach you choose—unsyncing affects only local device synchronization, not your actual data. By following these precise steps, you’ll regain control of your laptop’s storage while maintaining full access to all your important files through alternative channels.