How to Use Print Screen on Laptop
You’re staring at an error message, an important email, or a funny meme on your screen—but when you hit PrtScn, nothing happens. This frustrating experience affects millions of Windows laptop users every day. Print screen functionality varies wildly between laptop models, leaving many wondering why the basic screenshot method they’ve always used suddenly stopped working.
This comprehensive guide cuts through the confusion and shows you exactly how to use print screen on laptop devices running Windows 10 and 11. You’ll discover which keyboard combination works for your specific model, master advanced capture techniques most users never find, and solve common problems that prevent successful screenshots.
Stop wasting time searching for answers—within minutes, you’ll confidently capture any screen content on any Windows laptop.
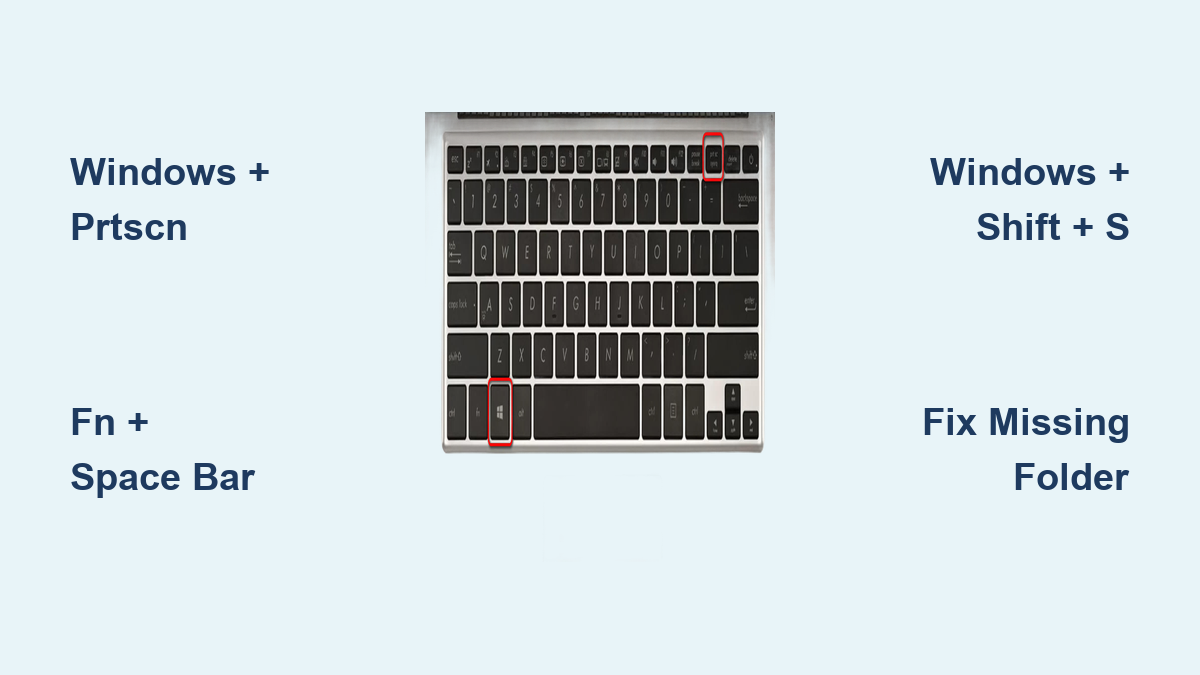
Windows + PrtScn: The Universal Full-Screen Capture
This single shortcut works on nearly all modern Windows laptops and delivers the simplest way to capture your entire display. Press Windows key + PrtScn simultaneously, and watch your screen briefly dim—this visual confirmation means Windows has already saved your screenshot.
Unlike older methods that copy to clipboard, this combination automatically saves your screenshot as a PNG file in your Pictures folder. No pasting required, no extra steps—just pure efficiency. Most users find this method works within 3 seconds of pressing the keys, making it ideal when you need to capture time-sensitive content.
What to look for: If your screen dims momentarily but you can’t find the screenshot, check your Pictures > Screenshots folder. Windows creates this directory automatically after your first successful capture.
Missing PrtScn Key? Use This Alternative Instead
Many ultrabooks and newer laptops eliminate the dedicated PrtScn key to save space. If your keyboard lacks this button, look for tiny secondary labels on your function keys—particularly the space bar or insert key.
For these compact devices, press Fn + Windows key + Space Bar to trigger the same full-screen capture. This three-key combination appears on Dell XPS, Microsoft Surface, and most Chromebook-style Windows laptops. The space bar often has “PrtSc” printed in miniature text along its top edge—a dead giveaway this method applies to your device.
Common mistake: Users often press Fn + PrtScn on devices that don’t have a PrtScn key. Check your keyboard layout first to avoid unnecessary frustration.
Capture Specific Areas With Windows + Shift + S
:max_bytes(150000):strip_icc()/D1-Snipping-Tool-Windows11-20544d8be0084d219b79011d9524cdcb.jpg)
When you need precision rather than the whole screen, this is the fastest method to use print screen on laptop devices. Press Windows key + Shift + S to activate the snipping overlay—your screen will dim with a toolbar offering four capture options:
- Rectangular Snip: Drag to select any rectangular area (most commonly used)
- Freeform Snip: Draw custom shapes around irregular objects
- Window Snip: Click any open window to capture it exclusively
- Full-screen Snip: Grab everything visible with one click
Pro tip: For dropdown menus that disappear when you release keys, open Snipping Tool first, then press Ctrl + PrtSc to freeze your screen with menus visible before selecting your capture area.
Fix Your Missing Screenshots Folder
Nothing’s more frustrating than capturing a screenshot but not finding where Windows saved it. If your Screenshots folder appears empty or missing entirely, follow these troubleshooting steps:
- Press Windows key + PrtScn (or your model’s equivalent) to force-create the folder
- Open File Explorer and navigate to Pictures
- Check if the Screenshots folder now appears—Windows creates it automatically after first use
If the folder still doesn’t show up, manually create it: Right-click inside Pictures > New > Folder and name it “Screenshots”. Windows will recognize this location for future captures.
Critical check: Ensure your Pictures folder isn’t set to read-only. Right-click the folder > Properties > uncheck Read-only under Attributes.
Edit Screenshots Without Extra Software
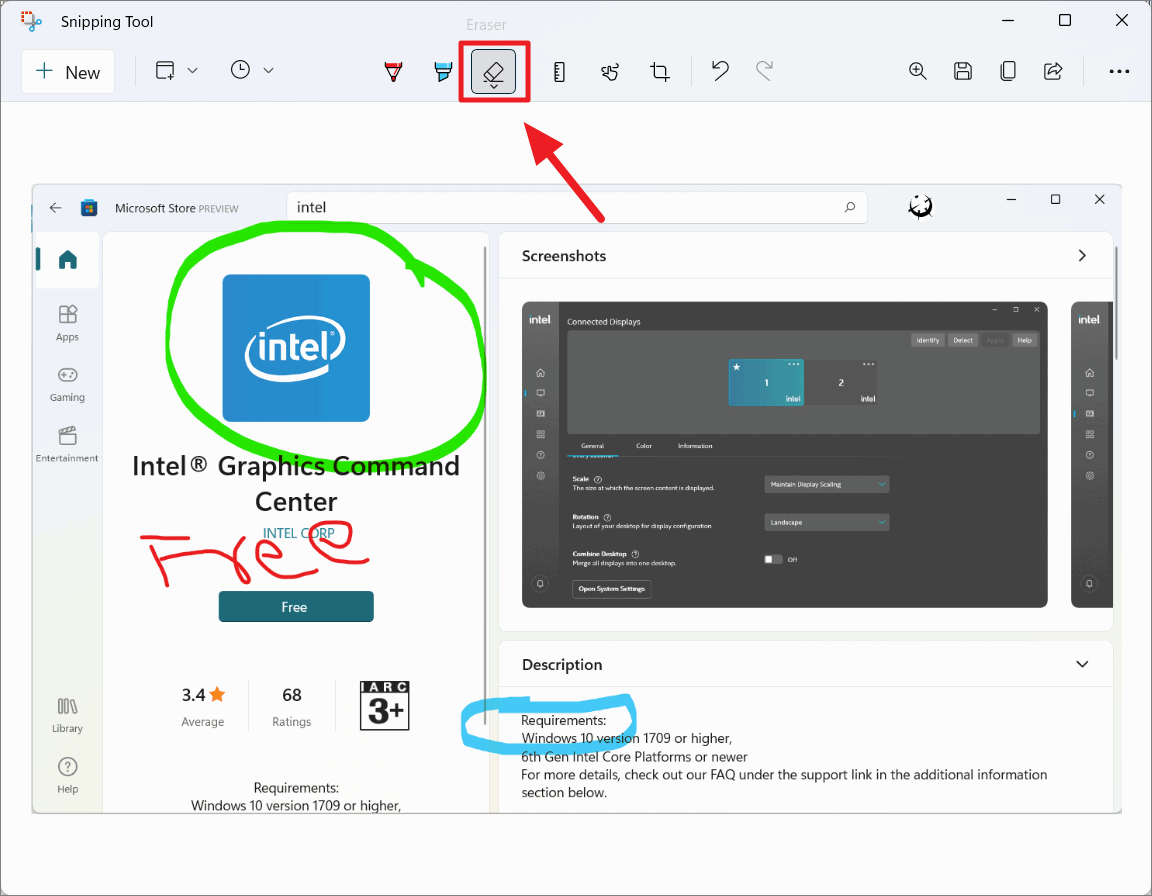
Most users don’t realize Windows includes powerful built-in editing tools that activate automatically after capture. When you use print screen on laptop devices with Windows key + Shift + S, your snip opens directly in Snipping Tool with professional-grade annotation features.
Master these essential editing tools:
– Pen tool: Draw arrows pointing to specific interface elements (adjust thickness/color via toolbar)
– Highlighter: Emphasize text with translucent yellow marker (perfect for tutorials)
– Eraser: Remove any accidental markings with pixel-level precision
– Text extraction: Click Text actions > Copy all text to convert image text to editable format
Privacy pro tip: Use Quick redact to automatically obscure email addresses and phone numbers in screenshots before sharing.
Record Screen Videos With Built-In Tools
Beyond static images, Windows lets you record screen activity with the same tools you use to print screen on laptop displays. Press Windows key + Shift + R to open the recording overlay, then select the area you want to capture.
The recording starts immediately after selection—perform your actions, then click Stop when finished. Your video saves automatically to the same Screenshots folder as your image captures, ready for sharing or editing.
Enhance your recordings: Right-click the saved video > Edit with Clipchamp to add captions, trim footage, or adjust audio levels without downloading third-party software.
Solve Non-Responsive Print Screen Keys
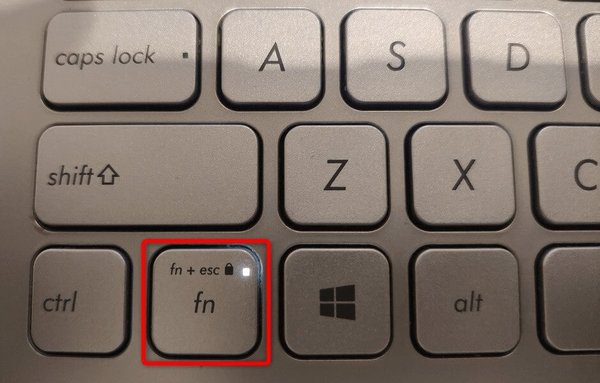
When your PrtScn key seems broken, don’t panic—several common fixes resolve this issue in under 2 minutes:
Fn Lock solution: Many laptops require Fn Lock enabled for specialty keys. Press Fn + Esc (or look for Fn Lock indicator on F1-F12 keys) to toggle this setting.
Test alternative combinations:
– PrtScn alone: Copies full screen to clipboard
– Alt + PrtScn: Captures only the active window
– Windows key + PrtScn: Full screen with auto-save
Hardware check: If multiple keys malfunction, clean under the keycap with compressed air—dust buildup often causes intermittent key failures on laptop keyboards.
Optimize Your Screenshot Workflow
Stop wasting time searching for tools—pin Snipping Tool to your taskbar for instant access:
- Type “snipping” in the taskbar search box
- Right-click Snipping Tool in results
- Select Pin to taskbar
This simple setup means you’re always one click away from professional screenshot capabilities, whether you’re troubleshooting issues or creating documentation.
Essential Print Screen Shortcut Cheat Sheet
| Capture Type | Keys to Press | Result |
|---|---|---|
| Full screen with auto-save | Windows + PrtScn | Saves to Screenshots folder |
| Select area capture | Windows + Shift + S | Copies to clipboard for editing |
| Active window only | Alt + PrtScn | Copies current window to clipboard |
| Video recording | Windows + Shift + R | Saves MP4 to Screenshots folder |
| Delayed capture | Snipping Tool > Delay | 1-5 second countdown before capture |
Troubleshoot Screenshots Not Saving Properly
When your captures disappear into digital oblivion, check these three critical settings:
Storage permissions: Right-click your Pictures folder > Properties > Security tab > ensure your user account has “Modify” permissions.
Save location override: Open Snipping Tool > See more > Settings > change default save path if needed.
File format issues: While PNG is standard, some applications require JPG. In Snipping Tool, click Save as > select JPEG from format options before saving.
Critical insight: Windows may save screenshots to unexpected locations if you’ve previously changed default folders in OneDrive settings—check both local and cloud storage paths.
Advanced Techniques for Power Users
Copilot+ PC owners access AI-enhanced screenshot features that transform basic captures into professional assets:
- Perfect Screenshot: Automatically frames content precisely with smart boundary detection
- Color Picker: Extract exact color values from any screen location (copies HEX/RGB to clipboard)
- Text extraction: Convert image text to editable format with one click—works entirely offline for privacy
For technical documentation, use delayed captures to prepare complex interface states: In Snipping Tool, select Delay > choose 3-5 seconds > click New > open your menus during the countdown.
Master Print Screen on Any Laptop Model
You now know exactly how to use print screen on laptop devices regardless of brand or age. Start with Windows key + Shift + S for most flexibility, then explore advanced options as your needs evolve.
Remember these three golden rules:
1) Check your specific keyboard layout before troubleshooting
2) Use the built-in Snipping Tool for editing (no extra software needed)
3) Screenshots always save to Pictures > Screenshots unless you’ve changed settings
Within 24 hours of applying these techniques, you’ll capture screenshots faster than most people can find their PrtScn key. The next time you need to save screen content—whether for work, troubleshooting, or sharing—your fingers will automatically reach for the right combination.