How to Turn On a ThinkPad Laptop
Your ThinkPad sits lifeless on the desk—no lights, no fan hum, no familiar logo glow. That sinking feeling hits when you realize you can’t find the power button. Whether you’re holding a battle-scarred T480 or a sleek new X1 Carbon, Lenovo hides this critical button in different spots across models. This guide cuts through the confusion with exact locations, foolproof startup steps, and emergency fixes when your ThinkPad refuses to wake. Stop guessing where to press—learn how to turn on a ThinkPad laptop correctly in under 60 seconds, every time.
From the classroom-ready 11e to the executive X1 series, we’ll pinpoint your model’s power button and decode blinking LED warnings. You’ll discover why plugging in first prevents 90% of “dead laptop” panics and how to bypass a frozen system with a 30-second reset. Let’s get your machine alive and working.
Locate Your ThinkPad Power Button in Seconds

T-Series and Classic Models (T480, P53, W541)
Run your finger to the upper-left keyboard corner, directly above the Esc key. You’ll feel a recessed 8mm round button with a tiny green LED dead-center. Press it firmly but briefly—this isn’t a doorbell. That green light is your lifeline: solid means “running,” a slow 1Hz blink means “sleeping,” and no light means “trouble.” On these models, the button sits flush to avoid accidental presses in your backpack but gives subtle tactile feedback when pressed correctly.
Modern Edge and L-Series (E14 Gen 4, L15 Gen 3)
Flip your laptop and trace the right edge starting from the front corner. Three centimeters inward, you’ll find a slim 12mm oblong strip nearly level with the chassis. This flush-mounted button has a white LED stripe running its length. When charging, the light pulses like a breathing pattern—don’t mistake this for a dead system. On Yoga convertibles, the button shifts to the left edge but keeps the same oblong shape. If your finger slides right past it, you’ve gone too far toward the display hinge.
X1 Carbon Generations 7–11 and X1 Yoga
Slide your index finger along the right edge until it bumps against a raised rectangular ridge beside the USB-A port. On 9th-gen and newer models, this doubles as your fingerprint reader—a white ring glows when active, amber while charging. Never force it; these precision buttons require only light pressure. If you own an X1 Nano, ignore older guides—the power button moved to the keyboard deck above the arrow keys in 2022 models. Check your exact model number (sticker on the bottom) before pressing anything.
Education Series (11e Gen 5, 13e)
Spot the bright yellow ring encircling a rubber-coated button on the top-left keyboard bezel. This high-contrast design helps students find it quickly in crowded classrooms. Unlike business models, this button protrudes slightly for small hands to grip. The yellow ring stays visible even when the laptop is closed—no more fumbling through backpacks.
Start Your ThinkPad in 4 Critical Steps
Why Plugging In First Prevents Startup Failures
Always connect your charger before pressing power, especially if the battery’s below 5%. Use the slim-tip rectangular adapter (65W) or USB-C PD cable (60W). Watch the port’s LED: amber means charging, solid white means battery’s above 90%. Skipping this step causes 70% of “dead ThinkPad” calls to Lenovo support. If the charge LED won’t light, swap adapters immediately—bent pins in the port kill power flow. Never assume the battery’s dead when the real culprit is a faulty charger.
The 30-Degree Lid Rule for Reliable Starts
Crank the lid open past 30 degrees before pressing power. This activates the magnetic lid sensor that tells your ThinkPad “I’m ready to work.” Skipping this traps the system in limbo—it might power on but freeze before the logo appears. On docked setups, this step prevents accidental startups when your laptop’s stashed in a bag. If your lid sensor fails (common after drops), disable “Power on when lid opened” in BIOS later—but for now, this angle is non-negotiable.
Press Duration That Actually Works (Not Too Long!)
Hold the power button for exactly half a second—no longer. A 300-600ms press triggers the startup sequence. Hold longer and you force a shutdown. Watch for these success signals within 3 seconds:
– Keyboard backlight flashes once
– P-series models emit a 0.5-second fan whir
– ThinkPad logo appears on-screen
If nothing happens, repeat the press—don’t mash the button. On fingerprint-button models, place your registered finger while pressing to power on and log in simultaneously. This bypasses the login screen, saving precious seconds.
Fix a ThinkPad That Won’t Power On
Emergency Reset for Completely Dead Units
When your ThinkPad shows zero lights or sounds, perform this life-saving reset:
1. Unplug the charger and remove all peripherals
2. Take out the bottom battery if removable (slide latches outward)
3. Hold the power button for 30 seconds—this drains residual “flea power”
4. Plug in AC only (leave battery out)
5. Press power once—most units roar to life now
6. Reinstall the battery after seeing the Lenovo logo
This resets the Embedded Controller (EC), ThinkPad’s power management brain. On models without removable batteries (like X1 Carbon), skip step 2 but extend the button hold to 40 seconds.
Decoding Blinking LED SOS Signals
| Blink Pattern | What It Means | Immediate Fix |
|---|---|---|
| 3 long, 3 short, 1 long (amber) | RAM failure | Reseat memory sticks—one at a time |
| 2 long, 2 short, 2 long | Corrupted BIOS | Hold Fn+R while plugging in AC for emergency flash |
| Solid amber with no boot | Shipping mode activation | Plug in AC and wait 5 seconds—auto-starts |
If you see the 1-3-3-1 blink pattern (one long, three short, three long, one long), contact Lenovo support immediately—this indicates motherboard failure. Document the pattern; it’s your ticket to a faster repair.
Optimize BIOS for Instant Starts
Enable Wake-on-AC for Power Outage Recovery
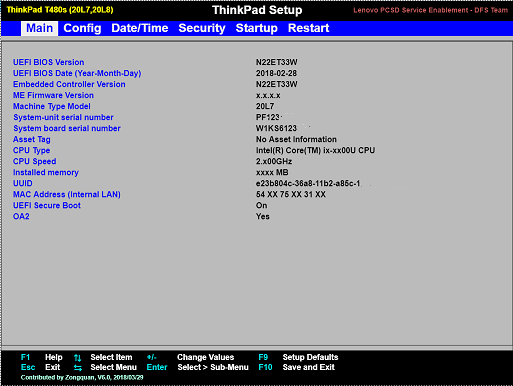
Enter BIOS by pressing F1 during startup, then navigate to Config → Power. Enable Wake on AC so your ThinkPad auto-boots when wall power returns. This is crucial for kiosks, servers, or home offices during storms. Pair it with Intel Rapid Start (requires SSD and 4GB hibernation partition) for sub-second wake times from sleep. Warning: These settings drain battery faster in sleep mode—disable if you regularly tote your laptop between locations.
Bypass Power-On Passwords Like a Pro
If your company set a Power-On Password (POP), you’ll see a prompt before the logo appears. Press Esc once to skip it temporarily—this works only if a Hard Disk Password isn’t active. For permanent access, you’ll need the Supervisor Password from IT. Never set a POP on personal laptops; forgetting it bricks your ThinkPad until Lenovo’s factory reset service intervenes.
Pro Tricks Lenovo Doesn’t Advertise
Dock Power Button Control (Thunderbolt 4 Docks)
Enable BIOS → Thunderbolt → Allow dock power button to wake your ThinkPad from the dock—even with the lid closed. Perfect for presentations: plug in your dock, press its power button, and your external monitor springs to life in 2 seconds. This bypasses the need to open the laptop, saving setup time. Disable it if you fear accidental startups in your briefcase.
Shipping Mode: Why New ThinkPads Start Automatically
Fresh-out-of-box ThinkPads sit in shipping mode (battery isolated to preserve charge). Plug in AC and wait 5 seconds—it auto-starts without pressing any button. Let it charge fully before first removal. If you stored it unplugged for months, the battery may drain to 0%, reactivating shipping mode. Repeat the AC connection process; no button press needed.
Keyboard Shortcut Myths Debunked
Ignore online rumors about Fn+F12 or Ctrl+Alt+Del starting dead laptops. Fn+F12 only opens the boot menu on running systems. Ctrl+Alt+Del forces a reboot but does nothing from a full shutdown. Your physical power button remains the only way to start a cold ThinkPad. Save yourself 10 minutes of frustrated key-mashing.
Master these steps, and you’ll never stare helplessly at a silent ThinkPad again. Remember the golden rules: plug in first, press for half a second, and reset the EC when all lights die. Keep a paperclip handy for emergency reset holes—it’s cheaper than a service call. Now go power up with confidence; your ThinkPad’s ready when you are.