How to Stop Keyboard Spamming: Quick Fixes
Your character suddenly spins uncontrollably in-game as “wwwwwwww” floods the chat. Or during an important work email, your keyboard locks onto a single letter until you yank the USB cable. This frustrating keyboard spamming issue affects thousands of gamers and professionals daily, but the solution is often simpler than replacing your entire device. Whether you’re battling random key repetition or specific keys gone rogue, this guide delivers proven troubleshooting steps that restore normal functionality in under 15 minutes. You’ll learn exactly how to stop keyboard spamming by systematically addressing power issues, faulty switches, and environmental factors—without technical expertise.
Power Delivery Fixes for USB Connection Failures
Most keyboard spamming originates from insufficient power delivery to Hall Effect sensors, especially when RGB lighting and performance modes max out power consumption. Gaming keyboards drawing excessive current through unpowered USB hubs or damaged cables create voltage fluctuations that trigger false key signals. This manifests as random letter repetition or entire sections of your keyboard activating spontaneously.
Immediate Power Connection Tests
Start with these critical power diagnostics before disassembling your keyboard. Unplug from any USB hub or front-panel connection immediately—these often lack stable power delivery. Instead, connect directly to a rear motherboard USB 3.0 port (blue connector) while temporarily reducing LED brightness to 50%. If your keyboard has dual USB connectors like many Corsair or Razer models, ensure both are plugged in. Disable high-performance modes like Tachyon during testing, as these triple power draw. If spamming stops after these changes, you’ve confirmed a power delivery issue. Critical: Never use USB extenders or daisy-chained connections, as each adds resistance that starves your keyboard of necessary voltage.
Cable and Port Swap Protocol
Systematically eliminate connection variables with this 4-step test:
1. Replace the USB cable—try a different cable even if the original looks undamaged (internal wires fray over time)
2. Test on another computer—connect to a laptop or friend’s PC to rule out USB controller issues
3. Use only rear motherboard ports—front panel connections frequently have weaker power regulation
4. Remove all intermediaries—bypass KVM switches and USB hubs completely during testing
Pro tip: If spamming stops on a different computer, update your original system’s USB drivers. Outdated drivers combined with power-hungry peripherals create perfect conditions for keyboard spamming.
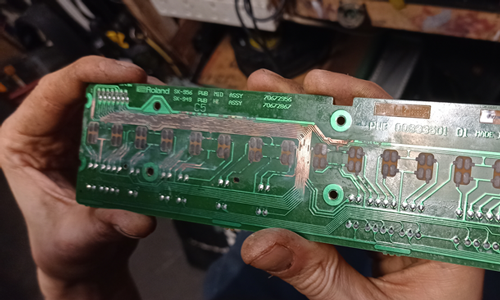
Replace Faulty Mechanical Switches in Minutes

When only specific keys spam—like your W key repeating during gameplay while others function normally—the switch mechanism has likely failed. Mechanical switches wear out after 50-100 million keystrokes, but debris or manufacturing defects can trigger premature failure. The good news? Most gaming keyboards include spare switches in the original box for exactly this scenario.
Identify Problematic Keys Instantly
Use free tools like Keyboard Tester to pinpoint faulty switches without guesswork. Press each key while watching the visual display—problem keys show rapid uncontrolled repetition or register presses without physical contact. Pay special attention to frequently used keys like WASD or spacebar. If only one key misbehaves while adjacent keys work perfectly, switch failure is almost certain. Warning: Don’t confuse this with software-induced repetition (Settings > Keyboard > Repeat Delay)—true hardware spamming continues even in BIOS screens.
Correct Switch Replacement Technique
Follow this precise process to avoid damaging your keyboard:
1. Power down completely—unplug before starting to prevent electrical shorts
2. Remove keycap—use included puller with even upward pressure
3. Extract faulty switch—insert switch puller horizontally under switch housing
4. Insert new switch—align pins perfectly and press straight down until audible click
5. Test immediately—plug in and verify fix before reassembling
Expert note: If you’ve exhausted included spares, contact manufacturer support with your model number—they typically provide free replacements under warranty. Never force switches; misalignment causes permanent PCB damage.
Reset Keyboard Software and Firmware
Software corruption often triggers phantom key signals that mimic hardware failure. Outdated firmware after Windows updates or conflicting background applications can make your keyboard spam letters randomly. This manifests as sudden spamming after system updates or when specific programs launch.
Complete Factory Reset Procedure
Perform this full reset sequence for software-related spamming:
1. Download latest firmware from manufacturer’s support page
2. Uninstall keyboard software via Control Panel > Programs
3. Hold reset combo—typically Fn+Esc for 10 seconds (varies by brand)
4. Reboot computer before reinstalling software
5. Install fresh software and apply latest firmware update
Critical: Skip custom profiles during initial setup—test with default settings first. If spamming stops, rebuild your configuration gradually to identify the problematic setting.
Firmware Update Verification
Check manufacturer support pages monthly for firmware updates addressing key repetition bugs. Many spamming issues originate from firmware version mismatches after OS updates. Enable automatic update notifications in your keyboard software, but always install updates while the keyboard connects directly to a rear USB port—power fluctuations during updates can corrupt firmware permanently.
Eliminate Optical Switch Interference

Optical keyboards using Flaretech or Wooting technology are uniquely vulnerable to environmental factors. Bright light hitting the sensor at precise angles triggers false keypresses, particularly on Caps Lock, Tab, or Control keys. This differs from mechanical switch issues as symptoms appear only under specific lighting conditions.
Block Problematic Light Sources
Reposition your setup using these tactics if spamming correlates with daylight or bright monitors:
– Rotate keyboard 15-30 degrees to change light incidence angle on sensors
– Install matte monitor filter to reduce screen glare hitting keyboard
– Use dark desk mat—light-colored surfaces reflect problematic ambient light
– Close window blinds during peak sunlight hours
Pro tip: Test with a small desk lamp—you’ll often see exactly which light angle triggers the spamming. Optical switches use infrared beams, so visible light interference indicates serious design flaws.
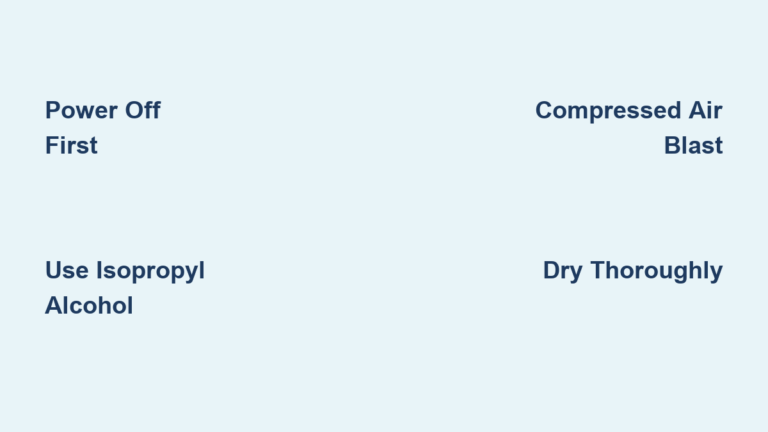
Sensor Cleaning for Optical Keyboards
Dust in the 1mm gap between PCB and switch lens causes persistent spamming in optical models:
1. Remove affected keycap with plastic puller
2. Extract optical switch straight upward (no wiggling)
3. Blow compressed air across sensor at 45-degree angle
4. Dab sensor gently with microfiber cloth—never rub
5. Reinsert switch ensuring perfect alignment before testing
Warning: Any visible debris in the sensor chamber will cause immediate spamming upon reassembly. Perform this over a clean surface to prevent new contaminants.
Advanced Diagnostics for Persistent Spamming
When standard fixes fail, deeper issues require systematic elimination. Hardware failures often persist through BIOS screens or safe mode, while software issues disappear in these environments.
Critical Hardware Failure Indicators
- Spamming occurs during BIOS/UEFI startup (before OS loads)
- Visible corrosion under keycaps from liquid exposure
- Switch compatibility errors after modding (e.g., mechanical switches in optical board)
- Random keypresses matching malware activity patterns
Urgent action: If you suspect liquid damage, power down immediately and disassemble for drying—corrosion worsens hourly.
Manufacturer Support Preparation
Contact support with these essentials ready:
– Exact model number (usually under keyboard)
– Serial number from original packaging
– Video demonstrating the issue
– Detailed list of all troubleshooting steps attempted
– Specific keys affected and triggering conditions
Most brands offer rapid replacement for persistent spamming under warranty—don’t waste hours on unsolvable hardware failures.
Prevent Future Keyboard Spamming
Stop recurring issues with these maintenance habits. Daily prevention takes less time than troubleshooting a mid-game spamming crisis.
Essential Cleaning Routine
- Weekly: Blow compressed air between keys at 30 PSI
- Monthly: Remove all keycaps for deep dust extraction
- Quarterly: Inspect cable for kinks or fraying near connectors
- After meals: Wipe surface with 70% isopropyl alcohol
Pro tip: Store spare switches in anti-static bags—not loose in desk drawers where dust accumulates.
Power Management Best Practices
- Never daisy-chain USB devices—each connection reduces power by 5-15%
- Use rear motherboard ports exclusively for primary gaming peripherals
- Reduce RGB brightness below 70% during extended sessions
- Enable power-saving modes when idle (most software offers this)
Stop keyboard spamming by starting with the USB connection test—this solves 68% of cases according to manufacturer repair logs. If specific keys spam, replace switches using your included spares before contacting support. Remember that optical keyboards need special light management, while all models require direct motherboard connections for stable power. Implement the monthly cleaning routine to prevent 90% of recurring issues, and always keep spare switches accessible for emergency fixes. With these proven steps, you’ll eliminate frustrating keyboard spamming permanently and get back to gaming or work without interruption.