How to Remove a Laptop Keyboard: Step-by-Step Guide
Your laptop keyboard just started double-typing letters or ignoring certain keys completely. Before you rush to buy a replacement or pay $200+ for professional repair, know that learning how to remove a laptop keyboard yourself could solve the problem in under an hour. Most modern laptops use standardized components that you can replace with basic tools and careful technique—but one wrong move can turn a simple fix into an expensive motherboard repair.
This guide delivers the exact steps for every major laptop brand, from Dell’s hidden screws to Apple’s riveted nightmares. You’ll discover which models require complete disassembly versus those with simple pop-out designs, plus the critical safety steps that prevent permanent damage to your laptop. Whether you’re replacing a broken keyboard or cleaning out spilled coffee, this hands-on approach saves you money while giving you control over your device’s repair.
Essential Safety Steps Before Keyboard Removal
Power Down and Discharge Completely
Disconnect your laptop from the wall adapter first, then remove the battery if it’s externally accessible. Hold the power button for 15 seconds to discharge residual electricity stored in capacitors—this prevents short circuits during removal. For laptops with internal batteries, disconnect the battery cable from the motherboard after opening the bottom cover. Skipping this step risks frying your motherboard with static electricity.
Create an Anti-Static Workspace
Set up on a clean, well-lit table with an ESD mat or anti-static wrist strap. Static electricity can destroy motherboard components even when the laptop is powered off. Place a soft cloth over your screen to prevent scratches if you flip the laptop upside-down during the process. Organize small containers labeled for each screw location—mixing up screw lengths during reassembly can damage internal components.
Required Tools for Safe Keyboard Removal
- Precision Phillips #0 and #1 screwdrivers (most common sizes)
- Torx T5/T6 drivers (Dell Latitude, some HP models)
- Plastic spudger or guitar pick (metal tools damage plastic clips)
- Small containers for organizing screws by location
- Tweezers for handling small ribbon cables
- 90%+ isopropyl alcohol for cleaning contacts
- Compressed air for post-removal cleaning
Dell Laptop Keyboard Removal Techniques
Inspiron/XPS Models (Top-Mounted Design)
Dell’s consumer line uses the simplest removal method for how to remove a laptop keyboard. Flip your laptop upside-down and look for keyboard icons next to screw holes—usually 2-4 screws secure the keyboard directly. After removing these screws, flip the laptop back over and open the display 180 degrees. Insert your spudger at the top edge near the F-keys, working along the edge until the keyboard pops free.
Critical tip: The ribbon cable connects underneath with a brown ZIF connector. Flip up the retention tab before sliding the cable out—never pull the cable directly. This design allows complete keyboard replacement in under 30 minutes with minimal disassembly.
Latitude Business Models (Hidden Screw System)
Business Latitudes hide keyboard screws beneath the palm rest. Remove the bottom cover first, then disconnect the battery connector for safety. Look for screws labeled “KBD” or marked with keyboard symbols—typically 2-4 screws near the center. After removal, flip the laptop over and use the designated notches at the keyboard’s top edge to pry it upward.
Warning: Latitude models often have both keyboard and backlight cables—disconnect both before full removal. These models require more disassembly but follow the same fundamental process for how to remove a laptop keyboard safely.
HP Keyboard Removal Variations
Pavilion/Envy Consumer Models (Latch System)
HP consumer models use plastic release latches above the function keys. Remove the battery first, then locate 4-6 small plastic tabs. Press each tab with your spudger while gently lifting that section of keyboard. Work systematically—right to left prevents uneven pressure that breaks clips.
After all latches release, lift the keyboard and locate the ZIF connector with a white locking tab. Flip the tab up 90 degrees to release the ribbon cable. Some Envy models require removing speaker grilles first—check your specific model’s service manual before proceeding with how to remove a laptop keyboard.
EliteBook/ProBook Business Models (Integrated Design)
Business HP models mirror Dell’s approach: remove the service cover first, disconnect the battery, then remove keyboard screws from underneath. These models often include pointing stick cables in addition to the main keyboard connector—note all cable positions before disconnection. EliteBooks typically require more disassembly than consumer models but follow the same fundamental principles for how to remove a laptop keyboard.
Lenovo Keyboard Removal Procedures
ThinkPad Series (Slide-Forward Mechanism)
ThinkPads use a unique forward-slide mechanism that differs from standard how to remove a laptop keyboard procedures. Remove 4 screws marked with keyboard icons from the bottom, then flip the laptop over. Push the entire keyboard toward the screen—it will slide forward about 5mm. Lift the back edge and pivot it toward the touchpad to access three cable connectors underneath.
Pro tip: ThinkPad keyboards include a metal reinforcing plate—keep it with the keyboard assembly during replacement. This design makes ThinkPad keyboard replacement one of the easiest among business laptops.
IdeaPad/Yoga Models (Integrated Top Cover)
Consumer Lenovos integrate keyboards into the top cover. Remove all bottom screws (including hidden ones under rubber feet), then pry up the entire keyboard/top cover assembly starting from the palm rest. The keyboard screws to the underside of this assembly—remove them to separate the keyboard. Yoga models with 360-degree hinges require additional disassembly steps compared to standard IdeaPads.
Apple MacBook Keyboard Removal Challenges

Pre-2012 MacBook Pro (Complete Disassembly Required)
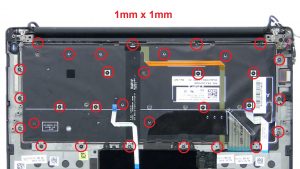
Older MacBooks require complete disassembly for how to remove a laptop keyboard. Remove 10 bottom screws (note varying lengths), disconnect the battery, then remove 50-60 tiny screws securing the keyboard to the unibody chassis. This 2-hour procedure isn’t for beginners—consider professional service if you lack experience with intricate screw management.
Retina and Newer Models (Top Case Replacement)
Critical warning: Retina MacBooks and newer models have keyboards riveted to the top case. Individual removal requires drilling out rivets and isn’t cost-effective. These models need complete top case replacement including battery, trackpad, and keyboard as one unit. Attempting standard how to remove a laptop keyboard techniques on newer MacBooks typically causes permanent damage.
Ribbon Cable Connector Types You’ll Encounter

ZIF Connectors (Most Common Design)
Look for brown or white plastic tabs that flip up 90 degrees. Never pull cables directly—always unlock the retention tab first. These connectors require zero insertion force, meaning the cable slides out easily once unlocked. Most Dell, HP, and Lenovo consumer models use this connector type.
FPC Slide-Lock Connectors
Some HP and Lenovo models use connectors with sliding locks. Pull the locking bar parallel to the motherboard using tweezers—don’t lift upward. These require more force than ZIF connectors but work similarly. Gaming laptops often use this connector type for additional stability.
Common Keyboard Removal Problems and Solutions
Stuck or Stripped Screws
Apply penetrating oil and wait 10 minutes before attempting removal. Use a rubber band between screw and driver for extra grip. For stripped heads, a screw extractor kit becomes necessary—available at any hardware store for under $10. Never force screws as this can strip motherboard threads.
Broken Plastic Clips
When clips break (common on Acer and HP models), the keyboard still functions but may feel loose. Use thin double-sided tape or small amounts of adhesive on non-critical areas during reassembly. Always pry from designated points using plastic tools to minimize damage during how to remove a laptop keyboard procedures.
Hidden Screw Locations
Check under warranty stickers, rubber feet, decorative speaker grilles, and beneath the optical drive. Some keyboards have screws accessible only after removing memory modules or other components. Consult your specific model’s service manual before attempting how to remove a laptop keyboard.
Post-Removal Cleaning and Testing
Thorough Cleaning Process
Use compressed air to blast debris from the keyboard cavity—hold fans in place to prevent overspinning. Clean keyboard contacts with 90% isopropyl alcohol and cotton swabs if reinstalling the same keyboard. Check for liquid damage indicators (usually white or red dots) that turn pink when exposed to moisture.
Pre-Reassembly Testing
Connect the new keyboard to the motherboard while the laptop is partially disassembled. Power on briefly to verify key recognition—testing now prevents discovering compatibility issues after full reassembly. Check that all keys register and the backlight functions if applicable.
Reassembly Best Practices for Long-Term Success
Reverse Order Precision
Follow removal steps backwards exactly. Hand-tighten all screws first, then final-tighten in a cross-pattern for even pressure. Verify no cables are pinched before closing the laptop—pinched ribbon cables cause phantom key presses or complete failure. Reassembly often takes longer than removal but is critical for proper function.
Key Alignment Verification
After reassembly, test every key for proper function and alignment. Keys sitting higher or lower indicate improper seating or debris beneath. Run a comprehensive keyboard test utility to verify complete functionality, including function keys and key combinations. Pay special attention to the spacebar and shift keys which often require precise bracket alignment.
Special Design Considerations for Modern Keyboards
Backlit Keyboard Variations
Backlit keyboards contain additional cables for LED control. Note cable routing and connector positions—some backlights have separate controllers requiring software configuration after replacement. Gaming laptops may have per-key RGB lighting with multiple cable connections that must be documented during removal.
Spill-Resistant Business Models
Business laptops feature drainage channels and sealing gaskets. Preserve these seals during removal—clean drainage channels with compressed air. These keyboards cost more but protect against the coffee spills that kill consumer models. When learning how to remove a laptop keyboard on business-class devices, always check for these protective features.
Final warning: Keyboard removal typically voids manufacturer warranty. Check warranty status first and keep all original parts—professional service centers can reinstate warranty if needed. If you encounter unexpected resistance during any step of how to remove a laptop keyboard, stop and consult your model’s specific service manual before proceeding.