How to Take Screenshot on Laptop
Your laptop screen just displayed a crucial error message, a time-sensitive discount code, or that hilarious meme you need to share—but you’re frozen trying to figure out how to capture it. Unlike desktop keyboards with obvious dedicated keys, laptop manufacturers hide the Print Screen function behind cryptic key combinations that vary by brand. This confusion wastes precious seconds when you need a screenshot most. Whether you’re troubleshooting an issue, saving proof of a transaction, or documenting a software bug, knowing exactly how to print screen on laptop models saves frustration and gets the job done in one try.
Most users don’t realize their laptop requires special key combinations due to compact keyboard layouts. Standard Print Screen shortcuts often fail because manufacturers repurpose function keys for volume control, brightness, or other features. This guide cuts through the confusion with verified methods for Windows 10 and 11 laptops. You’ll discover where your specific PrtSc key hides, which exact key combinations work for full-screen or active-window captures, and how to fix common failures—no guesswork required.
Locate Your Laptop’s Hidden Print Screen Key

Identify PrtSc Key Variations on Function Row
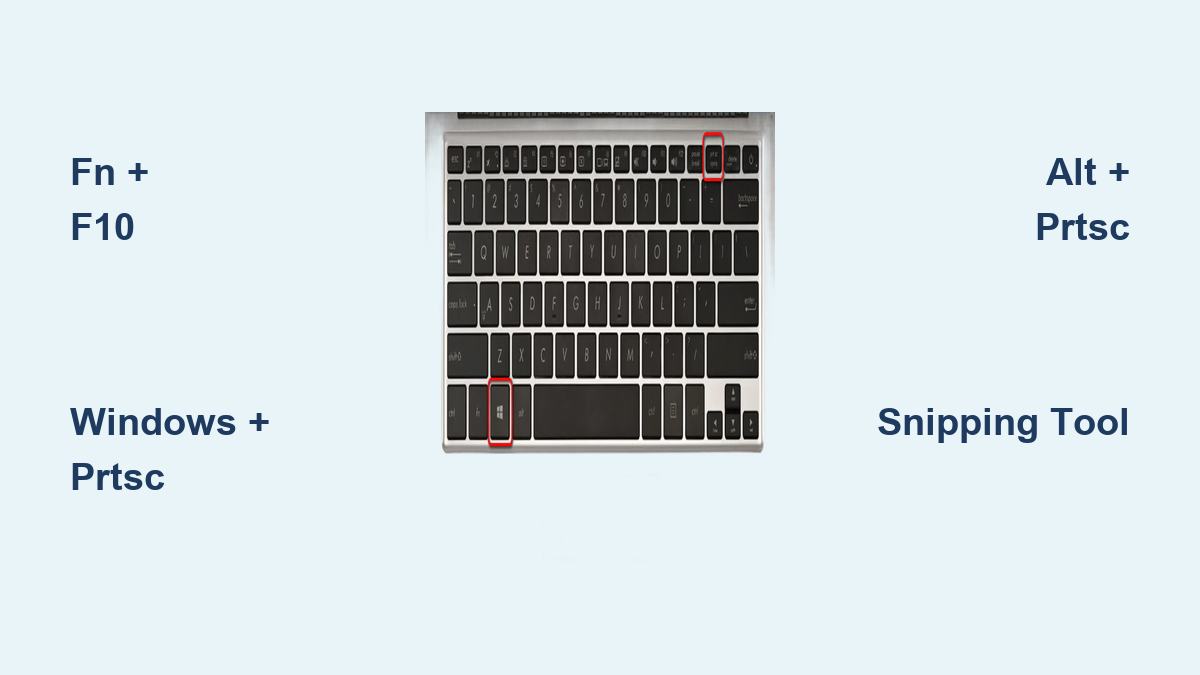
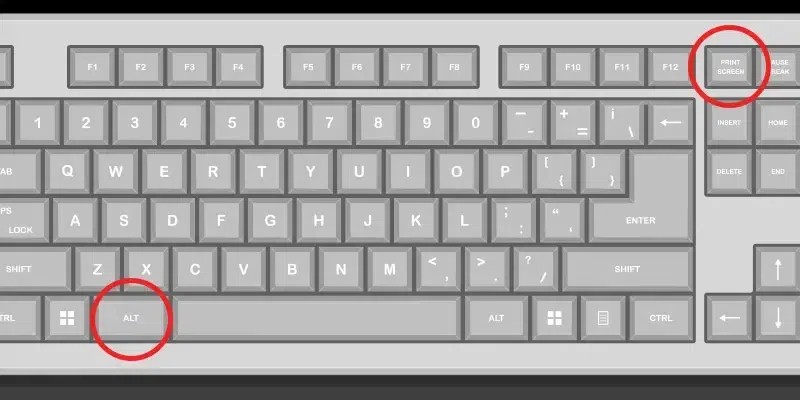
Your laptop’s Print Screen key won’t resemble desktop keyboards. Instead of a standalone key in the top-right corner, it’s squeezed into the function key row (F1-F12) with tiny secondary labels. Scan for these common abbreviations stamped in smaller text or blue ink: PrtSc, PrtScr, PrtScn, PrntScrn, or SysRq. On Dell, HP, and Lenovo models, it typically shares space with F10 or F11, while Acer and ASUS often pair it with F12. If you see a rectangle icon with horizontal lines (□—), that’s your visual cue—this symbol universally represents Print Screen functionality across all manufacturers.
Critical detail: Never press this key alone. Laptops require the Fn key (bottom-left corner) to activate its secondary function. Pressing PrtSc by itself usually does nothing or triggers an unrelated action like screen brightness adjustment. The exception is when “Function Lock” is enabled—a feature we’ll address later.
Manufacturer-Specific Key Combinations
The exact shortcut depends entirely on your laptop brand. Stop guessing and use these verified combinations:
- Dell & Lenovo: Press Fn + F10 (most common)
- HP: Try Fn + F11 or Fn + Insert
- Acer & ASUS: Use Fn + F12
- Dell Wireless Keyboard (KM3322W): Requires Fn + Insert—no dedicated PrtSc key exists
Pro tip: If your screen dims when pressing Windows + PrtSc, you’ve found the correct combo. If nothing happens, cycle through these variations while watching for visual feedback. Older Dell models like the Latitude series may need Fn + Spacebar—a relic from pre-2015 designs.
Capture Full Screen Without Manual Saving
Windows Key Shortcut for Auto-Save
Skip clipboard steps entirely with this one-button solution: Hold Windows logo key + PrtSc simultaneously. Your screen will briefly dim or flash (Windows 11 shows a subtle pulse animation), confirming the capture. Unlike basic PrtSc methods, this automatically saves the screenshot as a PNG file in Pictures > Screenshots—no pasting required. Each new capture increments the filename (Screenshot (1).png, Screenshot (2).png, etc.), preventing accidental overwrites.
Tablet users: If your laptop converts to tablet mode, press Windows logo button + volume down instead. This triggers the same auto-save behavior without physical keyboard access.
Where Screenshots Live and How to Access Them
Many users capture successfully but can’t find the image. Windows 10 and 11 default to C:\Users[YourName]\Pictures\Screenshots. Open File Explorer, click “Pictures” in the sidebar, then select the “Screenshots” folder. If you’ve customized your Documents folder location, check This PC > [YourDrive] > Users > [YourName] > Pictures.
Troubleshooting tip: If the folder appears empty after capture, refresh it (press F5) or check storage space—full drives prevent new screenshots from saving. Never delete this folder; Windows recreates it automatically but may cause temporary capture failures.
Copy Screen Directly to Clipboard
Basic PrtSc Method for Quick Pasting
When you need immediate access without file management, press Fn + PrtSc (or your model’s specific combo). Nothing visibly happens—that’s normal. The entire screen is now copied to your clipboard, ready for instant pasting. Open Paint, Word, or any image editor, then press Ctrl + V to paste. This method excels for quick email attachments or forum posts where saving a file is unnecessary.
Critical limitation: This only copies the current screen state. If you copy text or another image afterward, it overwrites your screenshot. Always paste immediately into your target application before continuing work.
When to avoid this: Don’t use this method for multi-monitor setups—it captures every active display. For single-window needs, skip to the Alt + PrtSc method below.
Capture Only Your Active Window
Alt + PrtSc for Targeted Snaps
Focus on one application without desktop clutter using Alt + Fn + PrtSc. First, click the window you want to capture (browser, error dialog, etc.). Then press the shortcut—your cursor briefly changes to a camera icon during capture. The active window copies to clipboard with a clean shadow effect, excluding taskbars and other apps. Paste instantly with Ctrl + V into documents or messaging apps.
Why this beats full-screen captures: When reporting software bugs, support teams need isolated window views. Capturing your entire desktop often includes irrelevant icons or confidential data. This method also avoids cropping steps since Windows automatically trims excess space around the window.
Device-specific note: Some Lenovo Yoga models require Alt + Fn + Spacebar due to unique key mapping. If standard combos fail, test Alt + Fn + F10/F11/F12 systematically.
Fix Common Print Screen Failures
Keyboard Setting Conflicts in Windows
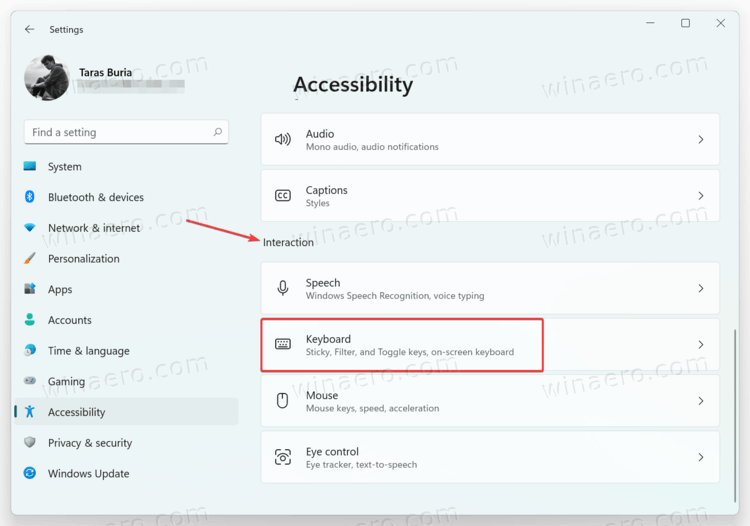
When PrtSc seems broken, Windows 11’s Accessibility settings often interfere. Go to Settings > Accessibility > Keyboard and toggle OFF “Use the Print Screen key to open Snipping Tool.” This restores standard functionality. Next, test Fn + Esc—this toggles “Function Lock” on HP and Dell laptops, which reverses primary/secondary key behaviors. If your PrtSc key suddenly works when pressing F10 alone, Function Lock was enabled.
Universal fallback: Press Windows + Shift + S regardless of keyboard issues. This instantly opens Snipping Tool’s overlay for custom captures—even when physical keys fail.
Special Fixes for Dell Wireless Keyboards
The Dell KM3322W wireless keyboard lacks any PrtSc label. Instead, press Fn + Insert (the Insert key sits above the arrow keys). If this does nothing, ensure the keyboard’s USB receiver is properly connected and batteries are charged. Older Dell models like the Inspiron 15R may require Fn + PrtScn—check for faded secondary text near F12.
Advanced Capture Techniques
Snipping Tool for Precision Control
Go beyond basic captures with Windows + Shift + S. This opens a toolbar with four modes:
– Rectangular Snip: Drag to select any area (ideal for cropping receipts)
– Freeform Snip: Draw irregular shapes around elements
– Window Snip: Click any open window for instant capture
– Fullscreen Snip: Captures all monitors simultaneously
Captures copy to clipboard and appear as toast notifications in the screen corner. Click the notification to open Snip & Sketch for annotations before saving.
Gaming and Full-Screen App Workarounds
Games often block standard shortcuts. Use Windows + Alt + PrtSc to save game screenshots directly to Videos > Captures as MP4s (video) or PNGs (single frames). For Steam games, press F12—this triggers Steam’s built-in screenshot manager. Non-Steam games work with Xbox Game Bar (Windows + G), where the camera icon captures instantly.
Prevent Costly Screenshot Mistakes
Storage Space and Clipboard Conflicts
Running out of space in your Pictures folder causes silent capture failures. Before critical screenshots, check drive space via Settings > System > Storage. More commonly, users overwrite screenshots by copying text after capture. Always paste immediately into your target app—never switch windows before saving.
Dual-monitor trap: Standard PrtSc captures every display. For single-monitor needs, use Alt + PrtSc on your target window or Snipping Tool’s Window Snip mode. If working across monitors, capture each screen separately to avoid privacy leaks.
Key takeaway: Your laptop’s print screen capability hinges entirely on finding the correct Fn + [key] combo for your brand. Start with Fn + F10 (Dell/Lenovo) or Fn + F12 (Acer/ASUS), then escalate to Windows + PrtSc for auto-saving or Windows + Shift + S for flexible captures. When all else fails, remember that Snipping Tool shortcuts bypass physical keyboard limitations entirely—making you screenshot-ready on any Windows laptop within seconds. Save this guide as a screenshot for instant access next time you need to capture your screen.