How to Fix a Malfunctioning Keyboard
Your keyboard stops responding mid-email, or your spacebar starts repeating endlessly—suddenly your workflow grinds to a halt. Whether you’re dealing with coffee spills on your laptop or worn-out switches on your gaming rig, knowing how to fix a malfunctioning keyboard can save you hours of frustration and hundreds in replacement costs. This guide reveals proven solutions for every keyboard failure type, from quick 30-second fixes to complex repairs that restore full functionality without breaking the bank.
Diagnose Your Specific Keyboard Failure Type
Before grabbing tools, identify exactly how your keyboard is failing. Complete unresponsiveness signals hardware failure, connection issues, or driver corruption. Intermittent key failures where “E” works every third press point to debris or worn contacts. Sticking keys that repeat endlessly indicate mechanical obstruction, while wrong characters appearing scream software configuration problems.
Test each failure systematically. Open Notepad and press every key individually. Document which keys fail and how they fail—this diagnostic log will guide your repair strategy. For wireless models, verify battery levels above 20% and check for USB receiver interference from WiFi routers or microwaves.
Quick Hardware Checks You Can Do Now
- Examine USB connectors for bent pins or corrosion (never force a damaged connector)
- Test multiple ports—USB 2.0 often works better than 3.0 for older keyboards
- Hold wireless pairing button for 3-10 seconds to re-establish connection
- Move USB receiver within 2 feet of keyboard, away from interference sources
Software Diagnostic Methods That Reveal Hidden Issues
Access Device Manager (Windows key + X) and expand “Keyboards”—yellow triangles indicate driver problems. Mac users check System Preferences > Keyboard for device recognition. Linux users run lsusb in terminal to verify detection. Run the Windows keyboard troubleshooter (Settings > Update & Security > Troubleshoot) which automatically fixes 65% of common driver issues.
Fix Physical Connection Problems in Under 5 Minutes
Resolving USB Port Compatibility Issues
Try your keyboard on a different computer first. If it works elsewhere, the problem lies with your ports, not the keyboard. USB 3.0 ports sometimes cause compatibility headaches with older keyboards—always test USB 2.0 ports as a backup. For persistent issues, disable USB selective suspend in Power Options to prevent Windows from powering down USB ports.
Solving Wireless Sync Failures
Re-pair your keyboard by holding the pairing button for 3-10 seconds until lights flash. Move away from 2.4GHz interference sources—wireless mice, WiFi routers, and even microwaves can disrupt connections. For Bluetooth keyboards, forget the device in system settings then re-pair from scratch, which resolves 80% of persistent connection drops.
Clean Mechanical Keyboard Switches Properly
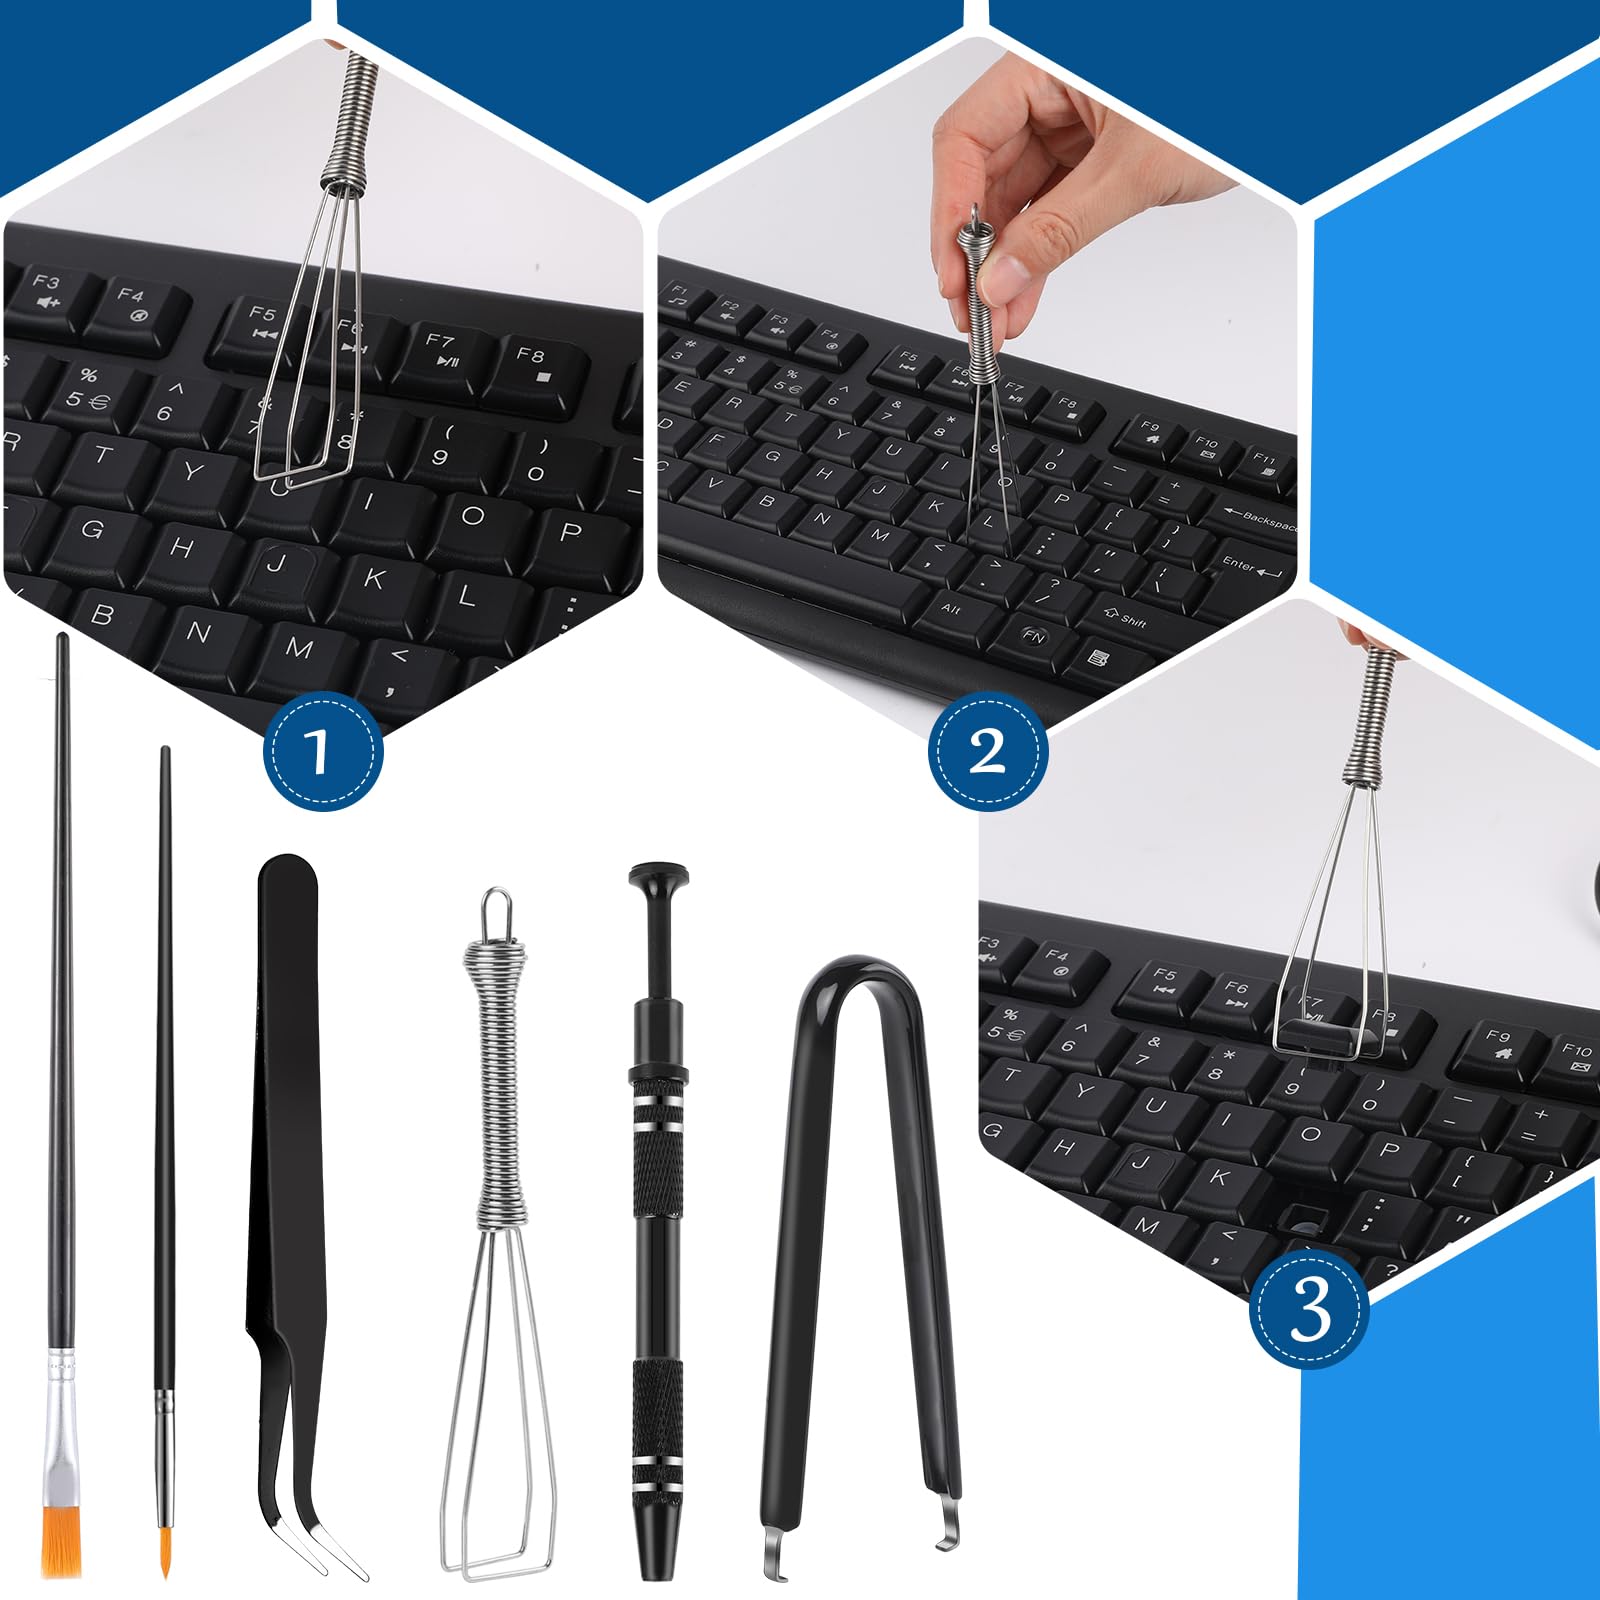
Safe Keycap Removal Without Damage
Use a keycap puller—never pry with screwdrivers. Plastic ring pullers work for Cherry MX switches, while wire pullers suit low-profile designs. Remove keycaps in a pattern (start with function keys) to maintain orientation reference. Pro tip: Take photos before disassembly—keyboard layouts can be confusing to reconstruct later.
Effective Cleaning Process for Sticky Keys
- Compressed air: Hold can at 30-45° angle, short bursts between switches
- Isopropyl alcohol: 90%+ concentration on cotton swabs for stubborn residue
- Stubborn gunk: Dampen swab slightly—never soak switches directly
- Drying time: 15-30 minutes minimum before reassembly
Critical warning: Never use household cleaners or water—these can damage switch mechanisms and cause permanent shorts.
Repair Membrane Keyboards Without Special Tools
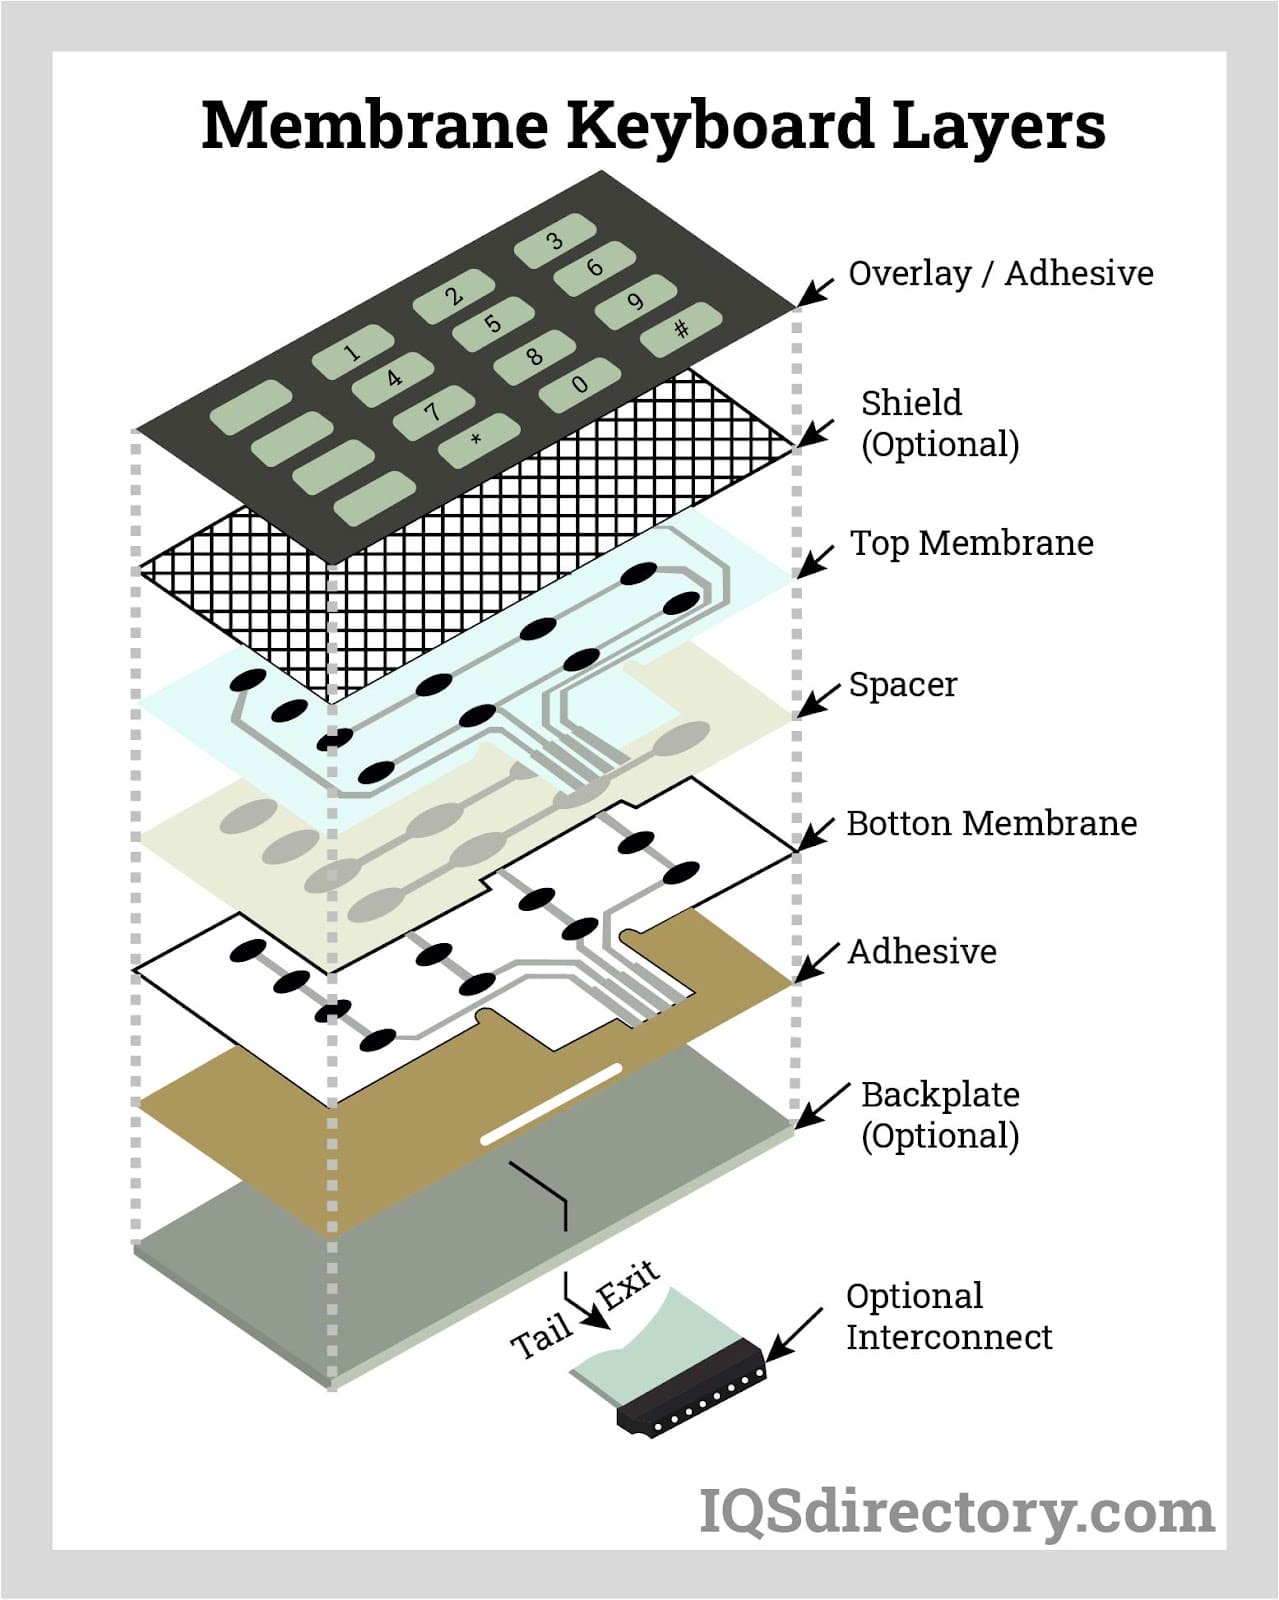
Disassembly Steps for Common Membrane Keyboards
Most membrane keyboards hide 6-12 screws under rubber feet or warranty stickers. Pry gently—plastic clips break easily. Once open, you’ll see three membrane layers that must stay in order. Take photos during disassembly to reference layer alignment during reassembly.
Contact Cleaning That Restores Functionality
Use a white pencil eraser on the circuit traces where keys make contact. This removes oxidation without damaging the delicate printed circuits. For broken traces, apply conductive silver paint or copper tape bridges—this DIY fix works for 70% of localized membrane failures. Never use metal tools which can scratch and permanently damage membrane layers.
Salvage Liquid-Damaged Keyboards Immediately
Emergency Actions (5-10 Seconds to Save Your Keyboard)
- Unplug immediately—every second counts with liquid exposure
- Remove batteries from wireless models or hold laptop power button 15-30 seconds
- Flip keyboard upside-down at 45° angle to drain liquid away from circuits
- Remove keycaps immediately if dealing with sugary drinks to prevent corrosion
Disassembly and Cleaning Protocol
Water damage: Complete teardown required—remove all membrane layers. Sugary drinks: Immediate disassembly is critical—sugar crystallizes and corrodes circuits within hours. Ultrasonic cleaning with distilled water provides thorough results for severe cases. Drying timeline: 48-72 hours minimum with silica gel packets—rice is ineffective and can introduce starch into mechanisms.
Fix Software Configuration Issues in Minutes
Windows-Specific Fixes That Work
Disable Filter Keys via Settings > Ease of Access > Keyboard—accidental activation causes perceived malfunctions. Roll back drivers through Device Manager when updates cause problems. Run System File Checker (sfc /scannow in Command Prompt) to repair corrupted system files affecting keyboard functionality.
macOS and Linux Solutions
Reset NVRAM on Macs by restarting while holding Command + Option + P + R for 20 seconds. Linux users reload kernel modules with sudo modprobe -r atkbd && sudo modprobe atkbd. Check input sources in system settings—multiple active layouts cause character mapping confusion.
Prevent Future Keyboard Failures Proactively
Cleaning Schedule That Extends Keyboard Life
- Weekly: Microfiber cloth dampened with water for surface cleaning
- Monthly: Deep clean for frequently used mechanical keyboards
- Quarterly: Lubricate stabilizers on mechanical keyboards with Krytox 205g0
Environmental Protection That Works
Dust covers prevent debris accumulation during extended idle periods. Silicone skins protect membrane keyboards against minor spills. Maintain 40-60% humidity to prevent static buildup and corrosion—use a hygrometer to monitor your workspace.
When to Replace vs. Repair: Cost Analysis

Basic repairs cost $20-50 for tools and replacement parts. Laptop keyboard replacement runs $80-150 plus labor. Compare to new keyboards—basic models start at $25, gaming mechanical keyboards at $70+. Red flags requiring replacement: multiple liquid damage incidents, cracked circuit boards, or vintage keyboards with unavailable parts.
Quick Reference: Fix Speed Guide
30 seconds: Try different USB port, check wireless batteries
5 minutes: Run Windows troubleshooter, clean visible debris
30 minutes: Remove and clean keycaps, check for liquid damage
2-4 hours: Complete disassembly, ultrasonic cleaning, full reassembly
A malfunctioning keyboard doesn’t always mean expensive replacement. Start with the simplest fixes—often a quick cleaning or software adjustment restores full functionality. Keep this guide bookmarked for future emergencies, and remember: prevention through regular cleaning saves hours of troubleshooting later. With these proven techniques, you’ll spend less time fighting your keyboard and more time getting work done.