How to Fix Half Keyboard Keys Not Working
You’re typing an important email when suddenly the right side of your keyboard goes dead. The letters “y, u, i, o, p” and everything to the right refuse to respond, while the left side works perfectly. This specific failure pattern—exactly half your keyboard becoming unresponsive—is almost always a hardware issue, not a software problem. When approximately half of your keyboard keys stop working, you’re likely dealing with a circuit failure in the keyboard matrix that you can often diagnose and repair yourself.
This frustrating scenario affects thousands of users daily, whether on desktop membrane keyboards or laptop integrated models. Unlike random key failures, when keys fail in a clear pattern (left side, right side, or specific sections), it points directly to physical damage rather than operating system issues. In this guide, you’ll learn precise diagnostic steps to identify whether your problem stems from membrane tears, cable damage, or circuit failures, plus practical solutions ranging from simple fixes to professional repair options.
Identify Your Exact Failure Pattern
Map Which Keys Actually Fail
Start by systematically testing every key to document your specific failure pattern. Open a text document and press each key while noting which ones don’t register. Most half-keyboard failures follow the keyboard’s internal matrix structure—either entire rows, columns, or specific sections stop working.
Critical pattern recognition points:
– Left/right split: Failure along the home row (j,k,l,;,’) indicates a vertical column break
– Top/bottom split: Non-working function keys with working letters suggests horizontal row damage
– Diagonal failure: Keys like q,a,z failing together often points to cable damage near the controller
Recognize Matrix Circuit Failure Signs
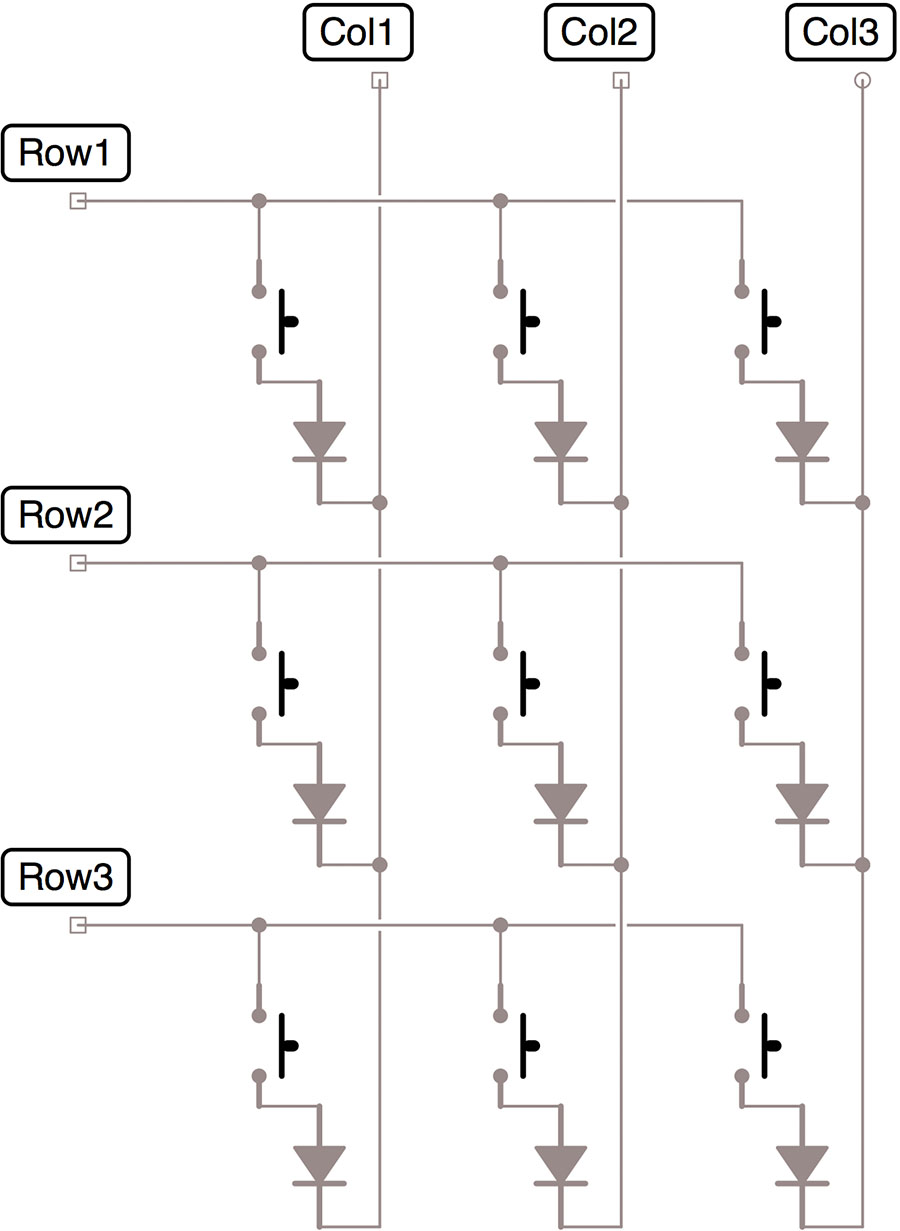
Keyboard circuits are arranged in grids where keys share electrical pathways. When half your keyboard stops working, you’re seeing evidence of a broken trace in this matrix. Membrane keyboards show this as dark spots or visible cracks on the plastic sheets, while mechanical keyboards may have multiple switches on the same circuit branch failing.
Physical indicators to check:
– Remove keycaps over affected area to inspect for debris or corrosion
– Look for discoloration on membrane layers beneath failed keys
– Test if pressing harder temporarily restores function (indicates partial circuit break)
– Check if liquid spills recently occurred near the failure boundary
Immediate Diagnostic Tests
Test in BIOS Mode for Hardware Confirmation
Restart your computer and press F2, F10, or Delete during startup to enter BIOS/UEFI. If the same keys don’t work here, you’ve confirmed a hardware issue—the operating system isn’t even loaded yet. This simple test eliminates software and driver problems from consideration.
BIOS test procedure:
1. Power down your computer completely
2. Press BIOS key repeatedly as soon as you power on
3. Navigate BIOS menus using affected keys
4. Try typing in any text fields (like date/time settings)
Check Cable Connections Thoroughly
For external keyboards, disconnect and reconnect the USB cable while testing keys. Examine the connector for bent pins or corrosion, then try different USB ports. Gently wiggle the cable near both ends while pressing affected keys—if functionality changes, you’ve found a cable break.
Laptop-specific cable check:
– Power down and unplug your laptop
– Remove bottom panel to access keyboard connector
– Locate the ribbon cable connecting keyboard to motherboard
– Disconnect and reconnect the cable, ensuring proper alignment
– Check for fraying where cable bends near the hinge
DIY Repair Solutions That Work
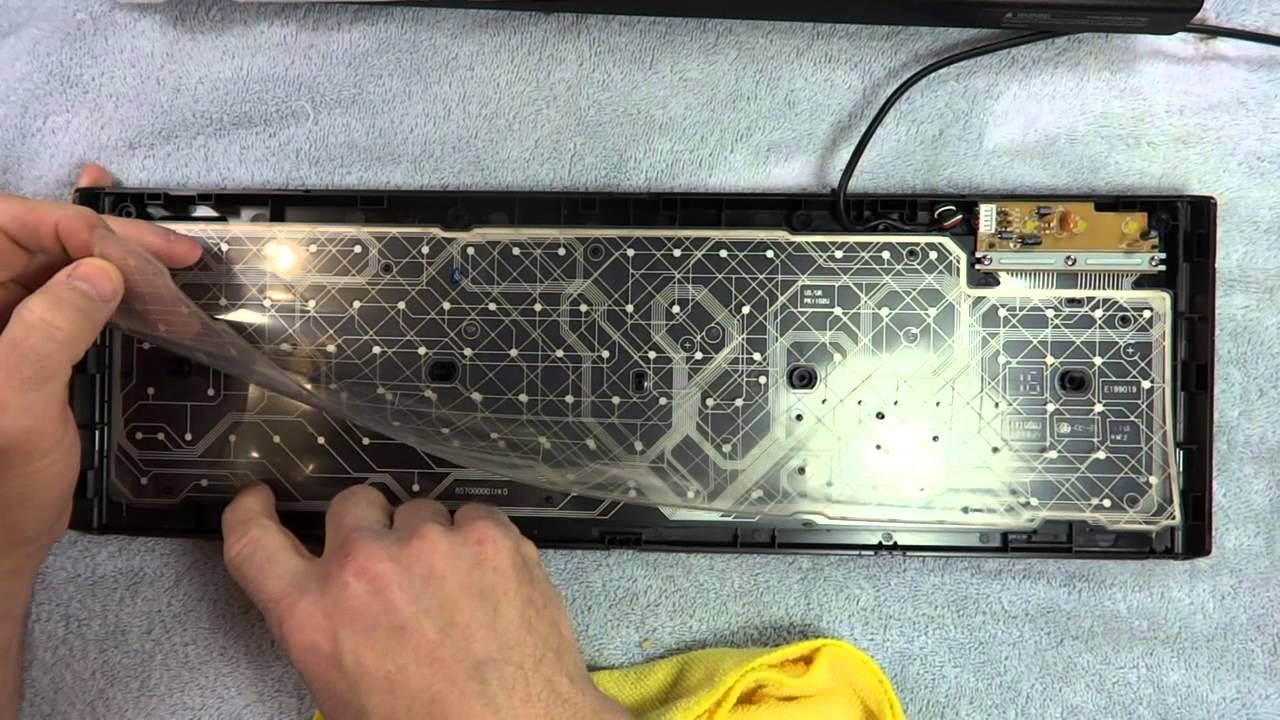
Membrane Keyboard Circuit Repair
Most standard keyboards use layered plastic membranes with printed circuits. When these develop breaks, entire sections fail. To fix half keyboard keys not working caused by membrane damage:
- Disassemble keyboard carefully (remove all visible screws, often hidden under labels)
- Lift keycaps over affected area using a puller or flat tool
- Examine membrane layers for visible cracks or dark spots at failure boundary
- Clean area with 90%+ isopropyl alcohol on cotton swab
- Apply conductive silver paint across broken trace, let dry 24 hours
- Seal with clear nail polish for protection before reassembly
Pro tip: Test circuit continuity with a multimeter set to ohms mode—you should see less than 1 ohm resistance across a working trace.
Mechanical Keyboard Switch Replacement
If you have a mechanical keyboard with half working keys, individual switches can often be replaced. This is especially effective when multiple keys in the same area fail simultaneously.
Switch replacement process:
1. Identify failed switches using the matrix test pattern
2. Desolder switches using 350°C soldering iron and solder wick
3. Clean PCB pads thoroughly before installing new switches
4. Use compatible replacements (Cherry MX, Gateron, etc.)
5. Test functionality before reassembling the keyboard
Professional Repair Options Worth Considering
When to Seek Expert Help
Consider professional repair if your laptop keyboard has integrated circuitry, or if you lack soldering experience. Integrated laptop keyboards often require specialized tools to remove bezels and access ribbon cables. If the failure involves multiple layers of circuitry or you see visible corrosion, professional cleaning and repair may save you replacement costs.
Typical repair costs:
– Basic membrane keyboard: $20-40
– Mechanical keyboard PCB repair: $50-100
– Laptop keyboard replacement: $100-200
– Gaming keyboard controller replacement: $80-150
Temporary Workarounds for Immediate Relief
Software Remapping Solutions
While waiting for repair, remap non-functional keys to working alternatives using free tools:
Windows solution:
1. Install Microsoft PowerToys
2. Open Keyboard Manager
3. Remap individual keys (e.g., assign “[” to “p”)
4. Save configuration for future use
Mac alternative: Use Karabiner-Elements to create custom key mappings that bypass your dead keys.
External Keyboard Setup
Connect a USB or Bluetooth keyboard for immediate relief:
- Position external keyboard over your laptop for seamless transition
- Disable internal keyboard in Device Manager (Windows) to prevent accidental keypresses
- Pair Bluetooth keyboard before your internal one fails completely for emergency access
Prevention Strategies That Actually Work
Environmental Protection Habits
Most half-keyboard failures stem from preventable issues like liquid damage or debris buildup:
- Elevate your keyboard slightly to prevent liquid pooling during spills
- Use compressed air weekly to remove debris from key mechanisms
- Keep drinks at least 12 inches away from your workspace
- Wash hands before extended typing sessions to reduce oil buildup
Maintenance Schedule for Longevity
Implement these regular checks to prevent circuit failures:
Monthly:
– Remove keycaps and clean underneath with soft brush
– Check cable connections for looseness
– Test all keys for responsiveness changes
Quarterly:
– Disassemble and clean membrane layers (for serviceable keyboards)
– Lubricate stabilizers on larger keys like spacebar and enter
– Check for corrosion around cable entry points
Repair vs Replace Decision Guide
Cost-Effective Solutions
Replace when:
– Repair cost exceeds 50% of new keyboard price
– Multiple previous failures indicate systemic issues
– Model is obsolete with unavailable parts
– Warranty expired and design has known flaw
Repair when:
– High-end mechanical keyboard ($100+ value)
– Sentimental or custom-built keyboard
– Simple cable or single switch failure
– Under warranty or extended coverage
When half keyboard keys not working strikes, start with basic diagnostics before panicking. Test in BIOS mode to confirm hardware failure, check cable connections thoroughly, and map your exact failure pattern. For membrane keyboards, conductive silver paint repairs can restore function for under $10. Mechanical keyboard users can replace individual switches, while laptop owners may need professional cable reseating.
Remember that prevention beats repair—implement monthly cleaning and maintain proper keyboard elevation to avoid liquid damage. If replacement becomes necessary, invest in spill-resistant designs with detachable cables to prevent future frustrations. With these strategies, you’ll minimize downtime and extend your keyboard’s lifespan significantly.