How to Use SSD in Laptop: Easy Setup Guide
Is your laptop taking forever to boot up or struggling to open basic applications? Upgrading to an SSD is the single most impactful improvement you can make to breathe new life into your machine. Knowing how to use SSD in laptop systems properly can slash boot times from minutes to seconds while dramatically improving overall responsiveness. Whether you’re working on important projects or just browsing the web, this upgrade delivers immediate, tangible benefits that most users notice the moment they power on their revitalized machine.
Replacing your old hard drive with a solid-state drive transforms sluggish performance into lightning-fast operation without requiring a costly new laptop purchase. The process takes less than an hour once you understand the critical steps, and the knowledge of how to use SSD in laptop environments properly ensures you maximize both speed and longevity from your new drive. This guide cuts through the technical jargon to deliver exactly what you need to know to successfully upgrade your laptop with an SSD today.
Verify Your Laptop’s SSD Compatibility Before Spending a Dime

Identify Your Drive Type: SATA or NVMe?
Your laptop likely supports either a 2.5-inch SATA SSD or an M.2 NVMe drive, but installing the wrong type wastes time and money. 2.5-inch SATA SSDs connect via standard SATA III cables and fit in traditional hard drive bays, offering speeds up to 550MB/s. M.2 NVMe SSDs plug directly into the motherboard and deliver blazing speeds up to 3,500MB/s—perfect for intensive tasks. Check your laptop’s manual or manufacturer’s website to confirm which slot your model supports, as some older laptops only accommodate SATA drives while newer models feature M.2 slots.
Use Manufacturer Tools for Guaranteed Compatibility
Don’t gamble on compatibility—visit your laptop maker’s support page and enter your exact model number. Most manufacturers provide detailed SSD compatibility lists that eliminate guesswork. Tools like Crucial’s Scanner or Kingston’s SSD Finder analyze your system specifications automatically, recommending drives that physically fit and work with your laptop’s firmware. This step prevents the frustration of purchasing an SSD only to discover it won’t work with your specific model.
Choose the Perfect SSD Capacity for Your Workflow
SSD-Only Setup: Performance Versus Storage Trade-Off
If you’re replacing your entire hard drive, 250GB works for basic web browsing and office applications, but fills up quickly with modern operating systems and updates. 500GB represents the sweet spot for most users, providing ample space for Windows, essential applications, and personal files. 1TB becomes necessary if you work with large media files, maintain extensive photo libraries, or install multiple resource-intensive programs. Remember that SSDs cost more per gigabyte than HDDs, so balance your budget against actual storage requirements.
Hybrid Configuration: Best of Both Worlds
Many laptops support dual drives, letting you install SSD for your operating system and critical applications while keeping your existing HDD for bulk storage. This setup gives you SSD speed where it matters most—for booting, launching programs, and opening files—while maintaining terabytes of affordable storage for documents, photos, and videos. The performance difference between this configuration and a full SSD setup is minimal for most users, making it an excellent compromise when budget constraints limit your SSD capacity.
Execute Flawless SSD Installation with These Critical Steps
Essential Safety Precautions You Must Follow
Power down completely and unplug your laptop before starting—never work on a live system. Remove the battery if your model allows it, as this prevents accidental power surges. Discharge static electricity by touching a grounded metal object before handling components, as static can instantly destroy your new SSD. Work on a clean, non-carpeted surface with good lighting, and use a magnetic parts tray to keep screws organized during disassembly.
Install 2.5-inch SSDs Without Damaging Your Laptop
Most laptops feature a dedicated hard drive bay accessible through the bottom panel. After removing the panel screws, locate your existing drive (usually secured with 2-4 screws). Transfer mounting brackets from your old drive to the new SSD if needed, then connect the SATA data cable (thin, flat connector) and power cable (larger connector) to the SSD. Secure the drive with screws but don’t overtighten—finger-tight plus a quarter-turn is sufficient. Reassemble the bottom panel carefully, ensuring no cables are pinched.
Insert M.2 NVMe SSDs at the Correct Angle
For M.2 drives, locate the slot (usually labeled “SSD” or “M.2” near the RAM slots). Insert the SSD at a 30-degree angle, aligning the drive’s notch with the slot’s key. Gently press down until the SSD lies flat against the motherboard, then secure it with the single mounting screw. Verify you’ve purchased the correct M.2 length (2242, 2260, or 2280mm) for your laptop’s specific slot—most support 2280, but smaller models may require shorter drives.
Transfer Your Data Without Losing a Single File
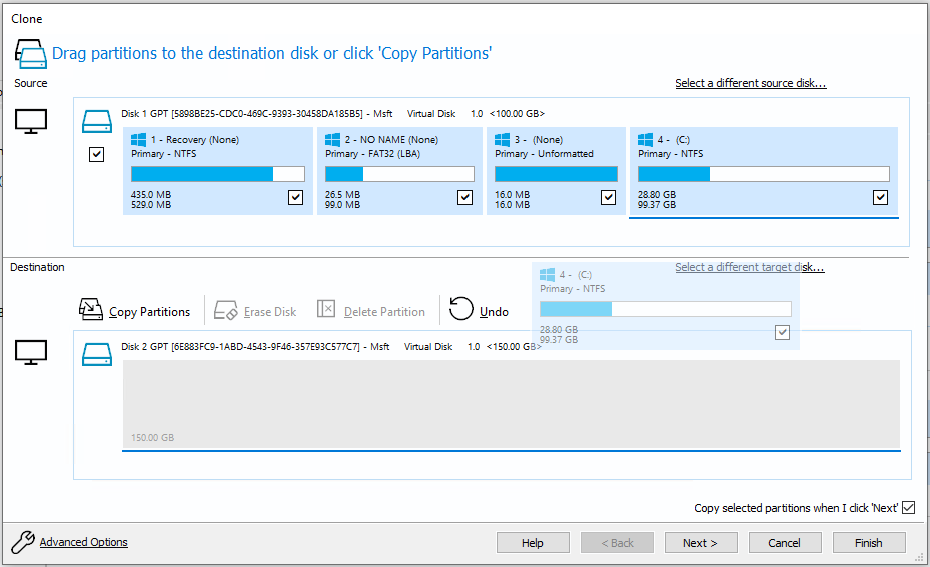
Clone Your Existing Drive Successfully
Connect your new SSD via an external USB enclosure before installation. Use Macrium Reflect Free or your SSD manufacturer’s cloning software to create an exact copy of your current drive. Ensure your SSD capacity equals or exceeds your used space—cloning fails if the target drive is too small. This method preserves your Windows installation, settings, and all personal files, letting you pick up right where you left off after the upgrade.
Perform a Clean Windows Installation for Optimal Results
For the best performance, install Windows fresh on your new SSD. Download the Media Creation Tool from Microsoft, create a bootable USB drive, and install Windows directly to your SSD. This eliminates accumulated software bloat and registry errors from your old system. Reinstall applications and restore personal files from backup—this extra effort delivers noticeably snappier performance compared to cloning, especially on older systems.
Optimize Your SSD for Long-Term Peak Performance
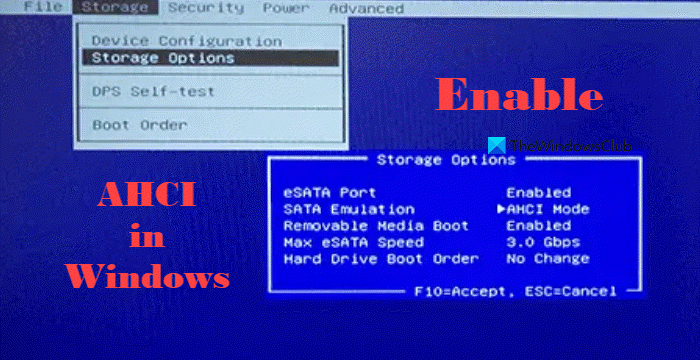
Critical BIOS Settings You Must Enable
After installation, enter BIOS/UEFI by pressing F2, F10, or Delete during startup. Navigate to SATA configuration and ensure AHCI mode is enabled—this setting unlocks your SSD’s full speed potential. Some older laptops default to IDE mode for compatibility with HDDs, severely limiting SSD performance. Save changes and exit—Windows should boot normally with dramatically improved responsiveness.
Essential Windows Tweaks for SSD Longevity
Disable disk defragmentation immediately—Windows automatically does this for SSDs, but verify by checking scheduled tasks. Enable TRIM by opening Command Prompt as administrator and typing fsutil behavior set DisableDeleteNotify 0. Update storage drivers from your laptop manufacturer’s website for optimal compatibility. Adjust virtual memory settings to 1.5x your RAM size to reduce unnecessary writes while maintaining performance.
Troubleshoot Common SSD Installation Problems Immediately

SSD Not Detected? Fix These Critical Issues First
If your system doesn’t recognize the new SSD, reseat all connections—a slightly loose SATA cable causes most detection failures. Check BIOS settings to ensure the drive isn’t disabled in the storage configuration menu. Test with different SATA ports if available, as some laptops disable ports when others are in use. For M.2 drives, verify compatibility—some slots only support SATA M.2 drives while others require NVMe, and mixing them causes detection failures.
Slow Performance After Installation? Check These Settings
If your SSD isn’t delivering expected speed gains, confirm AHCI mode is enabled in BIOS—this single setting affects performance more than any other. Update SSD firmware using manufacturer tools like Samsung Magician or Crucial Storage Executive. Check for driver updates specifically for your laptop model—generic Windows drivers often lack optimizations. Verify TRIM is functioning by opening Command Prompt and typing fsutil behavior query DisableDeleteNotify—a result of “0” confirms TRIM is active.
Extend Your SSD’s Lifespan with These Pro Maintenance Tips
SSDs naturally last longer than HDDs due to no moving parts, but you can maximize longevity further. Disable hibernation with powercfg /hibernate off in Command Prompt to prevent large, unnecessary writes. Move temporary files to a RAM disk using PrimoCache to reduce write cycles. Store large media files on external drives or cloud storage to minimize SSD wear. Monitor drive health monthly with CrystalDiskInfo to catch potential issues before they become critical failures.
Why Upgrading Your Old Laptop with an SSD Beats Buying New
Installing an SSD in a 5-year-old laptop often delivers better real-world performance than purchasing a new machine with a traditional hard drive. Boot times drop from 2-3 minutes to under 30 seconds, while application launches become nearly instantaneous. This $50-150 upgrade costs a fraction of a new laptop yet extends your current machine’s useful life by 2-3 years. For students, professionals, and casual users alike, learning how to use SSD in laptop systems properly represents the most cost-effective performance boost available today.
Final Tip: After completing your SSD installation, run a benchmark test with CrystalDiskMark to verify your drive is performing at expected speeds. If results fall significantly below specifications, revisit your BIOS settings and driver installations—most performance issues stem from simple configuration oversights rather than hardware problems. With proper setup and optimization, your newly upgraded laptop will deliver years of responsive, reliable performance that makes computing enjoyable again.