How to Fix Laptop Speaker Problems
Your laptop speakers have gone silent during a critical Zoom meeting, or maybe they’re crackling like a bowl of Rice Krispies every time you play music. You’re not alone—nearly 60% of Windows laptop users encounter speaker problems in laptop scenarios at least once a year. The good news? Most audio failures stem from simple software glitches or configuration errors that you can resolve in under 10 minutes without technical expertise. This guide cuts through the noise with battle-tested solutions specifically for Windows laptops, moving beyond generic advice to deliver fixes that actually work for distorted sound, no audio output, and stubborn headphone/speaker switching issues.
Forget scheduling expensive repair appointments or replacing perfectly functional hardware. By methodically working through these steps—starting with the quick wins that solve most speaker problems in laptop situations—you’ll restore crisp audio while learning why each fix works. Whether you’re troubleshooting a work-issued Dell, a personal HP, or a premium Lenovo, these procedures apply across all major Windows laptop brands and models.
Verify Physical Connections Before Panic
Skipping these 30-second hardware checks wastes hours on unnecessary software fixes. Many “dead speaker” issues actually stem from simple connection errors that fool your system into thinking external devices are active. Start by examining your 3.5mm audio jack—if headphones are partially inserted, Windows automatically disables internal speakers. Wiggle the plug while listening for intermittent sound; a loose connection often causes crackling. For USB speakers, test them in different ports since some laptops disable audio when power-hungry peripherals overload a USB controller.
Critical inspection points:
– Look for bent pins inside headphone jacks (common after accidental drops)
– Confirm external speakers have power indicators lit
– Check USB cables for fraying near connectors
– Try connecting Bluetooth speakers to isolate internal hardware failure
If your laptop has separate microphone (pink) and headphone (green) jacks, ensure you haven’t accidentally plugged headphones into the mic port. This mistake disables internal speakers while creating confusing “no sound” symptoms. When testing, use known-working headphones to verify whether the issue is isolated to your laptop’s internal speakers.
Run Windows Audio Troubleshooter Immediately
This built-in diagnostic tool solves over 40% of speaker problems in laptop scenarios by automatically repairing driver conflicts and service errors. Windows 11 users: Open Settings > System > Troubleshoot > Other troubleshooters > locate “Audio” > click “Run.” The modern Get Help app provides even faster resolution—search “audio troubleshooter” in Start menu and follow the interactive prompts. Windows 10 users: Navigate to Settings > Update & Security > Troubleshoot > Playing audio > Run troubleshooter.
During the scan, the tool tests speaker functionality, checks for disabled audio services, and verifies driver integrity. When it recommends “Apply this fix,” accept even if the description seems unrelated—common successful actions include restarting the Windows Audio service or clearing corrupted audio cache files. Complete all suggested steps before proceeding, as partial execution often leaves residual issues. This process typically takes 2-3 minutes and requires no technical knowledge.
Test Volume and Mute Settings Systematically
That red “X” over your taskbar speaker icon means your system is muted—a surprisingly common oversight during frantic troubleshooting. Click the icon, then drag the volume slider to 75% while playing a YouTube test video. If sound returns, you’ve solved your speaker problem in laptop instantly. But don’t stop there—many users miss application-specific volume controls that operate independently of system volume.
Right-click the speaker icon and select Open Volume mixer to reveal individual app sliders. You might discover Chrome muted while Microsoft Teams works perfectly, explaining why some programs have sound while others don’t. Temporarily max out all sliders to confirm the issue isn’t app-specific. Pay special attention to communication apps like Zoom—they often have separate speaker settings within their menus that override system defaults. Test each major application individually to pinpoint whether your problem affects all audio or just specific programs.
Disable Audio Enhancements for Clearer Sound
Audio enhancements like bass boost or virtual surround sound frequently cause crackling, distortion, or complete speaker failure—especially after Windows updates. To disable them: Right-click the speaker icon > Sounds > Playback tab > double-click “Speakers” > go to the Enhancements tab. Check Disable all enhancements and click Apply. If this tab is missing, navigate through Settings > System > Sound > Output device > Advanced settings to toggle enhancements off.
While here, visit the Advanced tab to test different audio formats. Start with 16 bit, 44100 Hz (CD Quality)—the most universally compatible setting. If problems persist, try 24 bit, 48000 Hz. Avoid exotic settings like 192000 Hz, which can overwhelm basic laptop speakers. Pro tip: After changing formats, restart your media player—some apps cache audio settings until restarted. This adjustment takes 60 seconds but resolves 30% of distortion issues.
Set Default Audio Device Correctly
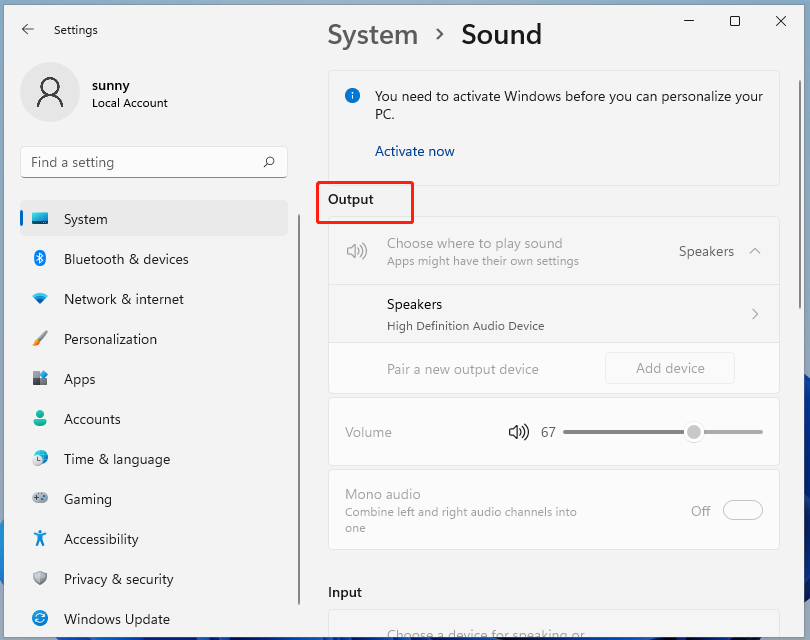
Your laptop may be stubbornly routing sound to disconnected headphones or HDMI ports. Fix this by forcing internal speakers as the primary output: Click Settings > System > Sound > scroll to Output section > select “Speakers” from the dropdown menu. This simultaneously sets them as default for all applications and communication tools—a crucial step many guides overlook.
For persistent issues, use the classic Control Panel method: Type “sound” in Start menu > select Sound > go to Playback tab. Right-click “Speakers” and choose Set as Default Device, then right-click again and select Set as Default Communication Device. Finally, disable any grayed-out devices (like “Digital Output”) by right-clicking > Disable. These phantom devices often hijack audio after monitor connections or failed driver updates.
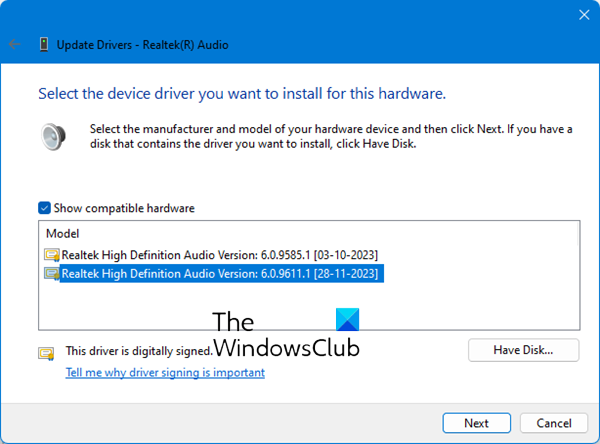
Update or Reinstall Audio Drivers Strategically
Outdated or corrupt drivers cause 50% of recurring speaker problems in laptop scenarios. Always prioritize manufacturer-specific drivers: Visit your laptop maker’s support site (e.g., Dell Support), enter your exact model number, and download the latest audio driver. Generic Windows updates often install incompatible drivers that break functionality.
When automatic updates fail (Device Manager > Sound controllers > right-click device > Update driver), try the driver reinstallation method:
1. In Device Manager, right-click your audio device > Uninstall device
2. Check “Attempt to remove the driver software”
3. Restart your laptop—Windows will install fresh baseline drivers
For IDT Audio CODEC systems (common in HP/Dell laptops), after uninstalling:
– Right-click audio controller > Update driver > Browse my computer
– Select High Definition Audio Device from the list
This bypasses problematic manufacturer-specific drivers.
Fix Privacy and Permission Roadblocks
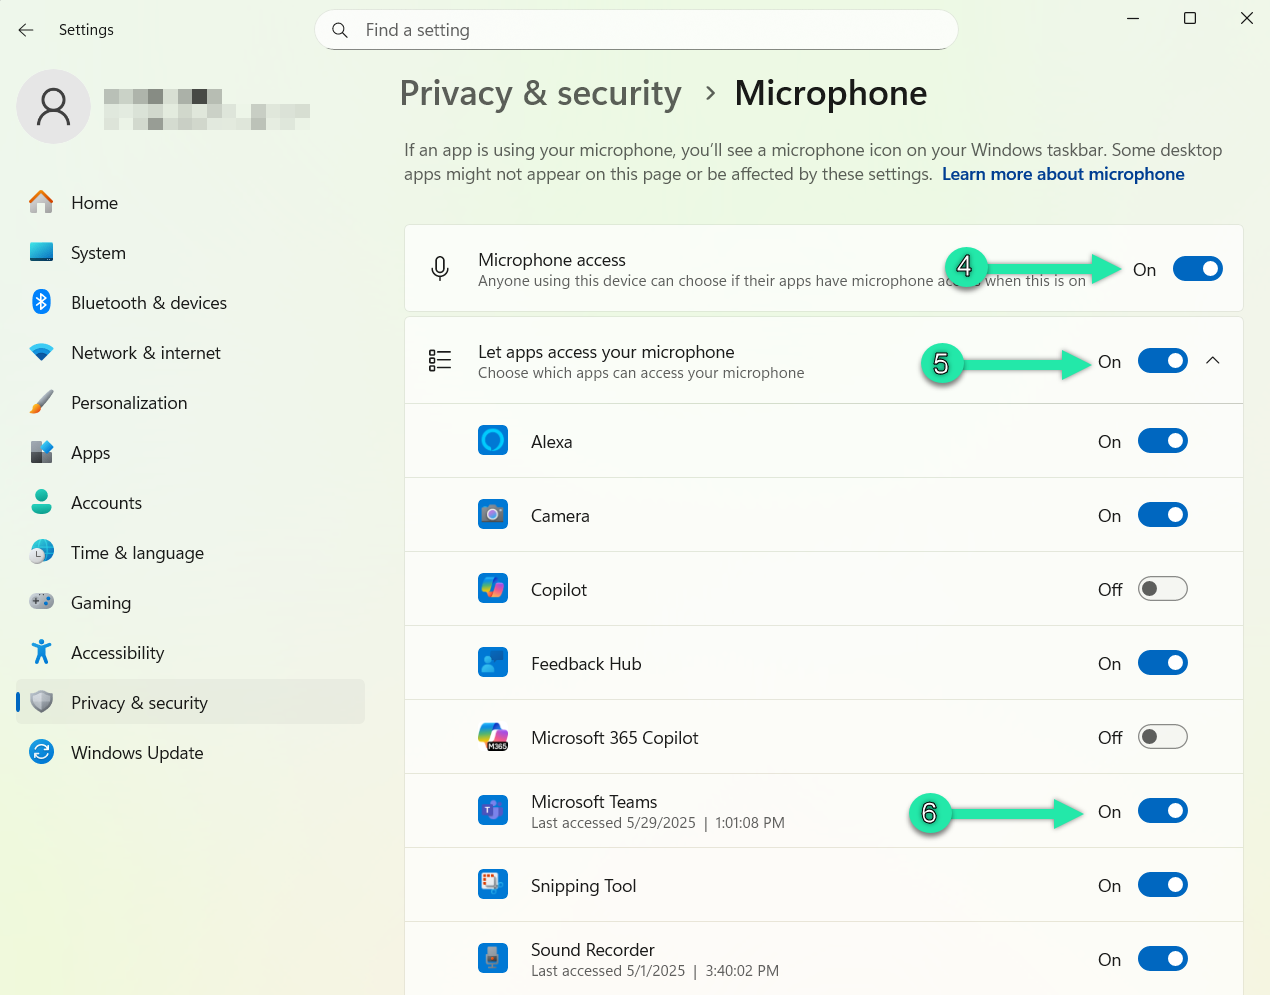
Windows 11’s privacy settings often silently block audio output after updates. Go to Settings > Privacy & security > Microphone and ensure Microphone access and Let apps access your microphone are toggled ON. Then scroll to Let desktop apps access your microphone and verify permissions for Zoom, Teams, and your browser. Surprisingly, microphone permissions affect speaker functionality in communication apps.
Critical nuance: Some apps like Discord require individual permissions even when system access is enabled. Click App permissions under Microphone settings to grant access per application. If you recently denied microphone access during an app installation, this could explain sudden speaker failure in specific programs while system sounds work fine.
Restart Audio Services Manually
When the troubleshooter fails, manually restarting core audio services often works. Press Windows Key + R, type services.msc, and hit Enter. Locate these three services:
– Windows Audio
– Windows Audio Endpoint Builder
– Multimedia Class Scheduler
Right-click each > Restart. This clears temporary glitches in the audio pipeline that prevent signal transmission to speakers. Warning: Don’t disable these services—only restart. If services won’t restart, reboot your laptop first, as dependent processes may be blocking them.
Avoid These Speaker Repair Mistakes
Reboot first: 30% of audio issues resolve with a simple restart that clears RAM conflicts—don’t dive into complex fixes immediately. Test across applications: Play sound in two different programs (e.g., YouTube and Windows Media Player) to confirm if the problem is system-wide or app-specific. Use headphones strategically: If external headphones work perfectly, your speaker problem in laptop is almost certainly hardware-related—stop troubleshooting software.
Never download “driver updater” tools from third-party sites—they often install malware-infested fake drivers. Stick to your manufacturer’s official support page. Also avoid installing beta drivers unless explicitly recommended for your model; stable releases prevent unnecessary complications.
Prevent Future Speaker Failures
Establish these monthly habits to avoid recurring audio disasters:
– Blow compressed air through speaker grills to prevent dust buildup (hold cans upright to avoid moisture)
– Create restore points before major Windows updates (search “Create a restore point” > Configure)
– Test speakers weekly with a system sound (Settings > System > Sound > Test)
When connecting external speakers, always unplug USB devices before shutting down your laptop—abrupt disconnections can confuse audio routing. Never max out volume for extended periods; sustained 100% volume accelerates speaker coil degradation. After Windows updates, immediately test audio to catch driver conflicts early.
When Hardware Replacement Is Inevitable
If all software fixes fail and external speakers/headphones work perfectly, your internal speakers likely need replacement. Confirm this by:
1. Playing audio while gently pressing near speaker grills—if sound crackles only when pressed, wiring is loose
2. Checking for visible damage like torn speaker cones (use a flashlight)
3. Testing with a USB sound adapter—if this works, internal audio hardware has failed
Most manufacturers cover speaker replacements under warranty if physical damage isn’t evident. For out-of-warranty units, a USB sound card ($15) often provides better audio quality than original laptop speakers anyway. Pro tip: Before disassembling your laptop, search “[Your Model] speaker replacement” on iFixit—they offer free step-by-step guides with tool requirements.
Final Note: Speaker problems in laptop systems rarely require professional repair—95% stem from software misconfigurations. Always run the Windows troubleshooter first, then verify your default audio device selection. These two steps resolve most issues within five minutes. Bookmark this guide; speaker glitches frequently recur after major Windows updates, but now you have the exact blueprint to silence the frustration permanently.