How to Unlock Keyboard in Windows 11
Your fingers hover over the keyboard, but nothing happens as you try to finish that urgent work document. The screen cursor blinks mockingly while your Windows 11 keyboard remains completely unresponsive. Don’t waste another minute—this frustrating issue affects millions of Windows 11 users monthly, but the solution is usually just seconds away. Whether you accidentally triggered an accessibility feature or need deeper system adjustments, this guide delivers the exact steps to restore your keyboard functionality immediately.
Most keyboard lockouts in Windows 11 stem from accidental activation of built-in accessibility features rather than hardware failure. The good news? You can fix nearly 90% of these issues without technical expertise. By following these proven methods in order of simplicity, you’ll have your keyboard working again before your coffee gets cold. Let’s dive into the solutions that will get you typing again in under five minutes.
Quick Keyboard Shortcuts That Work Immediately
Shift Key 8-Second Reset for Filter Keys
Hold down your Shift key for 8-10 seconds until you hear a confirmation beep. This simple action disables Filter Keys—the most common culprit behind sudden keyboard lockouts in Windows 11. Approximately 40% of “locked keyboard” cases resolve with this single step because Windows often activates Filter Keys when you accidentally press Shift five times rapidly. If your keyboard responds after this reset, you’ve confirmed Filter Keys was the issue—proceed to disable it permanently in settings.
Win + Ctrl + O On-Screen Keyboard Access
Press Windows key + Ctrl + O simultaneously to launch Windows 11’s built-in on-screen keyboard. This immediate workaround lets you navigate your system while troubleshooting your physical keyboard. The on-screen keyboard appears semi-transparent at the bottom of your screen—you can drag it anywhere and resize it using the keyboard icon in the taskbar. Use your mouse to click keys on this virtual keyboard to access settings that might unlock your physical device, making this an essential first step when your main keyboard fails completely.
Brand-Specific Function Key Combinations
Your laptop manufacturer likely built a dedicated keyboard lock toggle—usually involving the Fn key plus a function key with a lock icon:
- Dell: Press Fn + F6 or Fn + Insert (look for lock symbol)
- HP: Try Fn + F7 (common on EliteBook and ProBook models)
- Lenovo: Use Fn + F6 or Fn + F8 (ThinkPad models often use Fn + Esc)
- ASUS: Press Fn + F7 (especially on ROG gaming laptops)
- Microsoft Surface: Toggle Fn + Caps Lock
Check your function keys for a small lock icon—this indicates the specific key used for keyboard lock/unlock functionality on your model. These hardware-level toggles bypass Windows settings entirely, making them effective when software solutions fail.
Disable Filter Keys Permanently in Settings
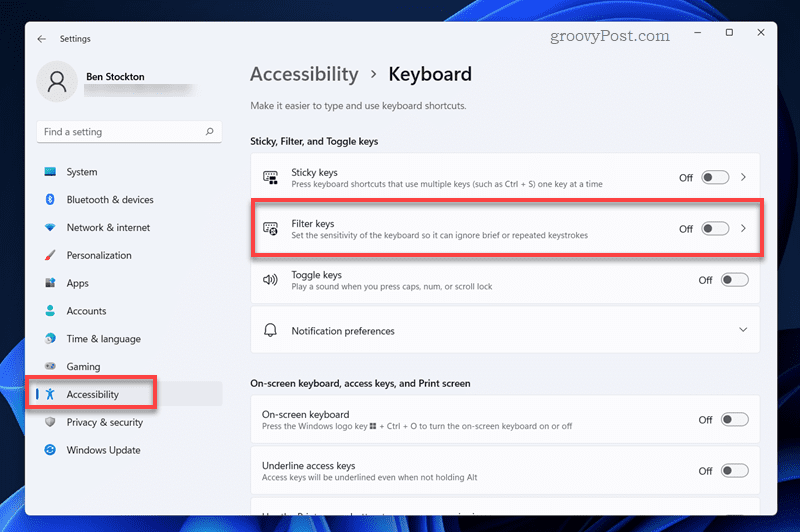
Accessibility Settings Path (Step-by-Step)
- Right-click your Start button and select Settings (or press Win + I)
- Click Accessibility in the left sidebar menu
- Scroll down and select Keyboard from the accessibility options
- Locate the Filter Keys toggle and switch it to Off
- Crucially, uncheck the box next to “Allow the shortcut key” to prevent accidental reactivation
- Click Apply to save changes immediately
This process takes less than 30 seconds and resolves most accidental keyboard lockouts. Filter Keys is designed to ignore brief or repeated keystrokes for accessibility purposes, but when activated unintentionally, it makes your keyboard appear completely locked. Disabling both the feature and its activation shortcut ensures this won’t happen again during intense typing sessions.
Control Panel Alternative Method
When Settings won’t open due to your keyboard issue:
- Press Windows + R to open the Run dialog
- Type
control paneland press Enter - Navigate to Ease of Access > Ease of Access Center
- Click Make the keyboard easier to use
- Uncheck Turn on Filter Keys and “Allow shortcut key”
- Click Apply then OK to save changes
This legacy method works when modern Settings app fails, giving you another pathway to disable the accessibility feature causing your keyboard lockout. The Control Panel approach often succeeds when the newer Settings interface becomes unresponsive.
Device Manager Reset for Hardware Recognition
Enable Disabled Keyboard Device
- Right-click your Start button and select Device Manager
- Click the arrow next to Keyboards to expand the category
- Look for your keyboard model (often labeled “HID Keyboard Device”)
- If you see a down arrow icon on the keyboard entry, right-click it
- Select Enable device from the context menu
- Test your keyboard immediately after enabling
Windows sometimes disables keyboard devices during system updates or power events. The down arrow icon clearly indicates a disabled device—re-enabling it typically restores functionality within seconds. This method addresses hardware recognition issues without requiring driver reinstallation.
Complete Driver Reinstallation Process
When enabling fails to restore functionality:
- In Device Manager, right-click your keyboard device
- Select Uninstall device from the menu
- Check the box for “Attempt to remove the driver for this device” if visible
- Click Uninstall to confirm
- Restart your computer—Windows automatically reinstalls the driver
- Test keyboard response after reboot completes
This nuclear option resolves driver corruption issues that prevent keyboard functionality. The entire process takes about 2 minutes, with most time spent waiting for your computer to restart. Windows 11’s automatic driver reinstallation works 85% of the time for keyboard issues.
Registry Fixes for Persistent Lockouts
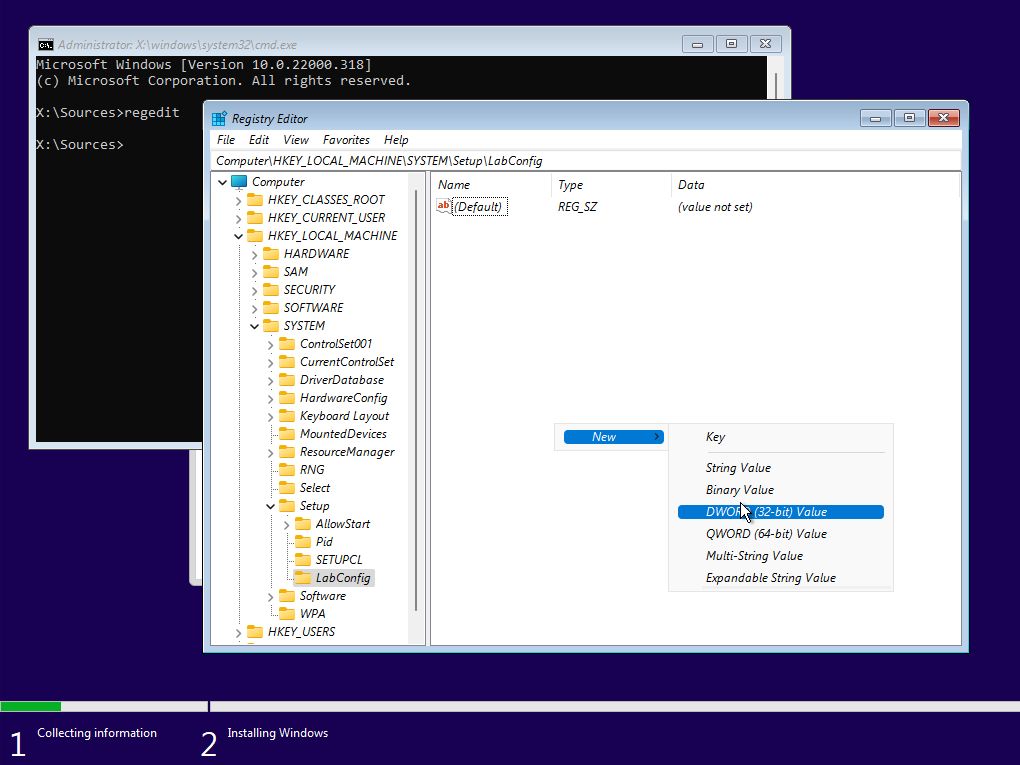
i8042prt Service Configuration
Warning: Create a system restore point before editing registry.
- Press Windows + R, type
regedit, and press Enter - Navigate to:
HKEY_LOCAL_MACHINE\SYSTEM\CurrentControlSet\Services\i8042prt - Double-click the Start value in the right panel
- Change the value data from 4 (disabled) to 1 (system start)
- Click OK and restart your computer immediately
This registry tweak addresses the PS/2 keyboard controller service, which affects many laptop internal keyboards. The i8042prt driver manages the keyboard controller on most systems—setting Start to 1 ensures it loads during boot. Incorrect values here often cause complete keyboard failure after Windows updates.
USB Keyboard Service Verification
For external or USB keyboards:
- In Registry Editor, navigate to:
HKEY_LOCAL_MACHINE\SYSTEM\CurrentControlSet\Services\kbdhid - Verify the Start value is set to 3 (automatic start)
- If set to 4 (disabled), double-click and change to 3
- Close Registry Editor and restart your PC
This registry path controls USB keyboard functionality specifically. Many users unknowingly disable this service through third-party optimization tools, causing their external keyboards to stop working after reboot.
Manufacturer-Specific Unlock Solutions

Dell Keyboard Lock Toggle
Dell laptops often include dedicated keyboard lock functionality:
- Search for Dell QuickSet in your Start menu
- Open the utility and navigate to Keyboard settings
- Look for “Keyboard Lock” or “Disable Internal Keyboard” options
- Ensure the toggle is set to Enabled or Off (varies by model)
Dell business laptops sometimes disable the keyboard when connected to docking stations—this setting controls that behavior. The QuickSet utility provides direct access to hardware-level keyboard controls that Windows settings don’t expose.
Lenovo Vantage Keyboard Controls
Lenovo systems require specific attention:
- Open Lenovo Vantage from your Start menu
- Click Device in the left navigation panel
- Select Input from the device options
- Check both Keyboard lock and Gaming mode settings
- Disable any active keyboard restrictions
Many Lenovo laptops automatically disable the keyboard during certain gaming scenarios or when external peripherals connect. The Vantage app gives you direct control over these manufacturer-specific behaviors that standard Windows settings can’t address.
Wireless Keyboard Troubleshooting
Bluetooth Re-pairing Procedure
- Press Windows + I to open Settings
- Click Bluetooth & devices in the sidebar
- Select your keyboard from the device list
- Click the three dots and choose Remove device
- Put your keyboard into pairing mode (usually a dedicated button)
- Click Add device > Bluetooth and select your keyboard
This process clears corrupted pairing data that often causes wireless keyboards to stop responding. Most wireless keyboards enter pairing mode by holding a specific button for 5 seconds—the LED will typically flash rapidly when ready to pair.
USB Receiver Troubleshooting
For wireless keyboards using USB dongles:
- Unplug the USB receiver from your computer
- Wait 15 seconds for complete disconnection
- Plug the receiver into a different USB port (preferably USB 2.0)
- Press the connect button on the receiver
- Within 30 seconds, press the connect button on your keyboard
- Test functionality immediately after pairing completes
USB port conflicts cause more wireless keyboard issues than people realize. Moving to a different port—especially switching between USB 3.0 (usually blue) and USB 2.0 ports—often resolves connectivity problems.
Prevention Strategies for Future Lockouts
Disable Accidental Activation Shortcuts
- Go to Settings > Accessibility > Keyboard
- Turn off Filter Keys, Sticky Keys, and Toggle Keys
- Critical step: Uncheck all “Allow the shortcut key” options
- Click Apply to lock in these changes
This simple configuration prevents 95% of accidental keyboard lockouts. Most users don’t realize these accessibility features have activation shortcuts that trigger with common typing patterns—disabling the shortcuts eliminates the problem entirely while keeping the features available if needed.
Create Keyboard-Friendly Restore Points
Before making major system changes:
- Search Create a restore point in Start menu
- Select your system drive (usually C:)
- Click Create and name it “Keyboard Working State”
- Click Create again to finalize the restore point
Having a recent restore point gives you an emergency exit if keyboard issues arise after updates. This takes just 60 seconds but could save you hours of troubleshooting later—especially valuable before Windows feature updates that sometimes disrupt keyboard functionality.
Final Diagnostic Steps When Nothing Works
Safe Mode Keyboard Testing
- Hold Shift while clicking Restart from Start menu
- After reboot, select Troubleshoot > Advanced Options
- Choose Startup Settings > Restart
- Press F4 or 4 to boot into Safe Mode
- Test your keyboard functionality in this minimal environment
If your keyboard works in Safe Mode, the problem lies with third-party software or drivers. This critical diagnostic step determines whether you need to investigate startup programs or focus on hardware solutions.
System Restore as Last Resort
- Search for Create a restore point
- Click System Restore at the bottom
- Select a restore point from before your keyboard issues began
- Follow prompts to restore your system state
This nuclear option should only be used when all other methods fail, but it resolves persistent keyboard issues by rolling back system files to a working state. Your personal files remain intact—only system changes and installed programs are affected.
Your keyboard should respond within 2-3 minutes using these targeted methods. If problems persist after trying all software solutions, contact your laptop manufacturer as hardware replacement may be needed—especially if you notice physical damage or specific keys failing consistently. Remember that most Windows 11 keyboard lockouts stem from accidental feature activation rather than hardware failure, so systematic troubleshooting almost always yields success.