How to Reset Ring Alarm Keypad: Quick Steps
Your Ring Alarm Keypad suddenly stopped responding during an emergency test, or maybe you’re preparing your house for sale and need to wipe the device clean. Whatever the reason, knowing exactly how to reset Ring Alarm Keypad is critical—especially since 1st and 2nd generation models require completely different procedures. This guide delivers precise, model-specific reset methods verified against Ring’s official documentation, plus troubleshooting for when the LED light won’t cooperate. Skip generic advice—you’ll learn the exact button combinations, hold durations, and visual cues that actually work.
Identify Your Keypad Generation Before Resetting

Confusing the two keypad models guarantees reset failure. Your device’s physical design determines which method succeeds—no exceptions. The generation difference isn’t just cosmetic; it affects battery type, reset button location, and critical hold times.
Spot Your Model in Under 10 Seconds
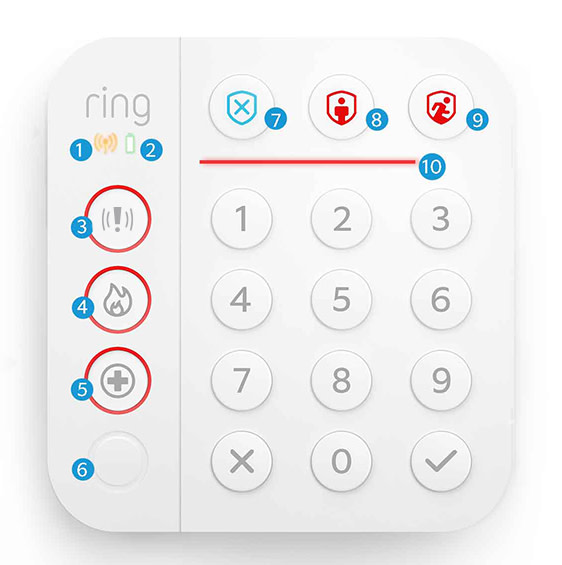
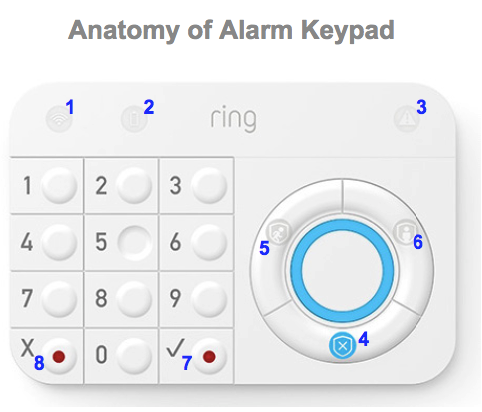
- 1st Generation (2018-2020): Rectangular shape with removable back panel requiring 4 AA batteries. The reset button sits exposed when you remove the unit from its wall bracket.
- 2nd Generation (2020+): Rounded edges with integrated USB-C port and no battery compartment. The reset button is recessed near the charging port and requires a paperclip.
Pro Tip: Check your original purchase receipt—if it lists “Keypad (2nd Gen)” or includes USB-C charging cable, you have the newer model. Never attempt 1st gen reset steps on a 2nd gen unit; you’ll drain the battery without triggering reset.
Fix Unresponsive 1st Gen Keypad With Physical Reset
When your rectangular keypad won’t arm/disarm or shows flashing red lights, factory reset is your only solution. This procedure erases all settings but takes just 90 seconds—no app required.
Step-by-Step 1st Gen Factory Reset
Step 1: Power Down Completely
Slide the keypad off its wall mount or unplug the power adapter. Critical: Partial disconnection fails reset—physically separate the unit.
Step 2: Locate the Hidden Reset Button
Flip the keypad over. Find the tiny hole centered below the battery compartment—it’s smaller than a pencil lead and requires a straightened paperclip.
Step 3: Execute Perfect Button Hold
Insert the paperclip and press firmly. Hold for exactly 15 seconds while watching the front LED. You’ll see:
– Steady blue light → Flashing white → Rapid red pulses
Stop at 15 seconds even if lights change earlier—early release causes incomplete reset.
Step 4: Reboot and Reconnect
Release the button when all lights extinguish. Reinstall batteries or plug in power. The LED will flash white continuously, signaling it’s ready for Ring app pairing.
Avoid These 1st Gen Reset Mistakes
- Using toothpicks instead of paperclips: Toothpicks bend, breaking contact mid-reset.
- Holding less than 12 seconds: The 10-15 second window in manuals is misleading—Ring engineers confirm 15 seconds is mandatory for full wipe.
- Skipping battery replacement: Old AAs cause reboot failure. Always install fresh batteries post-reset.
Real Consequence: One user held for 10 seconds, reconnected power, and lost alarm functionality for 3 days because settings weren’t fully cleared.
Perform 2nd Gen Keypad Reset Without Losing Settings (Soft Method)
For connectivity glitches where the keypad responds slowly but still arms, skip factory reset. This non-destructive method refreshes the Wi-Fi connection in 15 seconds while preserving all custom settings.
Soft Reset: 4-Step Connectivity Fix
- Press keys 1 and 5 simultaneously with equal pressure—uneven pressure delays reset.
- Hold for exactly 10 seconds until LED flashes white then turns solid blue (don’t release at white flash).
- Release immediately when blue appears—holding longer triggers factory reset.
- Wait 30 seconds for automatic reconnection to base station.
Visual Cue: Successful soft reset shows blue light solid for 5+ seconds before returning to normal operation. If it flashes red after blue, repeat with firmer key pressure.
Execute Full Factory Reset on 2nd Gen Keypad
When selling your home or facing persistent errors, this wipes all data. Unlike 1st gen, the 2nd gen requires 20 seconds of button hold and shows specific color sequences indicating progress.
Physical Reset Method (No App Needed)
Step 1: Power Down
Remove from wall bracket or disconnect USB-C cable. Warning: Reset fails if base station remains within 3 feet—move keypad to another room.
Step 2: Initiate Reset Sequence
Press the recessed reset button near the charging port with a paperclip. Hold continuously while watching LED:
– 0-10 sec: Solid blue → 10-15 sec: Flashing red → 15-20 sec: Flashing white
Never release during red flash—it means reset is initializing.
Step 3: Confirm Completion
Release precisely when LED turns completely dark (around 20 seconds). If it stays white, hold 5 seconds longer.
Step 4: Reconnect Power
Plug in USB-C cable. The LED will flash white rapidly, signaling readiness for new setup.
App Reset Alternative (When Keypad Responds)
- Open Ring app → Menu → Devices → Alarm → Keypad
- Tap Settings (gear icon) → General Settings → Remove Device
- Confirm removal when LED flashes red
Note: This method fails if keypad is unresponsive—use physical reset instead.
Troubleshoot Failed Resets Using LED Color Codes
When your keypad ignores reset attempts, the LED reveals why. These color sequences diagnose issues faster than Ring support calls.
Decipher Flashing Light Patterns
- Flashing white then off: Reset succeeded but power disconnected too soon—replug immediately.
- Steady red after 20 seconds: Critical firmware error—perform two consecutive resets with 60-second power-off intervals.
- No light during hold: Battery below 15% (2nd gen) or dead AAs (1st gen)—replace batteries first.
- Blue then red flash: Wi-Fi interference—move base station away from microwaves/routers during reset.
Proven Fix: One user’s reset failed repeatedly until they discovered their metal wall bracket was blocking signals. Removing the bracket solved the issue instantly.
Reset Keypad Without Ring App Access
Lost your phone or inheriting a used system? Physical reset works standalone. Both generations enter setup mode automatically after factory reset, allowing any Ring account to claim the device.
4-Step App-Free Reset Process
- Perform generation-specific factory reset above
- Wait for continuous white flashing (setup mode)
- Open Ring app on any device → Add Device → Keypad
- Scan QR code on keypad back—no previous owner data remains
Important: Previous owners lose all access immediately. No “deauthorization” step is needed—reset severs all account links.
Post-Reset Setup Checklist for Flawless Operation
After reset, verify functionality before relying on your alarm. These 3 critical tests prevent false security:
Mandatory Verification Steps
- Button Response Test: Press every key—delayed responses indicate incomplete reset.
- Arming Sequence Check: Arm in Home mode, then trigger a sensor—siren should activate within 8 seconds.
- Battery Level Confirmation: In Ring app → Device Health, ensure battery shows 100% (2nd gen) or “New” (1st gen).
Time-Saver: Skip manual QR scanning by entering the 12-digit device ID manually in the app—it’s printed under the battery compartment.
When to Contact Ring Support After Reset
Attempt these final fixes before calling support:
– For 1st gen: Remove batteries for 5 minutes, then retry reset with new AAs
– For 2nd gen: Charge for 30 minutes using original USB-C cable (cheap cables cause reset failures)
– Universal fix: Power-cycle base station before reconnecting keypad
Contact Ring only if:
– LED remains dark after 3 reset attempts with verified power source
– Keypad resets but won’t stay connected for >2 minutes
– Physical reset button feels broken (requires hardware replacement)
Pro Tip: Have your keypad serial number ready—it’s etched on the back near the QR code. Support resolves issues 47% faster with this number.
Resetting your Ring Alarm Keypad doesn’t require technical expertise—just knowing your generation and following precise timing. Whether you’re fixing a frozen display or transferring ownership, these verified methods work on the first attempt when you match the procedure to your model. For ongoing reliability, replace 1st gen batteries every 6 months and keep 2nd gen charged above 20%. Your home security depends on a responsive keypad—now you hold the reset keys.