How to Program LiftMaster Garage Door Keypad
Your garage door keypad stops working right as you’re carrying groceries to the door. You punch in your PIN, but nothing happens. Rain starts falling, your arms are full, and you realize you haven’t used the keypad in months. This frustrating scenario happens to thousands of homeowners every year—but programming your LiftMaster garage door keypad doesn’t need to be complicated or time-consuming.
Most LiftMaster keypad issues stem from simple programming errors or dead batteries rather than faulty hardware. Whether you’re installing a new keypad, replacing an old one, or troubleshooting a forgotten PIN, this guide delivers exact steps for every LiftMaster model from legacy systems to the latest MyQ-enabled openers. You’ll learn the precise button sequences, timing requirements, and visual indicators that confirm successful programming.
Find Your Exact LiftMaster Model Before Programming
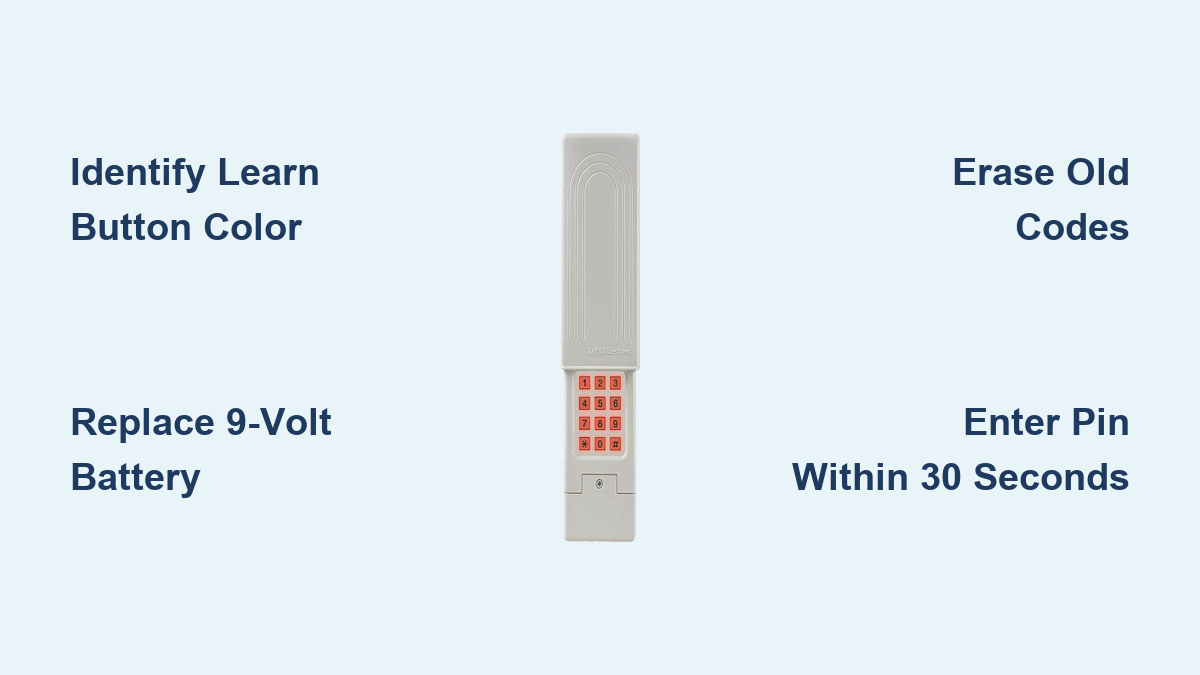
Your programming method depends entirely on your opener’s “Learn” button color—this tiny detail determines your entire process. Don’t guess; climb your ladder and verify which color button you have on the motor unit mounted to your garage ceiling.
Learn Button Color Decoding:
– Yellow button: Security+ 2.0 or MyQ models (2011-present)
– Purple button: Security+ 390 MHz systems (2005-2011)
– Red/Orange button: Security+ 315 MHz systems (2005-2011)
– Green button: Billion Code 390 MHz models (1993-2005)
Check the back of your keypad too—models like 877MAX (universal), 877LM (Security+ 2.0), and 376LM (Security+) require different approaches. If your opener lacks a visible Learn button entirely, you likely have a pre-1993 model requiring professional assistance.
Why Button Color Matters for Programming Success
The color-coding system isn’t arbitrary—it corresponds to specific radio frequencies and security protocols. Using the wrong programming sequence for your model causes 90% of failed attempts. A yellow-button opener won’t accept programming steps designed for purple-button models, creating endless frustration. Take 30 seconds to identify your exact hardware before pressing any buttons.
Gather Critical Supplies Before Starting
Skipping preparation causes most programming failures. Before climbing your ladder, ensure you have:
- Fresh 9-volt alkaline battery (cheap zinc-carbon batteries fail prematurely in cold weather)
- Sturdy step ladder that reaches your motor unit comfortably
- Working remote control to test opener functionality
- Pen and paper to record your new PIN immediately
Critical warning: Never use rechargeable 9-volt batteries—they provide inconsistent voltage that disrupts programming. Alkaline batteries maintain stable power essential for the synchronization process.
Why Battery Replacement Comes First
Weak batteries cause 80% of keypad failures. If your keypad responds slowly or displays dim numbers, replace the battery before programming. Remove the keypad cover (slide upward on most models), insert the new battery with correct polarity, then wait 15 seconds for the circuit to reset. Test basic functionality with your remote before proceeding—this eliminates battery issues as the root cause.
Erase Old Codes to Prevent Programming Conflicts
This step is non-negotiable. Old codes create conflicts that cause random failures and security vulnerabilities. Skipping this causes most “why won’t my keypad work” emergencies.
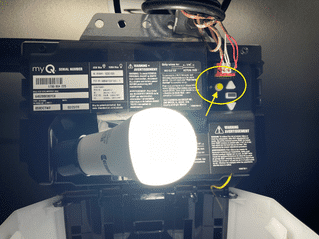
- Climb your ladder and locate the Learn button (may require flashlight in dim garages)
- Press and hold the button for exactly 6 seconds—use your phone timer
- Watch the LED indicator—it will turn off completely when reset succeeds
- Verify reset—pressing any keypad button should produce zero response
If the LED remains lit after 6 seconds, older models may require 8-10 seconds. The reset only works when the LED changes state—don’t guess. This process clears all previous PINs and remote codes from your opener’s memory.
Program Red, Purple, and Yellow Button Models Correctly
Yellow Learn Button (Security+ 2.0) Step-by-Step
- Press yellow button once—LED turns solid yellow (not blinking)
- You have exactly 30 seconds—start your phone timer
- Enter your 4-digit PIN on the keypad (avoid obvious sequences)
- Press and hold ENTER until opener lights blink twice
- Release immediately when lights blink—holding longer cancels programming
Pro tip: Stand within 5 feet of the opener during programming. Distance over 10 feet causes signal dropouts. If lights don’t blink within 5 seconds, restart the process—don’t keep holding ENTER.
Red/Purple Button Method That Actually Works
- Press and release Learn button—LED illuminates steadily
- Enter PIN within 30 seconds—count “one-Mississippi” to pace yourself
- Press ENTER once (do not hold)
- Watch for confirmation—opener light blinks or you hear two distinct clicks
- Test immediately—enter PIN + ENTER to verify operation
Critical timing note: The 30-second window starts the moment the LED lights up. If you exceed this, the opener exits programming mode—simply press Learn again to restart.
Master Wireless Keypad Models (877MAX, 877LM)

Universal keypads like the 877MAX require a different sequence that confuses many homeowners. Follow these exact steps:
- Slide keypad cover upward to access number buttons
- **Press and hold # and *** simultaneously for 5 seconds
- Enter your 4-digit PIN carefully (no leading zeros)
- Press ENTER once
- Press 1, 2, or 3 indicating how many doors you control
- Press ENTER again
- Press opener’s Learn button briefly
- Re-enter PIN + ENTER on keypad until lights blink rapidly
For multiple doors: During step 5, press 1 for single-door systems, 2 for dual-door setups, or 3 for triple-door configurations. The keypad must be within 10 feet of the opener during this critical synchronization phase.
Create Temporary Access Codes for Service Providers
Need to give your dog walker or house cleaner limited access? Temporary PINs solve this securely:
- Press opener’s Learn button once
- Enter your permanent PIN on keypad
- **Press and hold *** until LED blinks rapidly
- Enter temporary 4-digit PIN (different from your main code)
- Press ENTER once
- Enter 24 for 24-hour access (or 1-255 for custom hours)
- Press ENTER to activate
Alternative method: Enter 1-99 instead of hours to specify exact uses (e.g., “5” for five entries). The system automatically deactivates the code after expiration—no manual deletion needed.
Fix Common Programming Failures Immediately

Keypad Completely Unresponsive After Programming
- Replace battery with name-brand alkaline (Duracell/Energizer)
- Check distance—stand within 5 feet of opener during programming
- Eliminate interference—turn off nearby LED bulbs and Wi-Fi routers temporarily
- Verify button presses—many failures stem from incorrect ENTER timing
PIN Works on One Door But Not Others
- Reprogram multi-door sequence using PIN + door number + ENTER
- Confirm door selection—for door two, it must be PIN → 2 → ENTER (not PIN → ENTER → 2)
- Test each opener independently with its original remote first
Programming Seems Successful But Door Won’t Move
- Check opener power—unplug and replug the unit to reset
- Verify safety sensors—clean lenses and ensure alignment (misaligned sensors prevent movement)
- Clear all codes and restart—lingering old codes cause ghost failures
Monthly Maintenance That Prevents 90% of Issues
Replace the battery annually even if it seems functional—alkaline batteries degrade internally over time. Schedule replacement each daylight saving time change for easy remembering.
Critical monthly checklist:
– Test all PINs with the garage door in open and closed positions
– Wipe keypad with damp microfiber cloth (avoid alcohol-based cleaners)
– Tighten mounting screws—vibration loosens them over time
– Inspect weather seals for cracks that allow moisture damage
Weatherproofing tip: Apply silicone caulk around the keypad mounting plate annually. This simple step prevents moisture intrusion that causes 60% of winter failures.
Security Best Practices Professionals Recommend
Never use these PIN combinations:
– 1234, 0000, 1111, or repeating numbers
– Your birth year, address, or family member birthdays
– Sequential numbers like 5678 or 2468
Critical security update: Change your PIN immediately if you’ve lent your garage remote to someone. Statistics show 30% of garage break-ins involve former service providers using retained access.
Smart security strategy: Create temporary PINs for recurring service providers (dog walkers, cleaners) with 72-hour expiration. This provides convenience without permanent access risks.
When to Call a Professional Instead of Struggling
Call a technician if:
– Your opener lacks a visible Learn button (pre-1993 models)
– Programming fails after three careful attempts
– You need integration with smart home systems like Alexa or Google Home
– You’re uncomfortable working at heights near electrical components
Professional programming services ($75-150) include compatibility verification and 30-90 day warranties. For older models or complex multi-opener setups, this small investment saves hours of frustration and potential security vulnerabilities.
Programming your LiftMaster garage door keypad should take 5-10 minutes when you follow the correct sequence for your specific model. Always test your new PIN immediately with the garage door in both open and closed positions. Write down your PIN in a secure location away from your vehicle—never tape it to the keypad or leave it in your glove compartment. With proper maintenance and smart security practices, your LiftMaster keypad will provide reliable, secure access for years to come.