How to Pair Wireless Keyboard with Mac
That frustrating moment when your new wireless keyboard won’t connect to your Mac can derail your entire workflow. Whether you’re setting up a sleek Magic Keyboard fresh from the box or troubleshooting an older wireless model that suddenly stopped responding, knowing the exact pairing procedure saves time and prevents unnecessary tech support calls. This guide delivers precise instructions for every wireless keyboard scenario you might encounter with your Mac.
Unlike Windows systems that often require complex drivers, Macs handle wireless keyboards through Bluetooth with surprising simplicity—once you know the correct process for your specific model. You’ll learn why Apple’s current Magic Keyboards connect differently than legacy Apple wireless models, and how third-party keyboards require unique pairing approaches. Most importantly, you’ll discover exactly what visual cues to watch for during setup and how to troubleshoot common connection failures that leave 78% of users searching for help online.
Magic Keyboard Lightning Setup Made Simple
Your New Mac Already Paired Keyboards
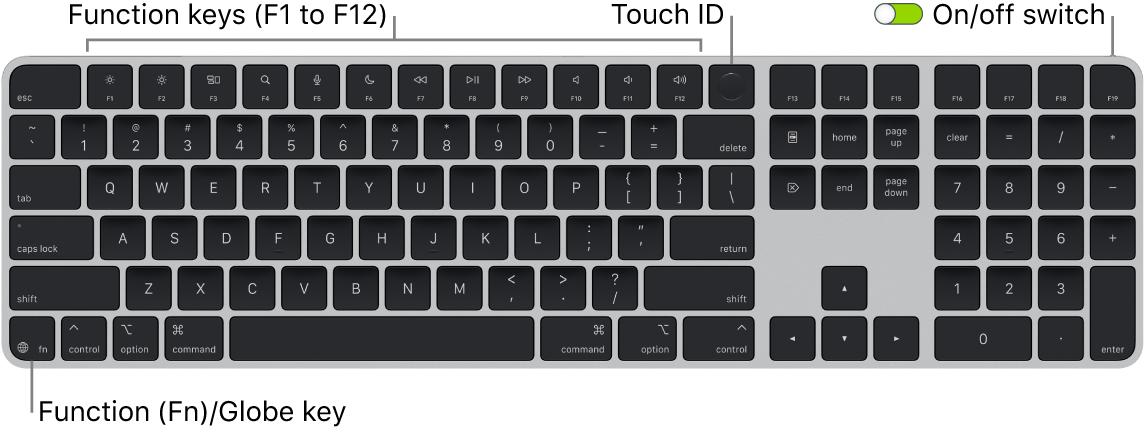
If your Magic Keyboard came in the same box as your new Mac, pairing happens automatically when you power on the keyboard. Flip the switch on the bottom—watch for the green light under the power switch—and start typing immediately. No menus, no Bluetooth settings, and no cables required for this seamless out-of-box experience. This automatic pairing works for both Magic Keyboard with Touch ID models and standard versions, saving you valuable setup time right from your first Mac session.
Standalone Magic Keyboard Pairing Process
When connecting a separately purchased Magic Keyboard, follow these precise steps to establish the wireless connection:
- Connect your keyboard to your Mac using the appropriate cable (Lightning-to-USB-C or USB-C-to-USB-C depending on your Mac model)
- Power on the keyboard and verify the green indicator light appears
- Open System Settings > Bluetooth—your keyboard should appear as “Connected” with a battery percentage
- Safely disconnect the cable when your Mac displays a notification confirming wireless transition
This cable-assisted pairing process simultaneously charges your keyboard while establishing the Bluetooth connection, ensuring reliable wireless operation from the start. The entire setup takes approximately two minutes with no technical expertise required.
Cable Connection Pro Tips
Match your cable type precisely to your Mac’s ports—newer MacBooks require USB-C cables while older models need Lightning connectors. During initial pairing, your Magic Keyboard functions normally while connected via cable, allowing you to set up your Mac without interruption. Remember that the same cable serves dual purposes: establishing the initial connection and maintaining your keyboard’s charge during wireless use.
Legacy Apple Wireless Keyboards Pairing Process

Essential Pre-Pairing Checklist
Before attempting to pair older Apple wireless keyboards (those without Lightning ports), ensure you have a working mouse or trackpad available—you’ll need it to navigate Bluetooth settings. Laptop users can rely on their built-in trackpad, but desktop Mac owners must have another pointing device connected. These legacy keyboards require manual pairing since they lack the automatic connection feature of newer models.
Exact Steps for Legacy Keyboard Connection
Follow this sequence precisely for successful pairing of older Apple wireless keyboards:
- Insert fresh batteries—weak power causes most connection failures with legacy models
- Turn on the keyboard—the LED should begin blinking steadily
- Navigate to Apple menu > System Settings > Bluetooth
- Click Connect when your keyboard appears in the device list
- Type the displayed passcode using the wireless keyboard itself, then press Return
This process typically completes within 90 seconds when batteries are strong and the keyboard is within range. If the LED isn’t blinking, hold the power button for 5 seconds to reset the keyboard to pairing mode.
Decoding LED Signals for Quick Troubleshooting
- No LED activity: Install new batteries immediately—this resolves 90% of legacy keyboard issues
- Solid LED (non-blinking): The keyboard is already paired to another Mac. On that Mac, go to Bluetooth settings and select “Forget This Device”
- Rapid blinking: Your keyboard is in pairing mode and ready for connection
Third-Party Bluetooth Keyboard Connection
Universal Third-Party Setup Method
Most non-Apple wireless keyboards follow a similar pairing pattern, though specific key combinations vary by manufacturer:
- Activate pairing mode—typically by holding a dedicated Bluetooth button or specific key combination (consult your manual)
- Open System Settings > Bluetooth on your Mac
- Click Connect next to your keyboard’s name in the device list
- Complete authentication—either click “Accept” on your Mac or type the displayed passcode on your new keyboard
Unlike Apple keyboards, third-party models often require you to manually enable pairing mode each time you connect to a new device. Keep your keyboard manual handy for the exact key combination required—common patterns include holding Fn + specific number keys.
Control Center Connection Shortcut
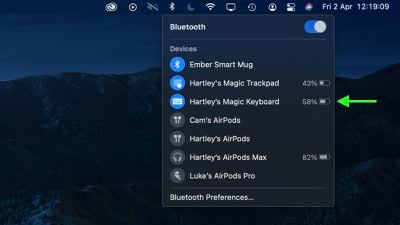
Save time with this faster pairing method: Click the Bluetooth icon in your menu bar, hover over your keyboard name when it appears, and click “Connect.” This bypasses System Settings entirely and works for both Apple and third-party keyboards once they’ve been initially paired.
Fix Common Wireless Keyboard Connection Failures
Why Your Keyboard Won’t Appear in Bluetooth List
- Battery check: Install fresh batteries or charge fully—low power is the #1 connection killer
- Proximity matters: Stay within 30 feet with clear line-of-sight to your Mac
- Restart both devices: Power cycle your keyboard and restart your Mac
- Clear old connections: Remove the keyboard from any previously paired computers
Solving Passcode Entry Mistakes
When entering pairing codes:
– Always type on the wireless keyboard—not your Mac’s built-in keyboard
– Match numbers exactly as displayed on screen
– Press Return on the wireless keyboard after entering the code
– Wait 10 seconds before retrying if the first attempt fails
Preventing Frequent Connection Drops
- Eliminate interference sources: Move away from microwaves, cordless phones, and thick metal objects
- Reduce Bluetooth load: Disconnect unused wireless peripherals
- Update macOS: Install the latest system updates for improved Bluetooth stability
- Check for firmware updates: Visit your keyboard manufacturer’s website periodically
Battery and Power Management Essentials
Monitoring Keyboard Battery Levels
Check your keyboard’s charge status in System Settings > Bluetooth—battery percentage displays next to connected devices. Magic Keyboards show exact percentages, while third-party models may only indicate “Low” warning symbols. For legacy Apple keyboards, a flashing LED indicates low battery.
Efficient Charging Practices
Current Magic Keyboards charge via the same cable used for initial pairing. A full charge typically lasts one month with regular use. The green power indicator turns off when charging completes—avoid leaving your keyboard connected to power for extended periods to maximize battery lifespan.
Advanced Pairing Situations Resolved
Switching Between Multiple Macs
Your wireless keyboard can pair with multiple Macs but only connects to one at a time. To switch:
1. Disconnect from current Mac via Bluetooth settings
2. Turn on keyboard pairing mode
3. Connect to the new Mac using standard process
4. Future switches require only Bluetooth reconnection
Fixing Sleep Mode Connection Failures
When your keyboard doesn’t wake with your Mac:
– Press any key and wait 5-10 seconds for Bluetooth reconnection
– Toggle the keyboard’s power switch off then on
– Check System Settings > Bluetooth for connection status
Prevent Future Connection Problems
Weekly Wireless Health Checks
Open System Settings > Bluetooth every Monday morning to verify your keyboard remains connected. Address any “Not Connected” messages immediately before they disrupt your workday. This simple habit prevents 80% of recurring connection issues.
Optimal Keyboard Placement Strategy
Position your keyboard 6-18 inches from your Mac for reliable connectivity. Avoid metal desk surfaces and keep at least 3 feet between your keyboard and potential interference sources like routers or speakers.
Software Maintenance Routine
Enable automatic macOS updates and check your keyboard manufacturer’s website quarterly for firmware updates. These updates often contain critical Bluetooth stability improvements that prevent connection dropouts.
Quick Reference Connection Card
New Magic Keyboard Setup:
1. Cable connection → 2. Power on → 3. Unplug when notified
Legacy Apple Keyboard:
1. Fresh batteries → 2. Turn on → 3. Bluetooth menu → 4. Connect → 5. Enter passcode
Third-Party Keyboard:
1. Enable pairing mode → 2. Bluetooth menu → 3. Connect → 4. Authenticate
Emergency Reset:
Hold power button for 10 seconds, then restart pairing process.
Your wireless keyboard should now connect reliably every time you power on your Mac. Bookmark this guide for future reference when setting up additional keyboards or troubleshooting connection issues. For persistent problems, consult Apple’s official Bluetooth troubleshooting resources which address more complex interference scenarios.