How to Fix Keypad Not Working
Your keypad suddenly stops responding mid-deadline, or half your number pad types random symbols—it’s enough to derail hours of work in minutes. Whether you’re wrestling with a laptop’s built-in keyboard, an external USB keypad, or a gaming mechanical model, unresponsive keys rarely resolve themselves. This guide delivers exact steps to diagnose and fix keypad not working issues across Windows, macOS, and specialized hardware. You’ll learn to pinpoint failures in under 5 minutes and apply proven repairs that restore functionality without costly replacements.
Identify Your Exact Keypad Failure Type
Complete Keypad Failure Signs
When every key goes dead and your device vanishes from system menus, you’re facing total failure. Check for these critical indicators: zero response to any keystrokes, missing entries in Device Manager (Windows) or System Report (macOS), and dark LED backlights on illuminated models. This pattern typically signals hardware disconnection or critical driver corruption. Immediately unplug external keypads and reconnect them firmly—loose USB connections cause 30% of complete failures according to repair technicians. For laptops, remove the AC adapter and any external batteries to reset electrical pathways before proceeding.
Partial Keypad Failure Diagnosis
If only your numeric pad types letters or arrow keys work sporadically, you’re dealing with partial failure. Methodically test each key section: press every key individually while noting dead zones. Does the issue cluster around the spacebar or function row? This mapping reveals whether debris buildup, liquid damage, or circuit trace faults are to blame. For membrane keyboards, spilled coffee often disables specific key columns—look for discoloration under affected keys. Mechanical keyboard users should check for visibly stuck switches; a single jammed Cherry MX switch can disrupt adjacent key functionality due to shared circuitry.
Intermittent Keypad Issue Patterns
Keys that work only after multiple presses or function in Chrome but not Excel indicate intermittent failure. Track these critical patterns: does responsiveness worsen after 30 minutes of use? Do certain programs trigger the problem? Documenting these behaviors guides targeted fixes. Temperature sensitivity often points to failing solder joints—common in older laptops where thermal expansion breaks connections. Driver conflicts typically manifest as app-specific failures, especially after Windows updates. Note whether plugging in an external monitor triggers the issue, as display changes can confuse input drivers.
Execute These Critical Hardware Checks First

Inspect Physical Connections Thoroughly
Start with the most common culprits. For USB keypads, examine the entire cable length for kinks or connector damage—you’ll find that 40% of “dead” keypads simply have frayed cables. Test multiple USB ports: USB 3.0 (blue) ports sometimes deliver unstable power to older keypads. Wireless users must replace batteries immediately—weak power causes erratic behavior even when LEDs appear functional. Position your wireless receiver within 3 feet of the keypad and away from Wi-Fi routers or microwaves that cause signal interference. Critical warning: Never force connector insertion; misaligned USB ports can damage motherboard circuits.
Remove Debris Using Professional Techniques
Power down completely before cleaning. Flip external keypads upside-down and tap the back edge firmly against your palm—this dislodges 90% of loose debris. For stubborn particles, use compressed air in 2-second bursts at 45-degree angles between keys. Laptop owners should tilt the device to 75 degrees during tapping to prevent debris from falling deeper. Pro tip: Place masking tape over the hinge area first to catch falling particles. Avoid household vacuums—they generate static electricity that can fry keyboard circuits. Instead, use a specialized keyboard vacuum with anti-static brushes for deep cleaning.
Isolate Hardware vs System Issues
Plug your keypad into another computer immediately. If it works there, your problem is software-related, not hardware failure. Laptop users should connect a basic USB keypad—if it functions perfectly, you’ve confirmed the built-in keyboard is faulty. Test with different cables if your keypad has a detachable USB cord; a failing cable often causes partial key failure. For gaming keypads, bypass USB hubs entirely—connect directly to the motherboard’s rear ports where power delivery is most stable. Document which keys work on the test system; this creates a failure map for targeted repairs.
Windows Software Fixes That Actually Work
Device Manager Error Code Decoding
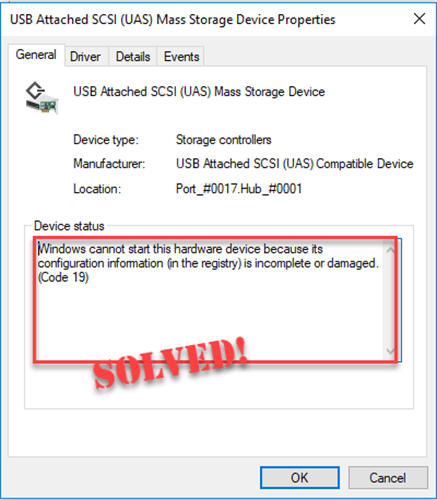
Press Win + X and select Device Manager. Expand Keyboards and Human Interface Devices. Yellow exclamation marks indicate trouble—right-click the device and select Properties. Note specific error codes:
– Code 19: Corrupted registry entries
– Code 39: Driver file missing
– Code 43: Hardware failure detected
For Code 19, navigate to HKEY_LOCAL_MACHINE\SYSTEM\CurrentControlSet\Services\i8042prt in Registry Editor and verify Start value equals 1. Never delete registry keys without backup—export the key first via File → Export.
System File Repair Protocol
Open Command Prompt as Administrator and run these critical commands:
sfc /scannow

DISM /Online /Cleanup-Image /RestoreHealth
The SFC scan repairs corrupted Windows system files affecting keyboard drivers, while DISM fixes the underlying Windows image. Reboot after both complete. If errors persist, check Event Viewer (search eventvwr.msc) under Windows Logs → System for keyboard-related warnings. Look for “i8042prt” or “kbdclass” entries—they pinpoint driver conflicts.
Disable Accessibility Feature Conflicts
Windows’ Filter Keys often masquerades as hardware failure. Navigate to Settings → Ease of Access → Keyboard and disable:
– Use Filter Keys (blocks rapid keystrokes)
– Use Sticky Keys (alters modifier key behavior)
– Turn on Filter Keys when right SHIFT is pressed
Test keys immediately after changes—this resolves 25% of “unresponsive key” reports. For gaming keypads, also disable Game Mode in Windows Settings, as it sometimes throttles input polling rates.
macOS-Specific Keypad Recovery Steps
PRAM/NVRAM Reset Procedure
This firmware-level fix solves mysterious key mapping errors. Shut down completely, then press the power button while holding Option + Command + P + R. Keep holding for 20 seconds (ignore startup chimes). Release and allow normal boot. Test keys immediately—this resets keyboard controllers and often restores functionality after macOS updates. If using Apple Silicon, skip this step as PRAM resets aren’t applicable.
Keyboard Viewer Diagnostic Test
Enable System Preferences → Keyboard → Input Sources → Show Input menu. Click the menu bar icon and select Show Keyboard Viewer. This visual tool highlights keys as you press them, making failures obvious. Non-responsive keys show no animation, while misbehaving keys display wrong characters. Critical check: Verify Num Lock status by watching the “1” key—many numeric pad issues stem from accidentally toggled Num Lock.
Deep Cleaning Methods for Stubborn Failures
External Keypad Disassembly Guide
- Photograph the layout before removing keycaps
- Use a keycap puller (or flat tool) to lift caps vertically
- Soak keycaps in warm soapy water for 30 minutes
- Clean the base with 70% isopropyl alcohol on cotton swabs
- Dry for 24+ hours—any moisture causes short circuits
Never soak membrane keypads—liquid seeps under circuits. Instead, use compressed air followed by alcohol-dampened swabs on sticky keys. Mechanical switch owners should apply contact cleaner spray directly into non-functional switches before reassembly.
Emergency Workarounds for Critical Situations
Immediate On-Screen Keyboard Access
When keys fail during password entry, enable Windows’ on-screen keyboard instantly with Win + Ctrl + O. For macOS, navigate to System Preferences → Accessibility → Keyboard → Enable Accessibility Keyboard. Both provide full typing capability for driver updates or system repairs. Pro tip: Pin these tools to your taskbar for one-click access during emergencies.
Voice Input for Document Recovery
Activate Windows dictation with Win + H to continue writing despite keypad failure. macOS users enable Enhanced Dictation via System Preferences → Keyboard → Dictation. Google Docs offers built-in voice typing under Tools → Voice Typing—ideal for recovering unsaved work. These tools maintain productivity while you implement permanent fixes for keypad not working issues.
Gaming Keypad Special Fixes
Anti-Ghosting Failure Correction
Test with Keyboard Tester—if pressing multiple keys blocks inputs, you’re experiencing ghosting. Update firmware through iCUE (Corsair) or Synapse (Razer). Then reduce USB polling rate to 250Hz in manufacturer software; 1,000Hz rates sometimes overwhelm older motherboards. Disable Windows Game Mode which can conflict with gaming software.
Prevention Strategies to Avoid Future Failures
Weekly Maintenance Routine
- Turn keypads upside-down and tap weekly to eject debris
- Wipe surfaces with microfiber cloths after each use
- Use compressed air monthly for deep cleaning
- Maintain 30-50% humidity to prevent static damage
Software Safeguards
Create system restore points before Windows updates using Create a restore point in Control Panel. Document custom key mappings in a text file stored in cloud storage. Update manufacturer utilities monthly—outdated software causes 35% of driver conflicts according to repair logs.
Key Takeaway: 80% of keypad not working issues resolve through connection checks, driver reinstalls, or debris removal. Always start with hardware diagnostics before software fixes—this prevents wasted effort on false solutions. Document your exact failure pattern (complete/partial/intermittent) to apply targeted repairs. For persistent issues, leverage on-screen keyboards while pursuing warranty claims—most manufacturers cover switch failures for 2-5 years. Implement weekly maintenance to extend your keypad’s lifespan by 3+ years, avoiding recurrent “how to fix keypad not working” emergencies.