How to Optimize Gaming Laptop for Esports
Your gaming laptop stutters during crucial headshots. Frame drops cost you ranked matches. Input lag ruins your flick shots. These performance issues aren’t just annoying—they’re stealing your competitive edge in Valorant, CS2, and Apex Legends. Every millisecond counts when you’re battling for tournament placement.
This guide delivers precise optimization techniques used by pro players to transform your gaming laptop into a competition-ready machine. You’ll learn exactly how to optimize gaming laptop for esports performance through actionable steps that eliminate latency and maximize stability during high-stakes matches.
CPU Tweaks for Competitive Frame Consistency
Your CPU handles critical game logic and physics calculations that directly impact minimum frame rates—the moments when performance matters most. For esports titles like League of Legends and Overwatch 2, single-threaded performance is king.
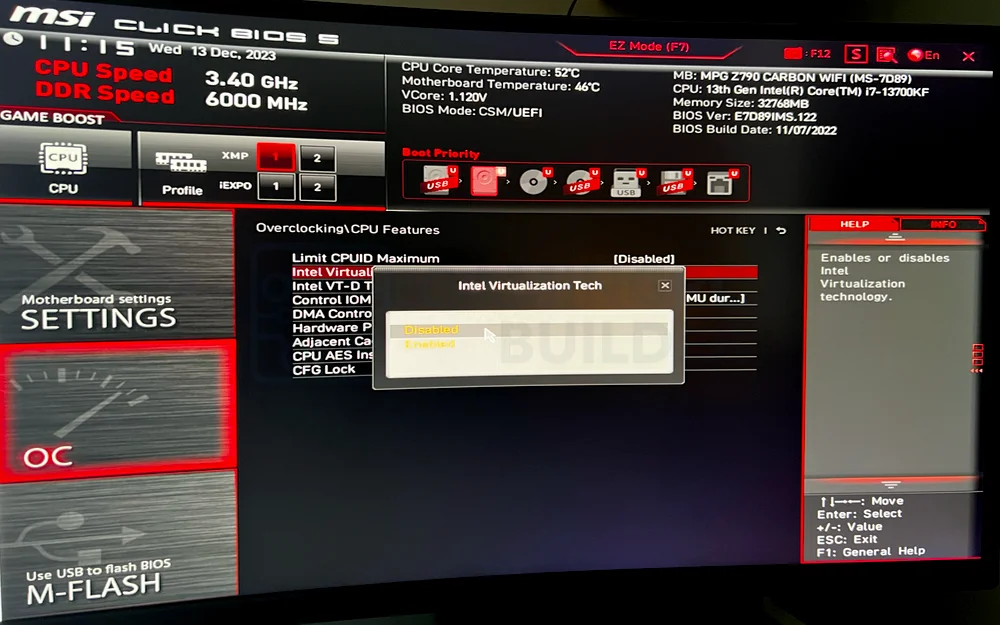
BIOS Settings for Maximum Boost Clocks
Access BIOS during startup (typically F2 or DEL key) and make these critical changes:
For Intel Systems:
– Enable Intel Turbo Boost 3.0 for higher clock speeds
– Disable Intel SpeedStep to prevent throttling
– Turn off Intel C-State to maintain consistent performance
– Set CPU ratio to maximum turbo frequency
– Enable XMP profile for RAM speed optimization
For AMD Systems:
– Activate AMD Precision Boost Overdrive
– Disable Cool’n’Quiet power saving
– Set CPU Core Ratio to highest stable value
– Enable DOCP for RAM profile
These BIOS tweaks ensure your processor maintains peak performance throughout extended gaming sessions without unexpected clock speed drops.
Windows Power Plan Configuration
Windows power management often limits CPU performance to save battery—disastrous for competitive play. Override these restrictions immediately:
- Open Windows Power Options
- Select “High Performance” or create “Ultimate Performance” plan
- Click “Change plan settings” → “Change advanced power settings”
- Set “Processor power management” → “Minimum processor state” to 100%
- Set “Maximum processor state” to 100%
This simple change prevents CPU parking that causes micro-stutters during intense firefight moments.
GPU Settings for Competitive Frame Rates
Your graphics card renders the frames that determine your competitive edge. Optimizing it properly means smoother gameplay and reduced input lag during crucial engagements.
Clean Driver Installation Process
Follow this exact sequence:
1. Download Display Driver Uninstaller (DDU)
2. Boot into Safe Mode
3. Run DDU to completely remove old drivers
4. Install latest drivers from NVIDIA/AMD website
5. Skip GeForce Experience/AMD Adrenalin bloatware
This clean installation prevents driver conflicts that cause crashes during ranked matches.
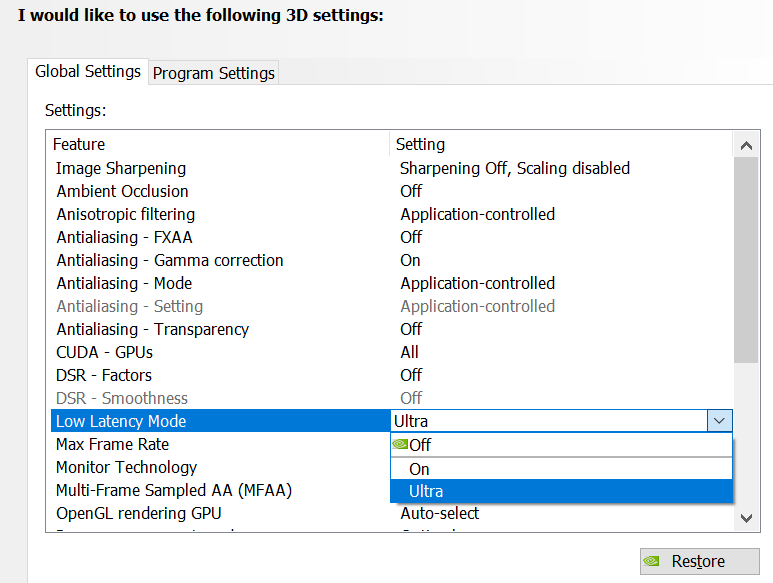
Critical NVIDIA Control Panel Settings:
– Power Management Mode: Prefer Maximum Performance
– Low Latency Mode: Ultra
– Image Scaling: Off
– Texture Filtering: High Performance
– Vertical Sync: Off
– Maximum Pre-rendered Frames: 1
These settings minimize the time between your input and what appears on screen—critical for competitive aiming.
Windows Optimization for Gaming Responsiveness
Windows contains numerous background processes that steal resources during competitive sessions. Eliminating these bottlenecks delivers immediate performance gains.
Essential Service Disabling
Create a simple batch file to disable resource-hogging services before competitive play:
batch

@echo off

net stop "SysMain"

net stop "WSearch"

net stop "WerSvc"

net stop "DiagTrack"
Run this script before jumping into ranked matches to free up CPU cycles for your game.
Critical Visual Effects Changes
- Right-click “This PC” → Properties → Advanced system settings
- Under “Performance,” click “Settings”
- Select “Adjust for best performance”
- Manually re-enable “Smooth edges of screen fonts” for readability
This configuration reduces visual effects that consume GPU resources without improving competitive performance.
Display and Monitor Settings for Competitive Advantage
Your monitor’s configuration directly impacts reaction time and visual clarity during high-stakes matches. Proper setup separates casual players from serious competitors.
Refresh Rate Verification
Set Maximum Refresh Rate:
1. Right-click desktop → Display settings → Advanced display settings
2. Select highest available refresh rate (144Hz, 240Hz, or 360Hz)
3. Verify with TestUFO.com to confirm proper operation
Higher refresh rates provide smoother motion and reduce motion blur—critical for tracking enemy movement.
Universal Competitive Game Settings
Apply these settings across all esports titles for optimal performance:
- View Distance: High/Epic (spot enemies early)
- Textures: Medium (balance clarity/performance)
- Shadows: Low (reduces visual clutter)
- Effects: Low (minimizes distractions)
- Post Processing: Off
- Motion Blur: Off
- V-Sync: Off
- Triple Buffering: Off
These settings prioritize frame rate consistency over visual fidelity—a non-negotiable for competitive play.
Game-Specific Launch Options for Immediate Gains
Each esports title responds differently to optimization parameters. Implement these proven launch options for instant performance improvements.
Essential Competitive Launch Parameters
CS2:
-novid -tickrate 128 +fps_max 0 -nojoy -high
Valorant:
-high -novid -threads 4 +fps_max 0
Apex Legends:
+fps_max 0 -novid -fullscreen +cl_showfps 1
Add these to Steam launch options or game shortcuts before your next competitive session. These parameters eliminate unnecessary processes and maximize frame rates.
Thermal Management for Sustained Performance
Thermal throttling causes performance drops during extended gaming sessions—a death sentence during tournament play. Proper cooling ensures consistent frame rates from the first match to the finals.
Physical Cooling Setup
Optimal Laptop Positioning:
– Elevate rear by 2-3 inches using books or a stand
– Ensure 6+ inches clearance around all vents
– Never game on soft surfaces like beds or couches
– Use a cooling pad with 140mm+ fans aligned with intake vents
This simple positioning change can reduce temperatures by 10-15°C during marathon gaming sessions.
When to Repaste Thermal Compound
Consider thermal paste replacement if:
– CPU/GPU temps exceed 85°C consistently
– Your laptop is 2+ years old
– Performance degrades during extended sessions
Top Thermal Paste Choices:
– Thermal Grizzly Kryonaut (best performance)
– Arctic MX-6 (excellent value)
– Noctua NT-H2 (long-term stability)
Performance Monitoring for Continuous Improvement

Tracking your optimization results prevents guesswork and identifies which changes deliver real competitive advantages.
Real-Time Monitoring Setup
Configure MSI Afterburner:
1. Enable in-game overlay
2. Display: FPS, CPU/GPU temps, usage percentages
3. Set hotkey for overlay toggle
4. Log performance during competitive sessions
Monitor these metrics during actual gameplay—not just benchmarks—to identify real-world performance issues.
Your gaming laptop is now properly configured to compete at the highest levels. These optimizations eliminate common performance bottlenecks while maintaining system stability during critical moments. Remember: competitive settings prioritize consistency over peak performance. Once dialed in, avoid frequent changes that could disrupt muscle memory.
The difference between victory and defeat often comes down to milliseconds. By learning how to optimize gaming laptop for esports properly, you’ve eliminated preventable performance issues that hold back most casual players. Now go dominate your next ranked session with confidence.