How to Reformat an Asus Laptop: Quick Steps
Your ASUS laptop’s running slower than molasses, apps crash constantly, and you’ve tried every troubleshooting trick in the book. Sound familiar? A complete reformat might be exactly what your machine needs to return to its former glory. Whether you’re battling stubborn malware, preparing to sell your laptop, or simply craving that fresh-out-of-box performance, this guide walks you through two proven methods to reformat any ASUS laptop running Windows 10 or 11. Skip the guesswork—these techniques work on all ASUS models from the ZenBook series to ROG gaming laptops.
Backup Critical Data Before ASUS Reformat
Don’t skip this step—reformatting erases everything on your laptop. Even if you’re keeping personal files, things can go sideways fast.
Essential Files You Must Save from ASUS Laptop
- Documents folder: School work, tax files, resumes
- Photos and videos: Family memories, screenshots, downloads
- Browser data: Chrome bookmarks, Firefox passwords, Edge favorites
- Application settings: Game saves, software preferences, custom configurations
- Product keys: Office 365, Adobe Creative Suite, antivirus software
Smart Backup Strategies for ASUS Owners
- External drive: Copy everything to a USB hard drive (fastest for large files)
- Cloud storage: OneDrive, Google Drive, or Dropbox for smaller files
- Email yourself: Quick way to save critical documents as attachments
- Screenshot method: Take pictures of complex software settings you might forget
Pro Tip: Create a dedicated “Reformat Prep” folder on your external drive with all critical files. ASUS laptops often have unique settings in MyASUS app that you’ll want to recreate later—screenshot these screens before proceeding.
Reset Your ASUS Laptop Using Windows Settings
This built-in feature is your fastest route to a clean slate. Choose between keeping your files or nuking everything—perfect for ASUS laptops with pre-installed Windows 10 or 11.
Access ASUS Recovery Menu in Windows
- Press
Windows + I(hold Windows key, tap I) - Click System → Recovery from the left menu
- Find Reset this PC and click Reset PC
Critical Note: If your ASUS laptop won’t boot to Windows, hold the power button for 10 seconds to force shutdown, then press it again while repeatedly tapping F9 during startup to access the recovery environment directly.
Choose the Right Reset Type for Your ASUS Model
Keep my files when:
– System feels sluggish but you need your documents
– Apps keep crashing but personal data is safe
– You’re troubleshooting without full data loss
Remove everything when:
– Selling or gifting the laptop
– System infected with persistent malware
– Want completely fresh Windows installation
Model-Specific Tip: ROG gaming laptops often benefit from “Remove everything” since they accumulate gaming bloatware that slows performance over time.
Configure Reset Options for ASUS Hardware
- Cloud download: Gets latest Windows files (requires internet)
- Local reinstall: Uses existing Windows files (faster, less reliable)
- Just remove my files: Quick delete (good for personal use)
- Fully clean the drive: Secure erase (essential when selling)
Time estimate: 20-60 minutes depending on system speed and chosen options. ASUS ZenBook models typically complete faster than gaming ROG laptops due to simpler configurations.
Clean Install Windows on ASUS Laptop Using USB Media
For maximum control and bloatware-free Windows, create installation media and start completely fresh—especially valuable for ASUS models with pre-installed software.
Create Windows USB Drive for ASUS Models
- Download Windows Media Creation Tool from Microsoft
- Insert 8GB+ USB drive (everything gets erased)
- Run tool → Create installation media
- Select your language, Windows edition, and 64-bit architecture
- Choose your USB drive and wait 15-45 minutes for completion
ASUS-Specific Warning: Some ASUS models require USB 2.0 ports for reliable booting—use a black USB port instead of blue if installation fails.
Boot from USB on ASUS Laptop Models
- Restart laptop with USB inserted
- Tap boot key repeatedly as soon as ASUS logo appears
- Common keys: F2, F8, F12, or ESC (varies by model)
- Select USB drive from boot menu (usually labeled “UEFI: [Brand]”)
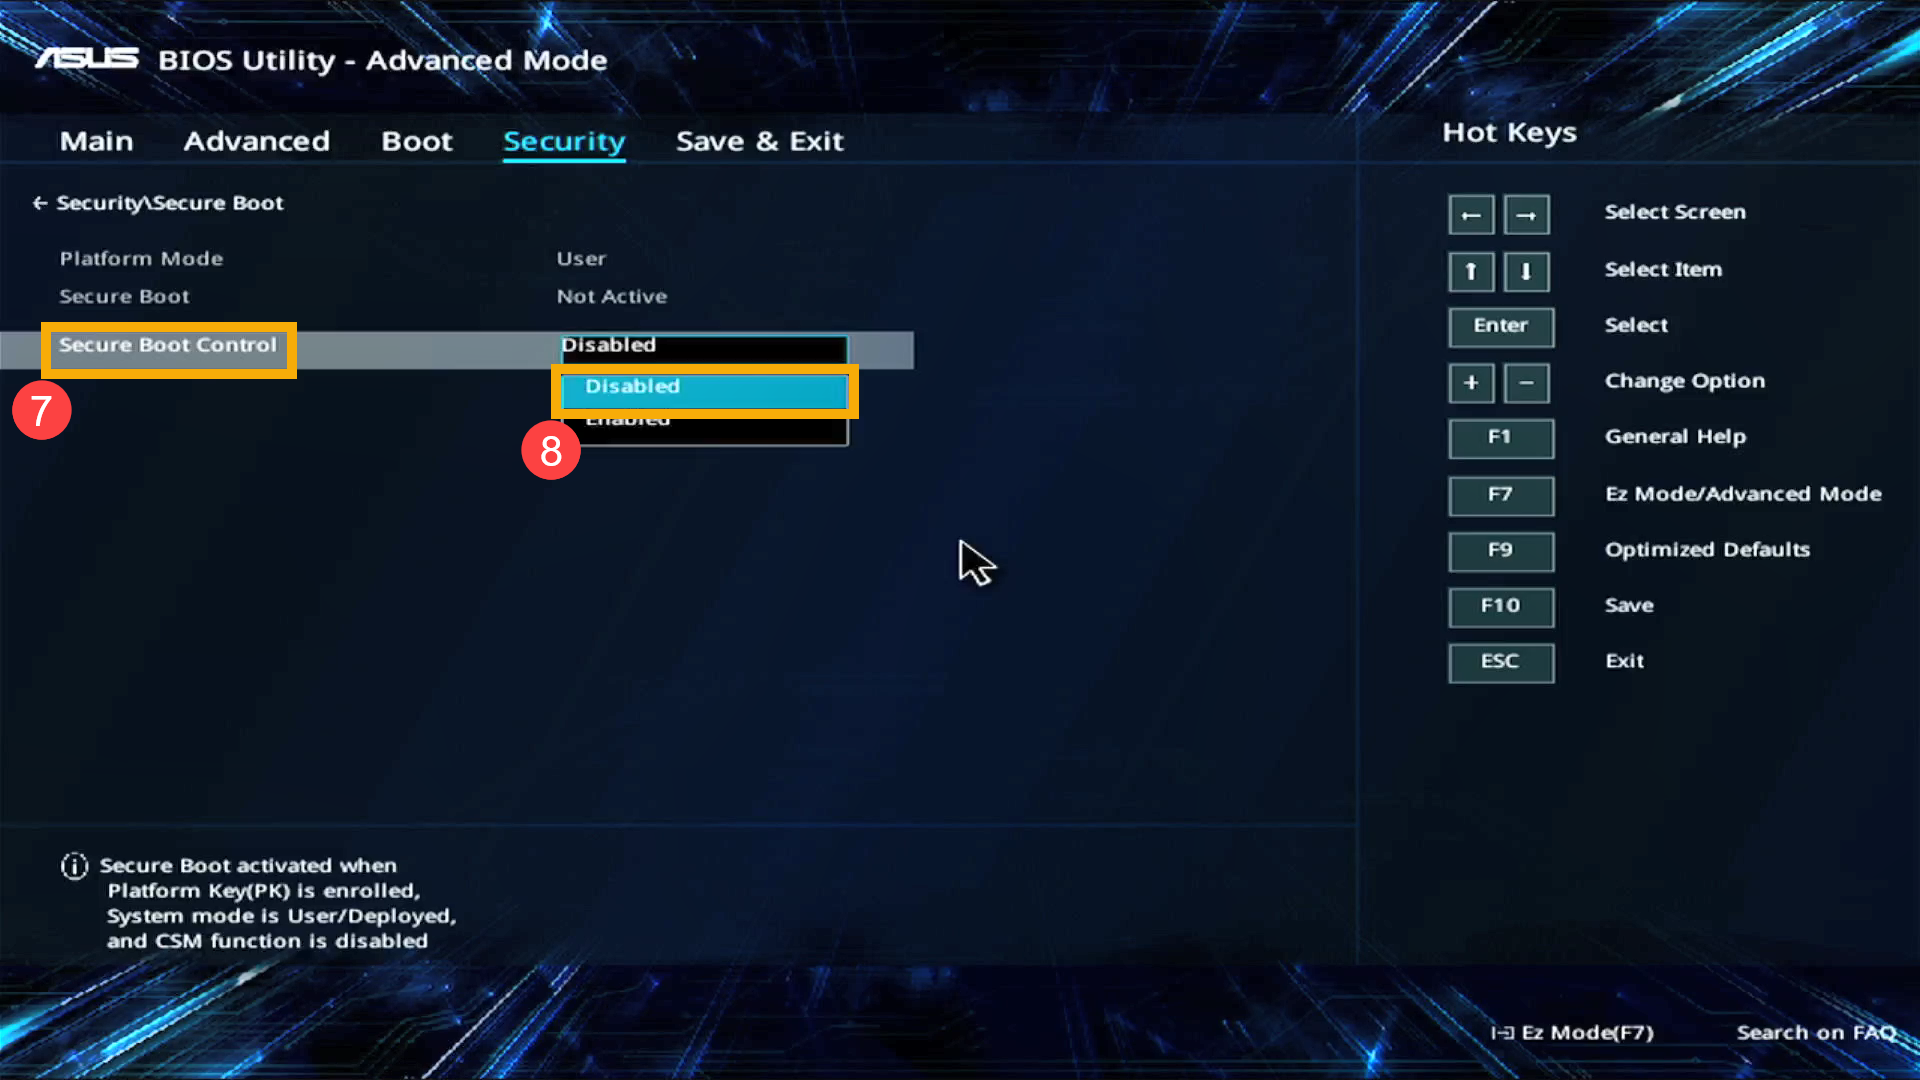
Troubleshooting Tip: If your ASUS laptop doesn’t recognize the USB drive, enter BIOS (F2) and disable Secure Boot temporarily. Most modern ASUS models require this step for clean installations.
Install Windows Step-by-Step on ASUS Hardware
1. Language selection: Pick your region and keyboard layout
2. Product key: Click I don’t have a product key (auto-activates later)
3. Installation type: Choose Custom: Install Windows only
4. Partition deletion: Delete all partitions until only “Unallocated Space” remains
5. New partition creation: Click New → Next (Windows handles the rest)
6. Installation begins: Sit back for 15-30 minutes of automated setup
Critical Step: When deleting partitions on ASUS laptops, ensure you remove all existing partitions—including the “Recovery Partition” that ASUS pre-installs. This prevents bloatware from returning after installation.
Install Essential ASUS Drivers After Reformat
Your laptop works, but those special ASUS features? They need attention before your system functions properly.
Critical Driver Installation Order for ASUS Laptops
- ASUS System Control Interface: Restores function keys, keyboard backlight
- Armoury Crate: Gaming models need this for fan control and RGB lighting
- Chipset drivers: Foundation for all other components
- Graphics drivers: Get from NVIDIA/AMD/Intel directly for best performance
- Network/WiFi: Connect to internet for remaining updates
Download ASUS Drivers Without Internet Access
- Use another device to visit drivers.asus.com
- Enter your exact model number (found on bottom sticker or in MyASUS app)
- Download all drivers to a USB drive before reformatting
- Focus first on network drivers to restore internet connectivity
Model-Specific Tip: ROG Strix models require Armoury Crate before keyboard RGB lighting works properly. ZenBook models need the ASUS System Control Interface for touchpad gestures and function keys.
Fix Common ASUS Reformat Issues
Even perfect plans hit snags with ASUS hardware. Here’s how to handle the usual suspects.
ASUS Boot Problems After Reformat
“No boot device found” error:
– Check USB is properly inserted and bootable
– Try different USB ports (USB 2.0 often works better)
– Recreate USB media if corrupted
– Verify boot order in BIOS (USB should be first)
Can’t access boot menu:
– Try F2 for BIOS setup instead
– Disable Fast Boot in BIOS settings
– Hold power button 10 seconds for hard reset, then retry
ASUS Installation Stalls and Failures
Stuck at 0% or 100%:
– Wait 30 minutes before panicking
– Disconnect external devices and peripherals
– Switch USB ports (try USB 2.0 instead of 3.0)
– Create new USB media on different computer
Activation headaches:
– Ensure internet connection for automatic activation
– Check Windows edition matches original (Home vs Pro)
– Run Windows Activation Troubleshooter
– Contact Microsoft support for persistent issues
Pro Tip: If your ASUS laptop won’t activate after reformat, it likely needs the correct Windows edition. Most ASUS consumer models use Windows 11 Home, while business models use Pro—mismatched editions cause activation failures.
Final Optimization for Your Reformatted ASUS Laptop
Your laptop’s reformatted—now make it perfect with these ASUS-specific tweaks.
Immediate ASUS Setup Checklist
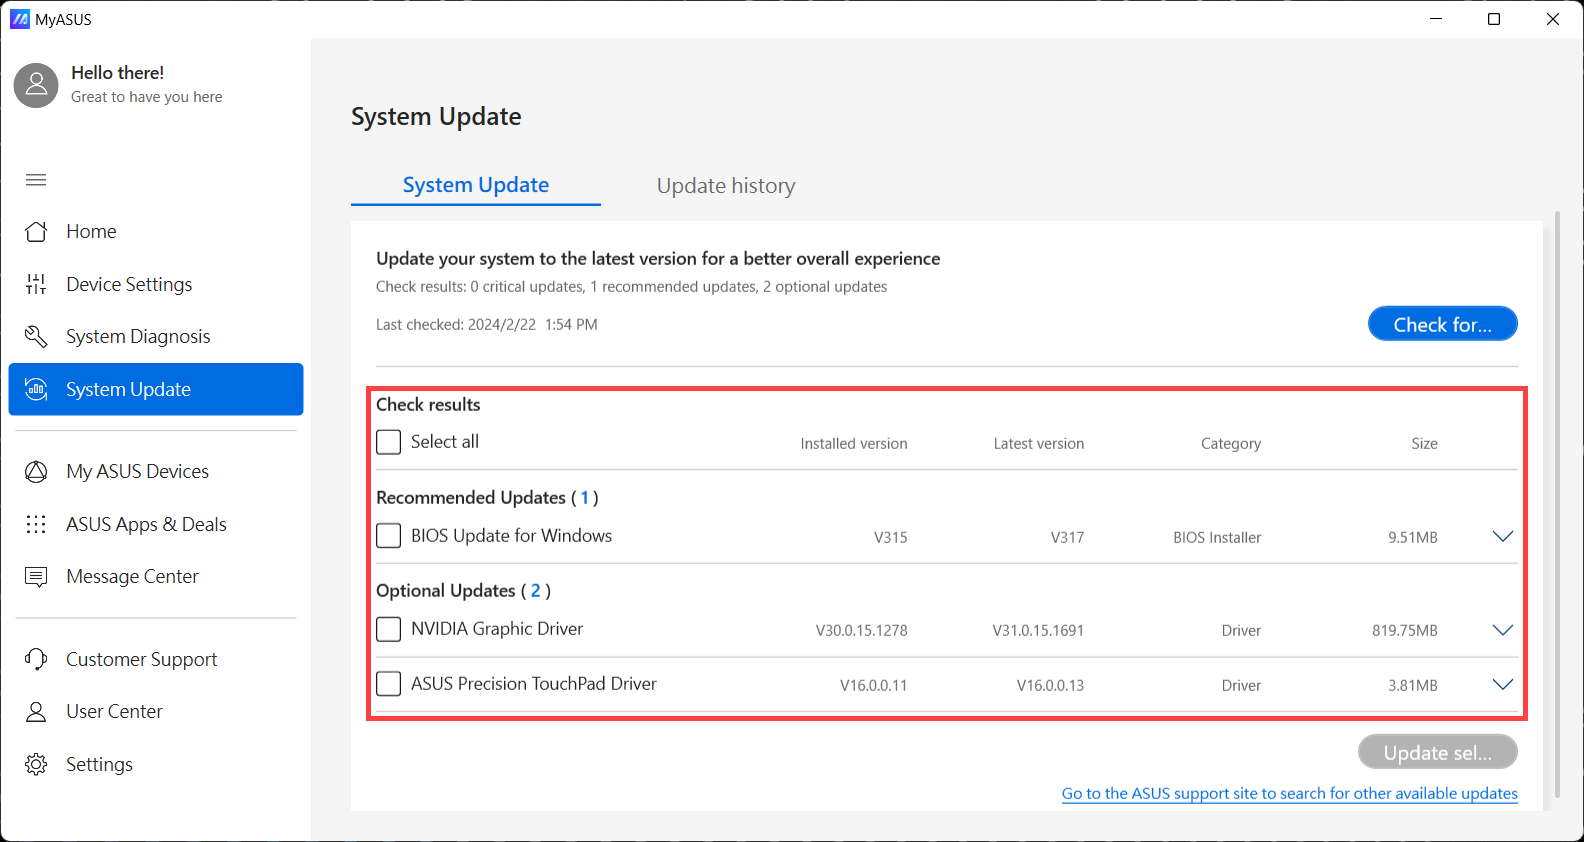
- Windows Update: Install all updates including optional drivers
- Security setup: Enable Windows Defender or install antivirus
- Power settings: Balance performance vs battery life (ASUS laptops have unique power profiles)
- Startup programs: Disable unnecessary auto-start apps
- System restore point: Create backup before installing software
Verify ASUS Hardware Functionality
- Device Manager: Check for yellow exclamation marks (missing drivers)
- Function keys: Test volume, brightness, airplane mode
- Keyboard backlight: Verify toggle works (Fn+F3/F4 on most models)
- WiFi/Bluetooth: Confirm both connect reliably
- Audio/video: Play test files to verify drivers work correctly
Critical Test: For gaming ASUS laptops, run a benchmark like 3DMark to verify thermal performance. If temperatures run high immediately after reformat, Armoury Crate likely needs installation to control fan curves properly.
Reformatting your ASUS laptop transforms sluggish performance into snappy responsiveness. Whether you chose the quick Windows reset or the thorough clean install method, your system now runs like new. Keep that USB drive handy—you’ll want to create a system image backup once everything’s perfectly configured. For ASUS laptop owners, the key to maintaining peak performance is regular driver updates from the official ASUS support site—set a quarterly reminder to check for critical updates. If you found this guide helpful, share it with fellow ASUS users who might be struggling with a slow laptop—they’ll thank you when their machine springs back to life.