How to Remove Laptop Keys Safely
Spilled coffee on your keyboard? Sticky spacebar making work impossible? Before you panic and buy a new laptop, removing individual keys for cleaning might solve your problem. This guide walks you through the delicate process of safely removing laptop keys without breaking the fragile mechanisms underneath. Most keyboard failures stem from crumbs, liquid spills, or dried residue—not permanent damage.
Whether you’re dealing with crumbs under your WASD keys or a sticky enter key after a snack mishap, you’ll learn the exact techniques professionals use to pop keys off without damage. We’ll cover everything from identifying your keyboard type to what to do if a plastic clip snaps. Skip this process if your laptop is under warranty—most manufacturers void coverage for user-removed keys.
Power Down and Ground Before Touching Keys
Shut down completely and unplug all cables—this prevents electrical shorts when cleaning under keys. Remove the battery if your laptop allows it (common in older models). Then hold the power button for 15 seconds to discharge residual power. Skipping this risks frying your motherboard if liquid contacts circuits during cleaning.
Ground yourself by touching metal like a doorknob or your laptop’s chassis. Static electricity can kill keyboard circuits silently. Work on a clean, flat surface with bright lighting—kitchen overhead lights often create shadows that hide tiny plastic clips. Take a photo of your keyboard layout with your phone before starting; misplacing even one keycap during reassembly creates frustrating typing errors.
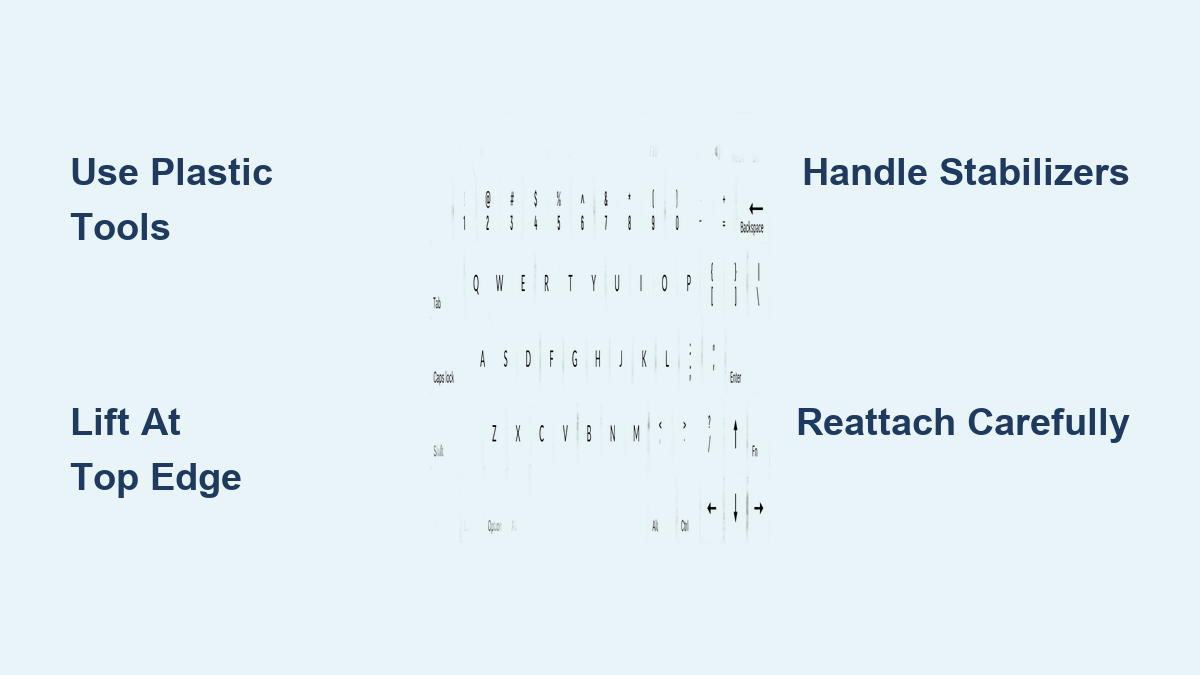
Plastic Tools Only: Why Metal Guarantees Scratches
Use a plastic spudger or bent guitar pick—never metal screwdrivers. Aluminum laptops scratch easily, and metal tools shear plastic clips. Fine-point tweezers handle stabilizer wires without bending them. Keep a small labeled container ready—losing a spacebar clip means disassembling your entire keyboard to find it.
Compressed air is non-negotiable for blowing out debris after removal. For sticky residue, 90%+ isopropyl alcohol dissolves gunk without damaging circuits (70% leaves moisture). Microfiber cloths beat cotton swabs—they won’t shed fibers into mechanisms. Invest in a $7 keycap puller if you own a gaming laptop; its even pressure prevents corner snapping on large keys.
Identify Your Keyboard Mechanism First
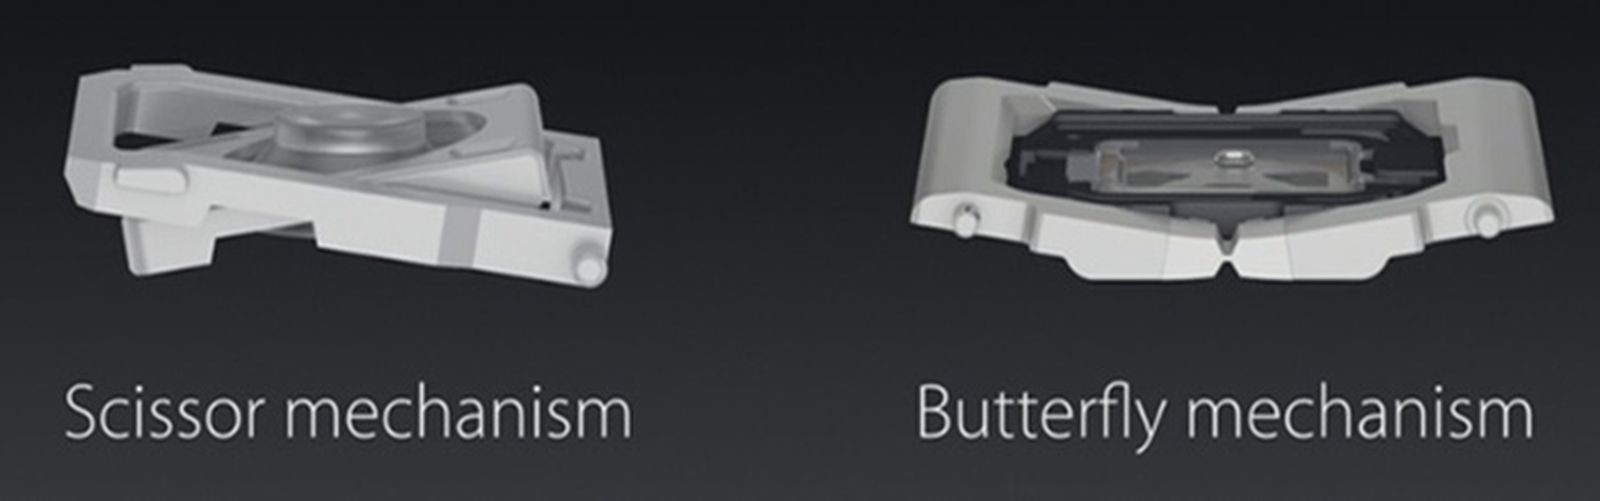
Scissor-Switch Keys (Most Common)
Look for X-shaped plastic hinges under keys—they dominate Windows laptops and newer MacBooks. These provide crisp feedback but snap when pried unevenly. Test a key: does it feel firm with short travel? You’ve got scissor switches.
Butterfly Mechanism (MacBooks 2015-2019)
These keys sit flatter and wider than scissor switches. They fail catastrophically with debris—Apple discontinued them for this reason. Never pry butterfly keys from the sides; start only at the top edge.
Rubber Dome Keys (Rare in Laptops)
Found in budget models, these have simple silicone domes under keys. They’re easier to remove but lack tactile feedback. If your key wobbles excessively, you likely have rubber domes.
Peek under a key corner with your phone flashlight before starting. Forcing a butterfly mechanism like a scissor switch guarantees broken clips.
Step-by-Step Key Removal Without Damage
Position Your Tool at the Top Edge
Slide your plastic spudger under the key’s top edge (farthest from you). This is the safest entry point since most keys hinge from the bottom. Insert only 2-3mm deep—deeper risks cracking the scissor mechanism. Angle the tool toward the key’s center.
Lift Gently While Pushing Inward
Apply upward pressure while nudging the key toward its center. You’re disengaging clips, not levering the key off. Stop immediately if you feel resistance—reposition your tool. Once the top clips release, work clockwise around the sides using feather-light pressure.
Slide Off the Bottom Hinge
After freeing three sides, tilt the key toward you 20 degrees. This exposes the bottom hinge slots. Slide the key away from you horizontally—never pull straight up. The key should detach cleanly. Place it in your container with the keycap facing up to avoid confusing orientation.
Handle Spacebars and Shift Keys Differently
Stabilizer Wires Demand Precision
Spacebars and shift keys have metal stabilizer bars running their length. Remove adjacent keys first to access the bar ends. Start prying at both ends simultaneously with two spudgers—never the center. If you feel resistance mid-key, the stabilizer wire is snagged. Nudge it sideways gently with tweezers.
Function and Arrow Keys Need Extra Care
Smaller keys like F1 or arrow keys offer less surface area for tools. Position your spudger precisely at the visible clip points (usually top corners). Apply less pressure—these clips are thinner and snap easier than standard keys.
Clean Thoroughly Before Reassembly
Blast debris with compressed air at 45-degree angles for 10 seconds per keywell. Tilt the laptop to let dust fall out. For sticky residue, dip a cotton swab in alcohol and wipe mechanism housings—never the rubber dome itself. Clean keycaps by soaking in warm soapy water for 15 minutes, then scrub crevices with a soft toothbrush. Dry all parts completely—reinstalling damp components causes corrosion within hours.
Reattach Keys Without Mushy Feedback
Align the Bottom Hinge First
Slide the key’s bottom edge into the hinge slots while holding it tilted 15 degrees toward you. You’ll hear a faint click when seated. If it resists, check for misaligned scissor arms—realign them with tweezers.
Press Down Firmly and Test Immediately
Apply even pressure across the key surface until all clips snap home. Test responsiveness: the key should spring back instantly. If it feels mushy, remove and reseat it—debris or misalignment is likely trapping the mechanism. Sticky keys after reassembly mean residual gunk; clean again.
Fix These 3 Common Removal Disasters
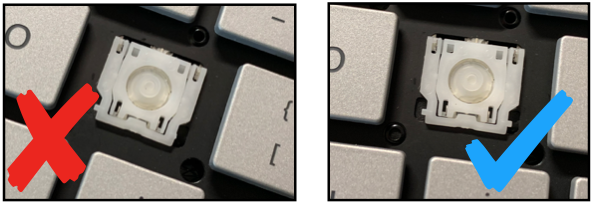
Key Won’t Budge? Check for Hidden Screws
Some gaming laptops hide screws under key labels (common on WASD keys). Peel back the label corner gently with a spudger. If screws appear, remove them before prying the key.
Broken Clip? Super-Glue as Temporary Fix
For snapped plastic clips, apply gel superglue to the break and clamp for 5 minutes. Let cure 24 hours before use. This buys time until you order a replacement mechanism ($5 online)—search “[Your Model] keyboard mechanism replacement.”
Key Sticks After Reassembly? Realignment Needed
Tilt the laptop and shake gently—debris may be trapped under the mechanism. If sticking persists, the scissor arms are misaligned. Remove the key and ensure both plastic arms form perfect X-shapes before reattaching.
Prevent Future Key Failures With These Habits
Blow compressed air weekly while holding keys down—this dislodges crumbs before they settle. Wipe key surfaces monthly with alcohol-dampened microfiber cloths (never spray directly). Replace keyboard covers every 6 months; worn covers trap grime. Most importantly, keep drinks 3+ feet from your laptop—87% of keyboard failures start with liquid spills.
When to Call a Professional Immediately
Stop if your laptop is under warranty—most void coverage for user-removed keys. Never attempt removal within 48 hours of liquid spills; moisture trapped under mechanisms causes short circuits. For high-value laptops ($1,500+), professional cleaning ($65) beats risking $200 keyboard replacement. If multiple keys fail simultaneously, you likely have a ribbon cable issue requiring soldering skills.
Removing laptop keys successfully hinges on patience, not pressure. With the right plastic tools and this targeted technique, you’ll clean or replace keys safely—saving $150+ in repair costs. Remember: if a key resists, photograph the mechanism before forcing it. Rushing breaks clips 9 times out of 10, while methodical work preserves your keyboard’s lifespan for years. When in doubt, consult YouTube videos for your exact laptop model—visual guides prevent costly mistakes.