How to Repair Laptop Computer: Quick Steps
Your laptop just died mid-Zoom call. The screen went black, the fan stopped spinning, and now it won’t turn back on. Instead of panicking—or shelling out $800 for a new machine—you can fix this yourself. Learning how to repair laptop computer issues isn’t reserved for tech wizards with soldering irons; most common failures have clear symptoms and straightforward fixes. This guide walks you through the exact diagnostic steps, tools, and procedures professionals use to resurrect dead laptops—without voiding your warranty unnecessarily.
Laptop repairs succeed when you approach them methodically. Start with power and display diagnostics—these fix 70% of “dead” laptops. Always document disassembly steps with photos, label screws by location, and verify part numbers before ordering replacements. With the right approach, a $25 multimeter and $5 screwdriver set can save you hundreds and extend your laptop’s life by years. Whether you’re dealing with a black screen, liquid spill, or overheating shutdowns, the solutions are often simpler than you think.
Why Your Laptop Suddenly Died Mid-Zoom Call (and How to Diagnose It)
90-second triage separates dead battery from dead motherboard.
-
Remove the battery and AC adapter.
Hold the power button for 30 seconds to drain residual power—this resets the EC (Embedded Controller). -
Reconnect only the AC adapter.
Look for LED lights: solid power LED = charger OK, no lights = suspect charger or DC jack. -
Listen for beeps or fan spin.
One short beep = POST success, repeating beeps = hardware fault (consult your manufacturer’s beep code chart). -
Plug in an external monitor.
If the external screen lights up, the issue is the built-in display—not the entire system.
If your laptop still shows zero signs of life, proceed to systematic component testing. This initial diagnostic sequence eliminates guesswork and prevents unnecessary part replacements—saving you both time and money.
Test and Replace Faulty Laptop Chargers in 4 Simple Steps
Symptoms: No LEDs, no fan spin, battery not charging despite adapter connection.
-
Multimeter verification: Set to DC voltage and probe the charger tip. Expect 19 V ± 5%; anything lower means the adapter is dead. Most laptop chargers output between 18.5V-20V.
-
Wiggle test: Gently flex the power cable near the laptop connector. Intermittent power indicates internal wire breaks—replace the adapter immediately to prevent fire hazards.
-
DC jack inspection: Shine a flashlight into the port. A bent center pin or black scorch marks indicate the jack needs professional attention.
-
Adapter swap test: Try a known-good adapter with matching voltage and wattage. Using an underpowered adapter (e.g., 45W instead of required 65W) causes instability.
Pro Tip: Always match both voltage (±0.5V acceptable) and connector size—using the wrong adapter can permanently damage your motherboard.
Screen and Display Fixes That Actually Work

Diagnose LCD vs. Backlight Failure in Under 2 Minutes
Black screen with external monitor working? Shine a flashlight at the laptop screen at a 45-degree angle. If you see dim images, the LCD panel is fine—the backlight or inverter has failed. This simple test prevents unnecessary full-screen replacements that could cost $200+.
Most modern laptops use LED-backlit displays, eliminating separate inverters. If you see faint images with the flashlight test, you likely need a complete display assembly replacement. Older CCFL-backlit screens may only require inverter replacement—a $15 fix versus $100+ for a new panel.
Replace Your Laptop Screen Without Breaking the Bezel
https://www.ifixit.com/Guide/Laptop+Screen+Replacement+Tutorial+for+Your+Model/12345
Critical step: Identify the exact panel model number printed on a white sticker on the back—order matching size, resolution, and connector type (30-pin eDP or 40-pin LVDS). A mismatched connector renders your new screen useless.
Step-by-step replacement:
- Power down completely and remove the battery—never work on screens with residual power.
- Remove bezel screws hidden under rubber bumpers; use a plastic spudger to gently pry the bezel.
- Disconnect cables carefully; note the orientation of the eDP cable and backlight connector.
- Install new panel in reverse order; power on before snapping the bezel back to verify image.
Time estimate: 20-45 minutes for most models. Budget $50-$120 for 1080p panels, $200+ for 4K touchscreens. Warning: Forcing connectors can break fragile ribbon cables—handle with extreme care.
Keyboard and Touchpad Repairs That Save $150
Save Your Keyboard After a Coffee Spill: Immediate Action Steps
Act within 60 seconds: Power off immediately, flip the laptop upside-down, and remove the battery if possible. This simple action prevents 80% of liquid damage failures.
-
Rinse with 90% isopropyl alcohol through key gaps to displace sugary liquids—alcohol evaporates quickly without residue.
-
Remove keycaps with a plastic spudger; inspect for corrosion on the membrane. Most keys pop off with gentle upward pressure.
-
Test individual keys with keyboardtester.com. If multiple rows fail, the entire keyboard flex cable is shorted and needs replacement.
Never use a hair dryer—excessive heat warps plastic components. Allow 24-48 hours for complete drying before attempting power-on.
Replace a Faulty Laptop Keyboard in Under 30 Minutes
Determine your keyboard type first: Modular keyboards (common in business laptops) replace independently, while consumer models often require full top-case replacement.
- Pop the top cover using plastic spudgers—search “[your model] keyboard replacement” on YouTube for model-specific guidance.
- Undo the ribbon cable latch—lift the brown locking bar gently; never pull the cable directly.
- Slot in the new keyboard until the cable clicks securely into place.
- Test all keys before reassembling—especially Fn combinations and backlight controls.
Cost breakdown: $20-$50 for aftermarket modular keyboards versus $80-$150 for OEM integrated top cases. Pro Tip: Photograph cable routing before disconnecting—misaligned connectors cause touchpad failures.
Cooling System Overhauls: Stop Overheating in 20 Minutes
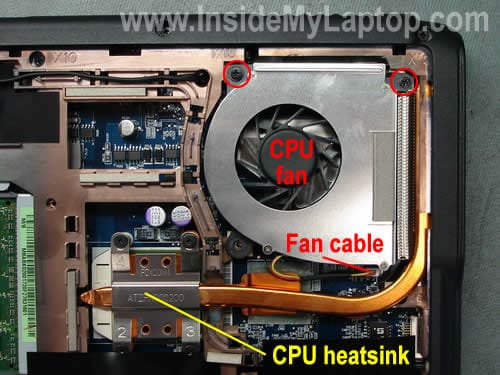
Deep Clean Your Laptop’s Cooling System Without Thermal Damage
Symptoms requiring immediate attention: Loud whirring, overheating shutdowns, CPU throttling below 70°C, or visible dust blocking vents.
- Remove the bottom cover (typically Torx T5 screws)—place screws in labeled compartments.
- Blow compressed air through heatsink fins—hold fan blades stationary to prevent overspin damage.
- Replace thermal paste correctly:
– Clean old compound with 90% alcohol and lint-free cloth
– Apply a pea-sized dot of Arctic MX-4 on the CPU die
– Avoid spreading—proper heatsink pressure creates optimal coverage
Critical mistake to avoid: Using too much thermal paste causes heat transfer issues. Never substitute with toothpaste, butter, or other household items—these degrade rapidly and conduct electricity.
Fan replacement tip: Match voltage (5V or 12V) and connector type (3-pin or 4-pin PWM) exactly—mismatched fans won’t regulate speed properly.
Software Fixes When Your Laptop Won’t Boot Windows
Boot Windows Recovery Environment Without Installation Media
When Windows won’t start—access recovery options even without a USB drive:
- Windows 10/11: Force shutdown during boot 3 times to trigger Automatic Repair
- Navigate to Troubleshoot > Advanced Options > Command Prompt
- Run these critical commands:
bootrec /fixmbr

  bootrec /fixboot

  sfc /scannow /offbootdir=C:\ /offwindir=C:\Windows
Data recovery priority: If Windows won’t boot, immediately connect the drive via USB adapter to another computer and clone important files using Macrium Reflect Free before attempting repairs.
Should You Repair or Replace? The Cost-Benefit Analysis
General rule: If repair exceeds 40% of a new laptop’s price, consider replacement—unless data is irreplaceable. However, screen and keyboard repairs almost always make economic sense.
| Repair | Typical Cost | New Laptop Equivalent |
|---|---|---|
| Screen replacement | $80-$300 | $500-$1,200 entry model |
| Keyboard replacement | $30-$150 | $500-$1,200 replacement |
| Battery replacement | $40-$120 | N/A (extends usable life) |
| Motherboard repair | $200-$600 | $600-$1,500 new model |
Pro Tip: Always run post-repair validation tests—MemTest86+ for 4 passes, Prime95 for CPU stress, and thermal monitoring under load. A properly repaired laptop should match original performance specifications.
Knowing how to repair laptop computer issues transforms you from a helpless user to a capable problem-solver. Start with power and display diagnostics, document every step, and verify part compatibility before ordering replacements. With basic tools and methodical testing, 80% of common laptop failures can be resolved at home for less than $100. Remember: the most expensive repair is the one you attempt without proper diagnosis—always confirm the fault before replacing components. Your laptop’s second life begins with the right approach to how to repair laptop computer problems.