How to Uninstall Apps on Laptop: Easy Guide
That frustrating moment when your laptop slows to a crawl because of bloated software—you’re not alone. Nearly 70% of Windows users struggle with app removal at some point, often leaving behind hidden files that continue to sap performance. Knowing how to properly uninstall apps in laptop environments is critical for maintaining speed, security, and storage space. This guide delivers precise, step-by-step methods to completely remove any program from your Windows 10 or 11 machine—whether it’s a stubborn trial software, a pre-installed bloatware, or a system component resisting standard removal.
Remove Apps from Start Menu in Seconds
The fastest way to eliminate unwanted programs starts right at your Start button, requiring just a few clicks with no navigation through complex menus.
Right-Click Removal Process for Desktop Users
Open your Start menu and scroll through the All apps list alphabetically. When you spot the target application, right-click its icon and immediately select Uninstall. Windows instantly launches the removal wizard without requiring additional navigation. This method works seamlessly for both traditional desktop programs and Microsoft Store applications—saving you valuable time when cleaning up your system.
Touchscreen Laptop Uninstallation Technique
For 2-in-1 and touchscreen users, simply press and hold the app icon for two seconds until the context menu appears. Select Uninstall with your finger, mirroring the mouse experience perfectly. This intuitive gesture-based approach makes app removal effortless on convertible laptops without requiring a mouse or trackpad.
Warning: Critical system apps like Microsoft Edge won’t display the uninstall option here—these require the advanced techniques covered later. Attempting to remove protected system components through this method will simply fail without explanation.
Delete Programs via Windows Settings Completely
Settings provides the most comprehensive overview of your installed software, particularly when you can’t locate an app in the Start menu or need additional removal options.
Windows 11 Settings Path for Total Removal
Navigate Start > Settings > Apps > Apps & features. Use the search box to quickly target your program instead of scrolling through long lists. Click the three-dot menu (⋯) next to the application name and choose Uninstall. Confirm when prompted and watch as Windows handles the complete removal process. This method works for nearly all non-system applications and provides clear visual feedback during uninstallation.
Windows 10 Settings Route for Efficient Cleanup
The process differs slightly in Windows 10: Start > Settings > Apps > Apps & features. Here, clicking the application name reveals an Uninstall button directly beneath it. Click it, confirm your action, and monitor the progress bar as Windows completes removal. This interface often shows more detailed size information than the Start menu method.
Pro tip: Use the Sort by dropdown to organize programs by size—immediately identifying space-hogging applications that are prime candidates for removal. This saves you from manually scanning through dozens of small utilities when you’re trying to free up significant storage.
Uninstall Legacy Software via Control Panel
Classic desktop applications, especially older software and system utilities, often hide exclusively in Control Panel’s Programs section, bypassing modern interfaces completely.
Access Control Panel in Under 10 Seconds
Press Windows key + R, type control panel, and hit Enter—this shortcut bypasses multiple menus. Alternatively, right-click the Start button and select Control Panel (Windows 10) or search “Control Panel” in Windows 11. This method reveals traditional Windows programs that don’t appear in Settings or Start menu listings.
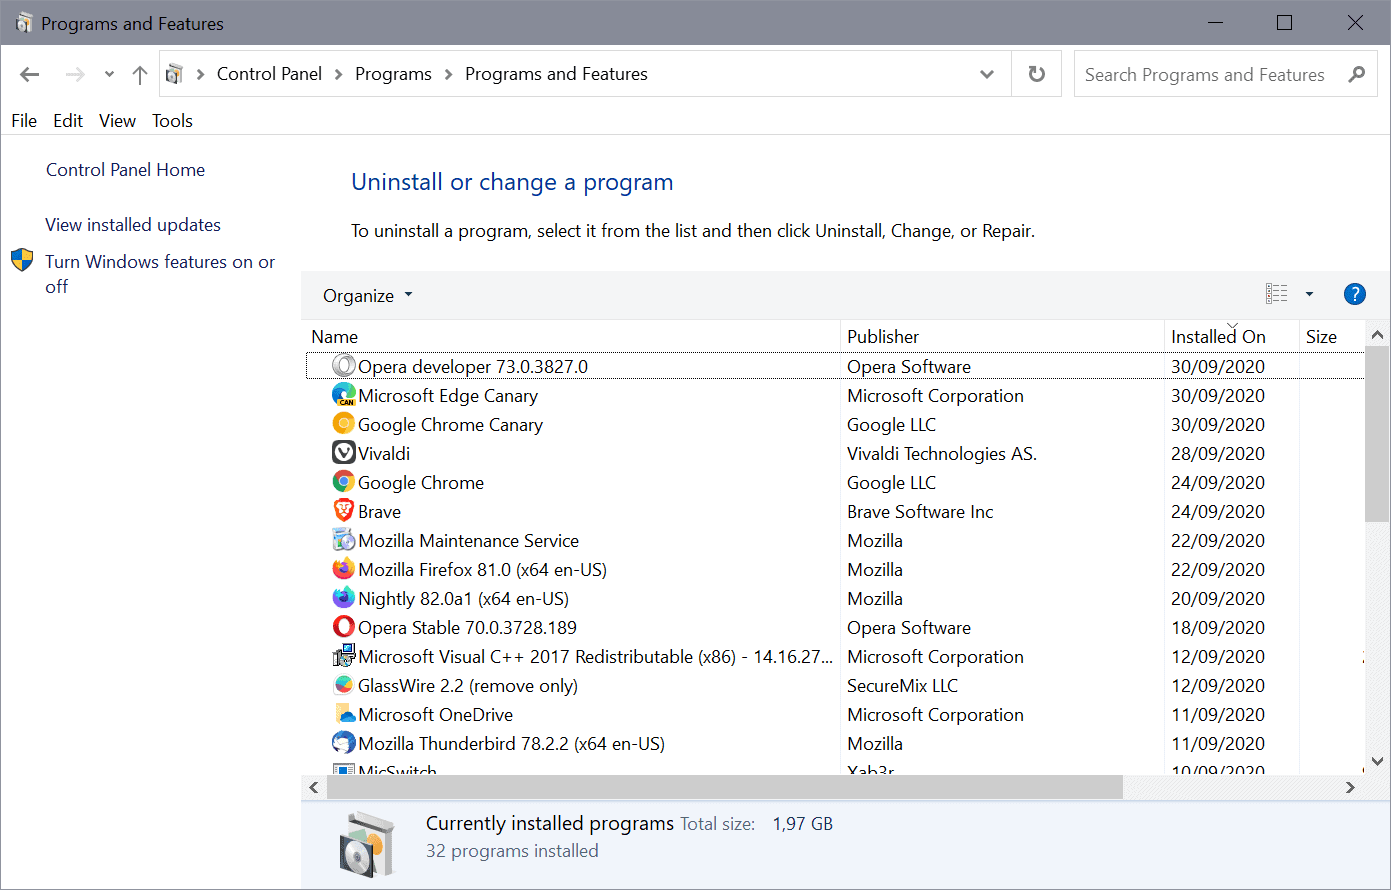
Programs and Features Workflow for Complete Removal
Inside Control Panel, click Programs > Programs and Features. The comprehensive list appears, showing every legacy Windows program installed. Right-click your target application and select Uninstall/Change. Some programs offer repair options here—useful for fixing rather than removing corrupted installations before resorting to complete removal.
Critical note: Pay attention to installation dates in the list—this helps identify recently added software causing new performance issues. Sorting by date makes troubleshooting much more efficient.
Force Remove Stubborn Applications Successfully
When standard methods fail—often with security software, drivers, or bloatware—these advanced techniques break through resistance by targeting hidden processes and dependencies.
Close Background Processes Before Uninstalling
Press Ctrl + Shift + Esc to open Task Manager directly. Under Processes, search for your target program or related services (check both “Apps” and “Background processes”). Right-click each instance and select End Task. Now retry standard uninstallation—it frequently succeeds once the application isn’t actively running system hooks.
Safe Mode Uninstallation for Problematic Software
For applications that resist normal removal, boot into Safe Mode: Press Windows key + I, then Update & Security > Recovery. Click Restart now under Advanced startup. After reboot, select Troubleshoot > Advanced options > Startup Settings > Restart. Press 4 to enter Safe Mode, where Windows runs minimal services, allowing you to remove even the most persistent applications.
Microsoft Troubleshooter Tool for Broken Installers
Download Microsoft’s official “Program Install and Uninstall troubleshooter” directly from their support site. Run the tool, select Uninstalling, and choose your problematic program from the generated list. This utility excels at removing applications with corrupted uninstallers or missing registry entries that standard methods can’t touch.
Handle Uninstallable System Apps Properly
Some Windows components resist removal entirely—they’re integral to the operating system’s functionality, but you can often disable rather than delete them.
Identifying Protected Applications
Apps like Microsoft Edge, Windows Security, and core system services won’t show uninstall options in any interface. Attempting command-line removal yields “access denied” errors even with administrator privileges. These are protected for good reason—removing them could destabilize your entire system.
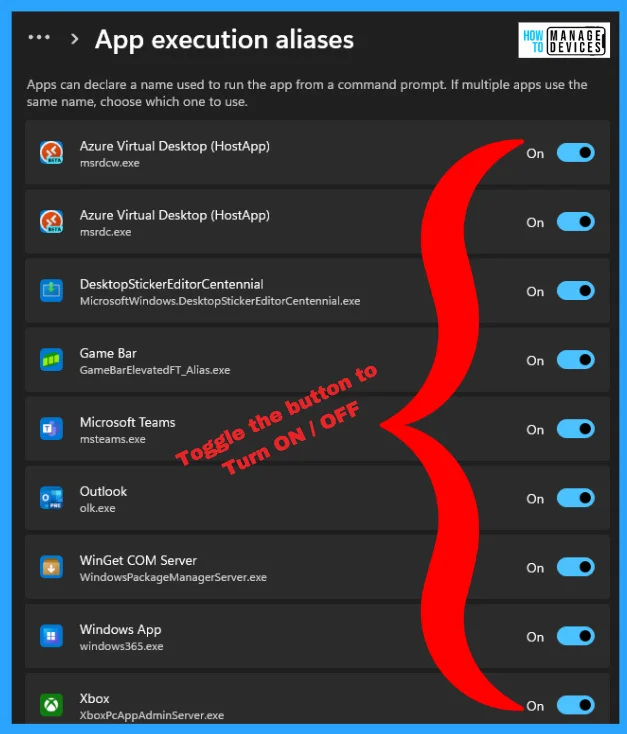
Disabling Instead of Removing System Components
For these protected apps, disable rather than delete. Use Settings > Apps > Advanced app settings > App execution aliases to turn off Microsoft Edge access while keeping core functionality intact. For security software, use Windows Security > Virus & threat protection > Manage settings to disable real-time protection temporarily if needed.
Best Practices for Clean Removal Every Time
Following these habits prevents future uninstall headaches and keeps your laptop running smoothly for years.
Pre-Uninstall Checklist for Complete Removal
- Close the program completely—check system tray for hidden icons that keep running in background
- Export settings or save work if you might reinstall later and want to preserve configurations
- Document license keys for paid software before removal to avoid repurchasing
- Restart your laptop after uninstallation to complete hidden cleanup processes
- Check Program Files and AppData folders for leftover directories that manual removal missed
Post-Removal Maintenance Routine
After successful uninstallation, empty your Recycle Bin and run Disk Cleanup to reclaim space. Navigate to Settings > System > Storage > Temporary files for additional cleanup opportunities. Schedule monthly maintenance using built-in Storage Sense to automatically prevent accumulation of residual files.
Troubleshoot Common Uninstall Errors Instantly

Error messages provide specific clues to underlying issues—here’s how to decode and resolve them immediately.
“Access Denied” Error Solutions
Right-click the uninstaller executable and select Run as administrator to bypass permission restrictions. For persistent issues, take ownership of the program’s folder through Properties > Security > Advanced > Change owner before attempting removal again.
“Program in Use” Error Workarounds
These errors require deeper Task Manager intervention. End all related processes, then check the Startup tab for programs that auto-launch at boot. Disable suspicious entries before retrying uninstallation—many applications reactivate background services that block removal.
Missing Uninstaller Recovery Techniques
When programs lack visible uninstallers, use the Microsoft troubleshooter first. If that fails, reputable third-party tools like Revo Uninstaller scan for installation remnants and create removal scripts based on detected files and registry entries—often recovering what Windows hides.
Mastering these uninstall methods keeps your laptop responsive and your storage optimized for actual work rather than digital clutter. Start with Start Menu removal for everyday convenience, graduate to Settings for thoroughness, and deploy advanced techniques only when necessary. Remember: prevention beats cure—be selective about what you install, and your future self will thank you during cleanup sessions. The average Windows user can reclaim 5-10GB of hidden storage through proper app removal techniques, significantly boosting performance on storage-constrained laptops. Take control of your system today by applying these precise methods to eliminate unwanted software completely.