How to Use HDMI on Laptop: Quick Guide
Your laptop’s HDMI port unlocks bigger screens for presentations, dual-monitor productivity, or movie nights on your TV. But when connections fail during critical moments—like a black screen before a client pitch or distorted audio during streaming—it turns a simple cable into a frustration trigger. This guide reveals exactly how to use HDMI on laptop displays correctly, troubleshoot stubborn issues, and optimize settings for seamless performance. You’ll learn why cables fail silently, how to bypass common OS pitfalls, and configure setups in under 60 seconds.
Identify Your HDMI Port Type Before Connecting

Grabbing the wrong cable wastes time and risks damage. Check your laptop’s sides immediately: Standard HDMI (Type A)—the most common 14mm trapezoidal port—fits most business laptops. If your device is ultrathin like a Dell XPS 13 or MacBook Air, hunt for Mini HDMI (Type C) (10.5mm) or Micro HDMI (Type D) (6.4mm). Don’t guess—measure with a ruler or check port labels like “HDMI 2.0” for bandwidth clues.
Critical mistake to avoid: Forcing standard HDMI into Mini ports cracks fragile connectors. If your cable doesn’t slide in smoothly, stop. Consult your laptop manual’s port diagram—search “[Your Model] port layout” online.
Choose the Right HDMI Cable for Your Resolution
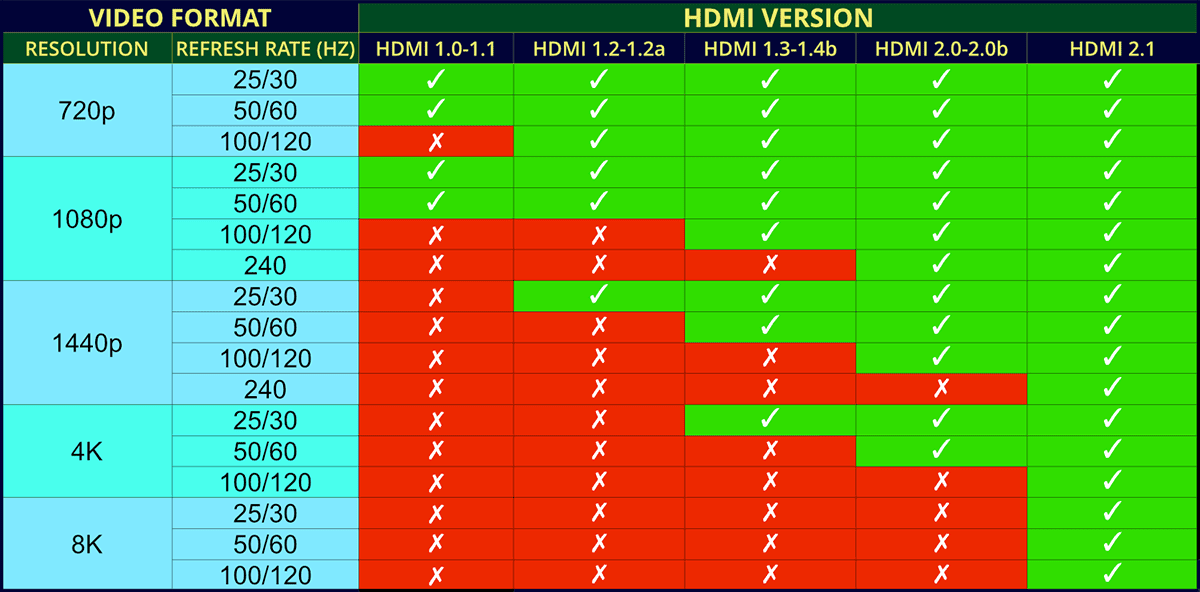
Generic “HDMI cables” cause 70% of 4K connection failures. Match your cable to your display’s needs:
- 1080p screens: Standard High-Speed HDMI (any length)
- 4K@60Hz: Premium High-Speed HDMI (max 3m length)
- 8K/120Hz gaming: Ultra High-Speed HDMI 2.1 (look for “48Gbps” label)
Pro tip: Test cables before presentations. Bend the connector 90 degrees—if the screen flickers, internal wires are damaged. Replace immediately; kinked cables degrade signal quality even when “working.”
Connect HDMI Cable Correctly to Prevent Signal Drops
Hot-plugging often fails due to HDMI handshake errors. Follow this sequence:
- Power down both devices (laptop and display)
- Align the wedge-shaped connector—it only fits one way
- Push firmly until you hear a click—loose connections cause intermittent blackouts
- Route cables with 3-inch bends—sharp angles break internal wires
Never force insertion. If resistance occurs, rotate the connector 180 degrees. HDMI ports have asymmetrical shapes; incorrect orientation damages pins.
Fix Windows Display Detection Failures in 60 Seconds
Windows often ignores HDMI connections. When your external screen stays black:
- Press Windows + P → Select Duplicate or Extend
- If no signal: Right-click desktop → Display settings → Click Detect
- Still failing? Update graphics drivers:
– Intel: Download directly from Intel’s site (not Windows Update)
– NVIDIA: Open GeForce Experience → Drivers → Custom install → Check “Perform clean install”
Urgent fix for frozen displays: Press Windows + Ctrl + Shift + B. This restarts your graphics driver instantly—no reboot needed.
Set HDMI Audio as Default Output Without Reboots
Windows frequently routes sound to laptop speakers after sleep mode. Stop this permanently:
- Right-click the speaker icon → Sounds
- Go to Playback tab → Right-click your HDMI device → Set as Default Device
- For game/app-specific audio: Settings → System → Sound → App volume preferences → Assign apps to HDMI
Critical step: Disable audio enhancements. Right-click HDMI device → Properties → Enhancements tab → Check Disable all enhancements. This fixes crackling audio and sync issues.
Configure macOS HDMI for Seamless Audio/Video Sync
macOS usually works instantly, but audio delays plague TV connections. Fix this:
- Go to Apple menu → System Preferences → Sound
- Under Output, select your HDMI device
- For 5.1 surround sound: Applications → Utilities → Audio MIDI Setup → Click HDMI device → Set Format to 24-bit 48000Hz
Pro tip: Disable “Automatic graphics switching” in Battery settings when gaming. Integrated graphics throttle HDMI bandwidth, causing 4K stutter.
Troubleshoot Black Screens with Physical Checks First
When displays show “No Signal,” skip software fixes initially:
- Bent pins: Shine a flashlight into the HDMI port. If pins are crooked, stop using it—seek repair
- Dirty ports: Blow compressed air into ports (never use cotton swabs)
- Wrong input source: Press your TV’s Source button → Select correct HDMI port (e.g., HDMI 2)
Test in 30 seconds: Swap cables with a known-working device (like a game console). If the TV works with the console but not your laptop, the issue is your port—not the cable.
Fix Overscan Cropping on HDMI TV Connections

TVs often crop edges of your laptop screen, hiding taskbars and menus. Correct this:
For Intel graphics:
Right-click desktop → Graphics Settings → Display → Scaling → Set Custom Scaling to 0%
For NVIDIA:
Right-click desktop → NVIDIA Control Panel → Adjust desktop size → Scaling tab → Select No scaling
For AMD:
Right-click desktop → AMD Radeon Settings → Display → Slide HDMI Scaling to 0%
Never accept “overscan” as normal—this wastes screen real estate and requires manual calibration.
Optimize for Gaming with 144Hz Refresh Rates
HDMI 2.0+ laptops support 1080p@144Hz gaming on compatible monitors. Enable it:
- Windows Settings → System → Display → Advanced display settings
- Click Display adapter properties → Monitor tab
- Set Screen refresh rate to 144Hz (if unavailable, update GPU drivers)
Critical for competitive gamers: Disable HDMI-CEC in your TV settings. This “smart control” feature adds 2-4 frames of input lag.
Extend to Two External Monitors Without Docking Stations
Most modern laptops drive 3 total displays (laptop screen + two externals). Use this combo:
- HDMI port → Primary monitor (4K@60Hz)
- USB-C port → Secondary monitor via DisplayPort Alt Mode (no adapter needed)
Check your limit: Intel integrated graphics max out at 3 displays. For 4+ screens, use a dedicated GPU like NVIDIA RTX 3050+ or a Thunderbolt dock.
Maintain HDMI Ports to Prevent Permanent Damage
HDMI ports fail from cable stress—not age. Extend their lifespan:
- Never yank cables—grip the connector base when unplugging
- Support cables with Velcro ties to reduce port strain
- Clean quarterly with 99% isopropyl alcohol on a microfiber swab (power off first)
Replace frayed cables immediately. Damaged shielding causes electromagnetic interference, distorting colors on high-resolution displays.
Quick HDMI Connection Emergency Checklist
When time is critical:
1. Power cycle both devices—unplug TV/laptop for 60 seconds
2. Try Windows + P → Duplicate
3. Update GPU drivers from manufacturer site (not Windows Update)
4. Test with different HDMI port on your display
Last resort: Reset display settings. Windows → Settings → System → Display → Advanced → Restore defaults. This clears corrupt EDID data causing “no signal” errors.
Mastering HDMI connections transforms your laptop from a solo device into a command center for presentations, creative work, and entertainment. By avoiding cable mismatches, configuring audio correctly, and applying these targeted fixes, you’ll eliminate connection anxiety. Remember: 90% of “broken HDMI” issues stem from simple oversights—not hardware failure. Bookmark this guide for your next setup—you’ll solve problems faster than calling tech support.